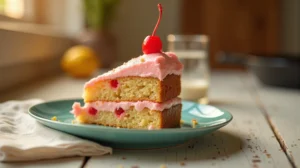
Mastering the Crazy Good Classic American Butter Cake
This is the definitive guide to achieving the legendary texture of The Famous Cake That Will Drive You Crazy. It’s a masterclass in the creaming method, resulting in a rich, buttery crumb that is simultaneously sturdy and ethereally tender. Perfect for birthdays, holidays, or when you simply need that quintessential taste of American home baking tradition, this cake promises deep satisfaction and zero baking regret. This recipe is designed for the home cook who demands restaurant-quality texture without unnecessary fuss.
restaurant_menu Ingredients
The Core Cake Ingredients (Dry)
The Core Cake Ingredients (Wet)
Optional Frosting Base (For Reference)
hardware Essential Tools
Two 8-inch round cake pans
Stand mixer or heavy-duty hand mixer
Large rubber spatula
Wire cooling rack
Parchment paper
Kitchen scale (recommended)
Oven thermometer
format_list_numbered Preparation
Prepping and Aeration
Preheat your oven meticulously to 350°F (175°C) and ensure the middle rack is centered. Prepare your pans by thoroughly greasing and lining the bottoms with parchment circles cut to fit exactly; this prevents sticking and preserves the cake’s edges. In a medium bowl, whisk together the flour, baking powder, and salt. Set this dry mixture aside; the baking powder needs to be evenly distributed to ensure uniform lift for The Famous Cake That Will Drive You Crazy.
Building the Emulsion and Batter
In your mixer bowl, cream the softened butter and sugar together on medium-high speed for a full 6 minutes, scraping down the bowl every 2 minutes. The mixture must become pale, voluminous, and light—this is the critical aeration step. Reduce speed to medium and incorporate eggs one at a time, ensuring each is fully mixed before adding the next, pausing to scrape down again. Alternate adding the dry ingredients and the room-temperature milk in three additions of dry and two of wet, beginning and ending with dry ingredients. Mix only until the batter just comes together; stop immediately to avoid gluten development. Gently fold in the vanilla extract by hand.
Baking and Cooling
Divide the batter evenly between the two prepared pans and smooth the tops gently with your spatula. Bake on the center rack for 30 to 35 minutes. The cake is done when the edges pull minimally from the pan sides and a wooden skewer inserted near the center comes out clean or with a few moist crumbs clinging to it, indicating an internal temperature near 205°F. Let the cakes cool in their pans on a wire rack for exactly 15 minutes before inverting them onto the rack to cool completely to room temperature—a minimum of one hour—before leveling or frosting.
favorite You Might Also Love
Browse All arrow_forwardThe Ultimate Halal Piña Colada Dip: Tropical Bliss at Home
Zesty Mediterranean Delight: Authentic Greek Orange Cake
Ultimate No Bake Chocolate Oat Bars: Rich & Chewy
Mastering Homemade Hobnobs: The Ultimate Oat Cookie

French Butter Cake Recipe
Homemade Flamingo Cake Recipe
Try These Variations
Lemon Zest Infusion
To introduce a bright, sunny flavor profile reminiscent of a lighter dessert like Peach Upside Down Cake, add the zest of two large, unwaxed lemons during the creaming stage along with the sugar. The oils released from the zest will infuse beautifully into the fat, providing a vibrant citrus lift that contrasts the buttery base. You can also replace 1/4 cup of the whole milk with fresh lemon juice, but ensure the milk is slightly warmed first to prevent curdling when it hits the batter base. This variation is spectacular under a simple lemon glaze rather than heavy buttercream.
Spice Cake Transformation
For a warm, autumnal version suitable for Thanksgiving or Christmas, omit the vanilla extract entirely. Instead, incorporate 1 teaspoon of ground cinnamon, 1/2 teaspoon of ground nutmeg, and 1/4 teaspoon of ground cloves into your dry ingredients. To enhance the depth, substitute 1/2 cup of the granulated sugar with packed light brown sugar. This modification pushes the cake into a realm closer to a spiced pound cake or a richer base for Creamed Corn Snacking Cake, though we omit the corn here for a traditional flavor profile. Ensure all spices are fresh for maximum aromatic impact.
Almond Extract Enhancement
If you prefer a flavor profile that suggests sophistication, similar to an almond-based pastry, substitute the 2 teaspoons of vanilla extract with 1 whole teaspoon of high-quality pure almond extract. Almond extract is potent, so using half the amount of vanilla is crucial. This works exceptionally well if you are planning to incorporate crushed almond meal into the flour mixture (substituting 1/4 cup of flour with 1/4 cup of finely ground almond meal). This subtle nutty background note makes this cake feel incredibly elevated, approaching the complexity found in some European tortes.
Chef's Pro Tips
When adding the eggs, if you notice the mixture starting to look slightly curdled or separated after the first egg incorporates, add one tablespoon of your reserved flour mixture immediately and beat briefly. The starch in the flour acts as a binder, helping to re-establish the emulsion between the fat and the liquid components before proceeding with the rest of the eggs. This trick saves batters that are on the verge of breaking and ensures a smooth final texture for The Famous Cake That Will Drive You Crazy.
Always use pure vanilla extract, not imitation vanilla flavoring. Imitation vanilla contains propylene glycol, which can sometimes interfere with the delicate protein structure of the egg and flour, leading to a slightly gummy texture near the crust. True vanilla bean paste or extract contains natural sugars and alcohols that integrate seamlessly, contributing to moisture retention and a cleaner flavor profile that stands up to the richness of the butter.
For the absolute flattest layers, once the cakes are baked and have cooled for the initial 15 minutes, I recommend wrapping the warm layers tightly in plastic wrap and placing them in the freezer for 30 minutes before unwrapping to finish cooling. The rapid, controlled cooling sets the crumb structure extremely quickly and evenly, minimizing the dome formation that often plagues tall layer cakes. You still need to let them reach room temperature before frosting, but this initial blast of cold stabilizes the cake beautifully, making leveling incredibly simple.
When measuring flour, never scoop directly from the bag with your measuring cup. Instead, use a spoon to lightly fluff the flour in its container, then gently spoon it into your dry measuring cup until overflowing. Finally, use the straight edge of a knife or offset spatula to level the top precisely. Scooping compacts the flour, meaning you could be adding up to 25% too much flour, which results in a dry, crumbly cake that completely misses the mark for The Famous Cake That Will Drive You Crazy.
Storage Guide
Room Temperature Storage (Unfrosted)
If you are planning to frost the cake within 24 hours, simply leave the cooled, plain layers on the counter, loosely covered with a clean cotton kitchen towel to protect them from dust while allowing slight air circulation. Avoid plastic wrap at this stage, as the minor residual warmth can cause condensation under the plastic, leading to a sticky crust. This is ideal for achieving the best texture the day after baking.
Refrigerator Storage (Frosted or Unfrosted)
For optimal moisture retention over several days, especially in dry climates, wrap the cooled, unfrosted layers tightly in plastic wrap, then foil, and refrigerate. If the cake is already frosted with a stable buttercream, place it uncovered in the refrigerator for 30 minutes to let the frosting firm up. Once firm, cover the entire cake loosely with plastic wrap, ensuring the wrap does not touch the frosting surface. This prevents the refrigerator air from drawing out moisture, keeping the cake moist for up to 5 days.
Freezing for Long-Term Preservation
This cake freezes exceptionally well, making it perfect for advance holiday baking. Once the layers are completely cool, wrap each one individually first in plastic wrap, pressing out all air, and then in a second layer of heavy-duty aluminum foil. Label and date the package. Frozen cake layers maintain peak quality for up to 3 months. Thaw overnight in the refrigerator while still wrapped; unwrap only once they have reached cool room temperature to prevent condensation from making the surface soggy.
Avoid These Mistakes
✕ The most frequent error I observe in home baking this type of cake is under-creaming the butter and sugar. Many home cooks stop when the mixture looks ‘combined.’ In reality, you need to beat this stage until the volume has noticeably increased and the color is noticeably lighter—often 5 to 8 minutes on medium speed. This process physically forces air into the fat matrix, creating millions of microscopic bubbles that expand in the oven, providing lift and the light, open crumb structure essential to this recipe’s fame. Stopping early guarantees a dense, short cake.
✕ Another critical mistake is using ingredients straight from the refrigerator, especially the eggs and milk. Cold liquids shock the creamed fat, causing the air pockets you just worked so hard to create to collapse immediately, resulting in a heavy, greasy batter that bakes unevenly. If you notice curdling after adding an egg, it is a direct temperature failure. Always bring your dairy and eggs to room temperature (around 70°F) for at least one hour before starting your mixing process.
✕ Many bakers overmix once the flour is introduced, driven by the fear of lumps. While lumps are undesirable, gluten development is the greater enemy here. Once you add the dry ingredients, mix only until the last streaks of white flour disappear. If you continue mixing, the protein strands (gluten) link up, creating a tight, elastic network that resists rising and results in a tough, chewy texture rather than the desired tender crumb of The Famous Cake That Will Drive You Crazy. Switch to a hand fold for the last few incorporations to maintain control.
nutrition Nutrition Facts
Per serving: 1/12th of cake
Nutritional values are estimates based on ingredients listed and do not account for added frosting.
flag Conclusion
There you have it—the roadmap to achieving what I consider one of the most satisfying, universally loved American cakes. The Famous Cake That Will Drive You Crazy isn’t a secret because of exotic ingredients; it’s famous because of the foundational mastery required to execute it perfectly. Now that you understand the science behind the creaming and the importance of temperature, you can replicate this tenderness every single time. Go forth, bake with confidence, and enjoy the pride of serving a truly exceptional homemade dessert. We can’t wait to see your creations here at HomeRecipes.com!
Frequently Asked Questions
Why is my cake dense instead of light and fluffy? expand_more
A dense crumb in The Famous Cake That Will Drive You Crazy is almost always a result of either insufficient aeration during the creaming stage or overmixing after the flour was added. Remember, creamed butter and sugar must look pale and fluffy—this process physically forces air into the fat matrix, creating millions of microscopic bubbles that expand in the oven, providing lift and the light, open crumb structure essential to this recipe’s fame. Stopping early guarantees a dense, short cake. Furthermore, once you add the flour, mix only until the streaks disappear. Overdeveloped gluten strands trap the gas bubbles too tightly, preventing expansion and leading to a heavy final product. Always use room temperature ingredients to ensure a smooth, cohesive batter that traps air effectively.
Can I substitute the butter with oil or margarine? expand_more
While substitutions are possible, you fundamentally change the nature of this cake. This recipe relies on the physical process of creaming solid fat (butter) with sugar to create air pockets—a process that liquid oils cannot replicate. Margarine contains more water and often less fat than butter, leading to a less rich flavor and a slightly soggier texture. If you must substitute due to availability, use a high-quality vegetable shortening, which is solid at room temperature, but understand that you will lose the complex, nutty flavor that real butter provides. For a cake this famous, I insist you use butter to honor the recipe's integrity.
My cake sank in the middle after baking—what went wrong? expand_more
A sunken center indicates that the cake structure was not fully set when it was removed from the oven, or that the leavening agent (baking powder) was exhausted too quickly. Check your baking powder freshness; if it’s old, it won't provide enough lift, as its chemical reaction weakens over time. More commonly, it means you opened the oven door too early, causing a sudden temperature drop that collapsed the delicate, rising structure. Wait until at least the 25-minute mark before even peeking! Secondly, ensure your internal temperature reaches 205°F; if you pull it at 195°F, the center will collapse as the starch and protein matrix hasn't fully stabilized during cooling.
How do I make this cake into a single-layer sheet cake, perhaps like a Creamed Corn Snacking Cake? expand_more
To adapt this recipe for a 9x13 inch sheet pan, you will need to increase the overall volume slightly to ensure the cake isn't too thin; I recommend increasing all ingredients by exactly 1.5 times the original amounts. Prepare the batter exactly as instructed, paying close attention to the folding stage to maintain aeration. Pour the larger volume of batter into your greased and parchment-lined 9x13 pan. Because the depth is greater, the baking time will increase significantly, likely requiring 45 to 55 minutes at 350°F. Test for doneness carefully, as the center of a deep sheet cake takes longer to set than thin layers; aim for the 205°F internal temperature benchmark.
What is the best way to store this cake if I plan to frost it later? expand_more
If you are preparing layers for a future frosting session, the key is to prevent moisture loss without creating a sticky exterior. Once the layers are completely cool, wrap each individually in plastic wrap, pressing the wrap gently against the surface to exclude air, followed by a layer of aluminum foil. They can be stored in the freezer for up to two months. When ready to frost, allow them to thaw overnight in the refrigerator while still wrapped. Unwrap them only after they have reached room temperature to prevent condensation from forming directly on the cake surface, which would ruin your frosting adhesion and texture for The Famous Cake That Will Drive You Crazy.
More Recipes You'll Love
Mastering 10 Cup Cookies: A Chewy American Classic
Cornflake Cakes Recipe (Golden Crunch)
Coastal Lemon Dream: My Atlantic Beach Pie Masterpiece
Mastering Flaky Apple Pie Bars: A Pastry Revelation
Community Kitchen