Chef’s Secret for Perfect Candy in Christmas Trays
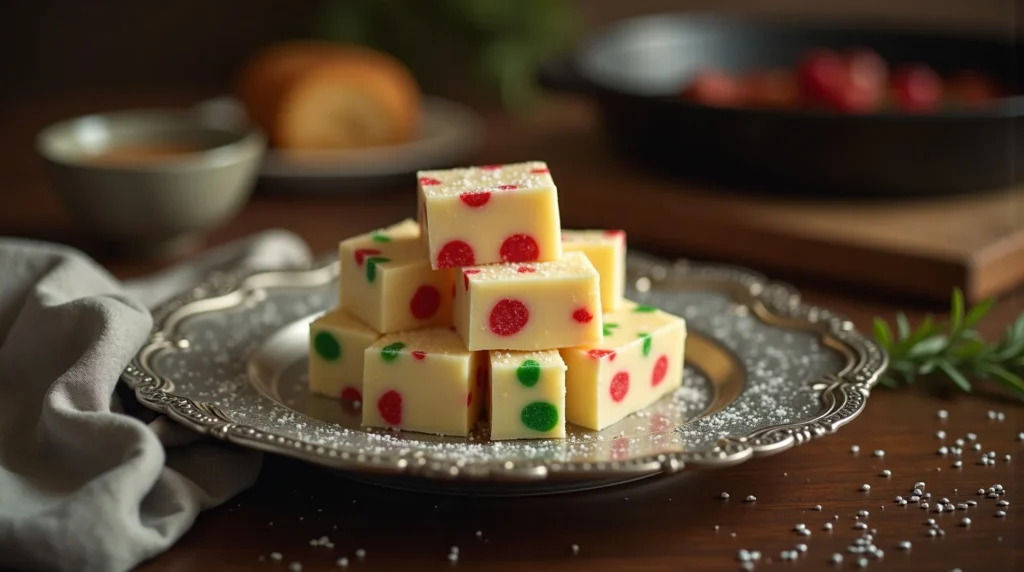
This is the ultimate easy, no-bake candy in Christmas tradition! Chewy marshmallows and smooth white chocolate create festive squares that are guaranteed to disappear first from your holiday platter.
restaurant_menu Ingredients
Core Ingredients for Christmas Candy
Optional Flavor Enhancers
hardware Essential Tools
8x8 inch metal baking pan
Parchment paper
Large, microwave-safe mixing bowl
Greased rubber spatula
Sharp chef's knife
Cutting board
format_list_numbered Preparation
Preparation and Molding
Line an 8x8 inch baking dish completely with parchment paper, leaving an overhang on two sides to act as handles later
Lightly grease the bottom of the pan and the parchment paper surface with a thin layer of butter or neutral oil
Set the prepared pan aside while you melt the base ingredients
Melting and Combining
Combine the butter, white chocolate chips, and mini marshmallows in your large microwave-safe bowl
Microwave on high for 60 seconds, then carefully remove and stir thoroughly with a greased spatula
Return to the microwave for 30-second intervals, stirring completely between each interval, until the mixture is perfectly smooth and glossy, watching vigilantly to prevent scorching
Remove from the microwave and allow the mixture to cool on the counter for exactly one minute
Gently fold in the chopped red and green chewy candies until just distributed, taking care not to overmix and bleed the colors
Chilling and Slicing
Immediately scrape the candy mixture into the prepared baking dish and use the greased spatula to press it into an even, flat layer across the entire base
Cover the surface directly with plastic wrap to prevent skin formation and transfer the pan to the refrigerator
Chill undisturbed for a minimum of 4 hours, though overnight chilling yields the best, firmest result for this candy in Christmas treat
Once fully set, use the parchment paper overhangs to lift the entire block from the pan onto a cutting board
Wipe a large, sharp knife clean, and slice the candy block into small, uniform, bite-sized squares, wiping the knife between each cut for the cleanest edges
favorite You Might Also Love
Browse All arrow_forwardRich Chocolate Depression Cake Mastered

Cowboy Cookie Recipe (Chewy & Loaded)
The Ultimate Heavenly Hash: A Creamy Retro Dessert Dream

Golden Pecan Dandy Delights: A Homestyle Classic
The Easiest 4 Ingredient Lemon Cream Cheese Dump Cake Recipe
Effortless 'Are You Kidding Me Cake' Marvel
Try These Variations
Spiced Holiday Twist
Add 1/2 teaspoon of ground cinnamon and a pinch of nutmeg to the melted mixture
Peanut Butter Swirl
Reserve 1/2 cup of the melted white chocolate base, swirl in 2 tablespoons of creamy peanut butter, and drizzle artfully over the top of the main mixture before chilling
Dark Chocolate Coating
Once the squares are chilled and cut, melt 4 ounces of high-quality dark chocolate and dip half of each square for a beautiful two-tone effect
Chef's Pro Tips
Always use room temperature butter for the smoothest initial melt and combination
For easier slicing, slightly warm your knife blade under hot water and dry it thoroughly between cuts
If you prefer a less intense sweetness, substitute 1/3 of the white chocolate chips with milk chocolate chips
When serving, dust the platter lightly with powdered sugar for a ‘fresh snow’ effect on your candy in Christmas display
Storage Guide
Room Temperature
Store in an airtight container with parchment dividers for up to 3 days, if the room is cool
Refrigerator
Store in an airtight container with parchment dividers for up to 5 days for optimal firmness
Freezer
Wrap individual squares tightly in plastic wrap, then foil; freeze for up to 3 months
Avoid These Mistakes
✕ Overheating the white chocolate in the microwave, leading to a grainy, seized texture
Not using parchment paper, causing the sticky candy to adhere permanently to the metal pan
✕ Slicing the candy before it has fully chilled, resulting in soft, messy edges that stick to the knife
✕ Overmixing the colored candies, which causes the dyes to bleed and dull the festive look of the treat
nutrition Nutrition Facts
Per serving: 1 square
Nutritional information is an estimate based on 24 servings and standard ingredient brands.
flag Conclusion
There you have it—the secret to flawless, festive candy in Christmas tradition, unlocked! This recipe proves that the most memorable holiday treats don’t require hours of complicated labor. They require good ingredients and a little bit of chef intuition. Take pride in serving something homemade that tastes like pure holiday nostalgia. Head over to HomeRecipes.com for more simple yet spectacular treats that will make your holiday season shine!
sell Related Topics
Frequently Asked Questions
What is the best way to prevent the candy from being too soft or sticky? expand_more
The key to preventing stickiness in this candy in Christmas recipe is patience during the chilling phase. Ensure the mixture is fully set—firm enough that you can press on it and it doesn't give way—which usually requires a full 4 hours, or ideally, overnight in the refrigerator. Room temperature fluctuations can also cause softening, so keep them stored cool until serving time.
Why are red and green candies specifically used for this Christmas candy? expand_more
The choice of red and green chewy candies is purely traditional for the Christmas season, providing that immediate visual cue of holiday cheer against the white chocolate background. Culturally, these colors are synonymous with the holiday season in American baking displays, making this a quintessential candy in Christmas item.
Can I use a different size pan, like a 9x13? expand_more
While you can use a 9x13 inch pan, you must significantly increase all ingredient quantities (by about 50%) to maintain the proper thickness. If you use the same recipe amount in a 9x13 pan, the resulting candy will be extremely thin—less than half an inch—which can make it brittle and difficult to handle or slice cleanly for your candy in Christmas platter.
Is it safe to use a stovetop instead of the microwave for melting? expand_more
Yes, you can use a double boiler (bain-marie) on the stovetop. Place the ingredients in the top bowl set over simmering (not boiling) water. Stir constantly until melted and smooth. This method provides more gentle, even heat, which is excellent for preventing scorching, though it will take slightly longer than the microwave. Either method works perfectly for this candy in Christmas base.
My candy has a slight oily sheen on top after chilling. What caused this? expand_more
That oily sheen is usually fat separation, often caused by overheating the white chocolate or by using a lower-quality white chocolate substitute that relies on vegetable oils instead of cocoa butter. When the mixture gets too hot, the fats separate from the solids. To minimize this next time, use the short, controlled bursts in the microwave, and always ensure you are using a true white chocolate product.
More Recipes You'll Love
The Definitive Guide: What is Figgy Pudding? (Holiday Classic)
Effortless ‘Are You Kidding Me Cake’ Marvel
The Ultimate Homemade Pumpkin Pie Recipe with Caramel Pecan Topping

Savory Cheddar Cheese Quick Bread Masterpiece
Community Kitchen