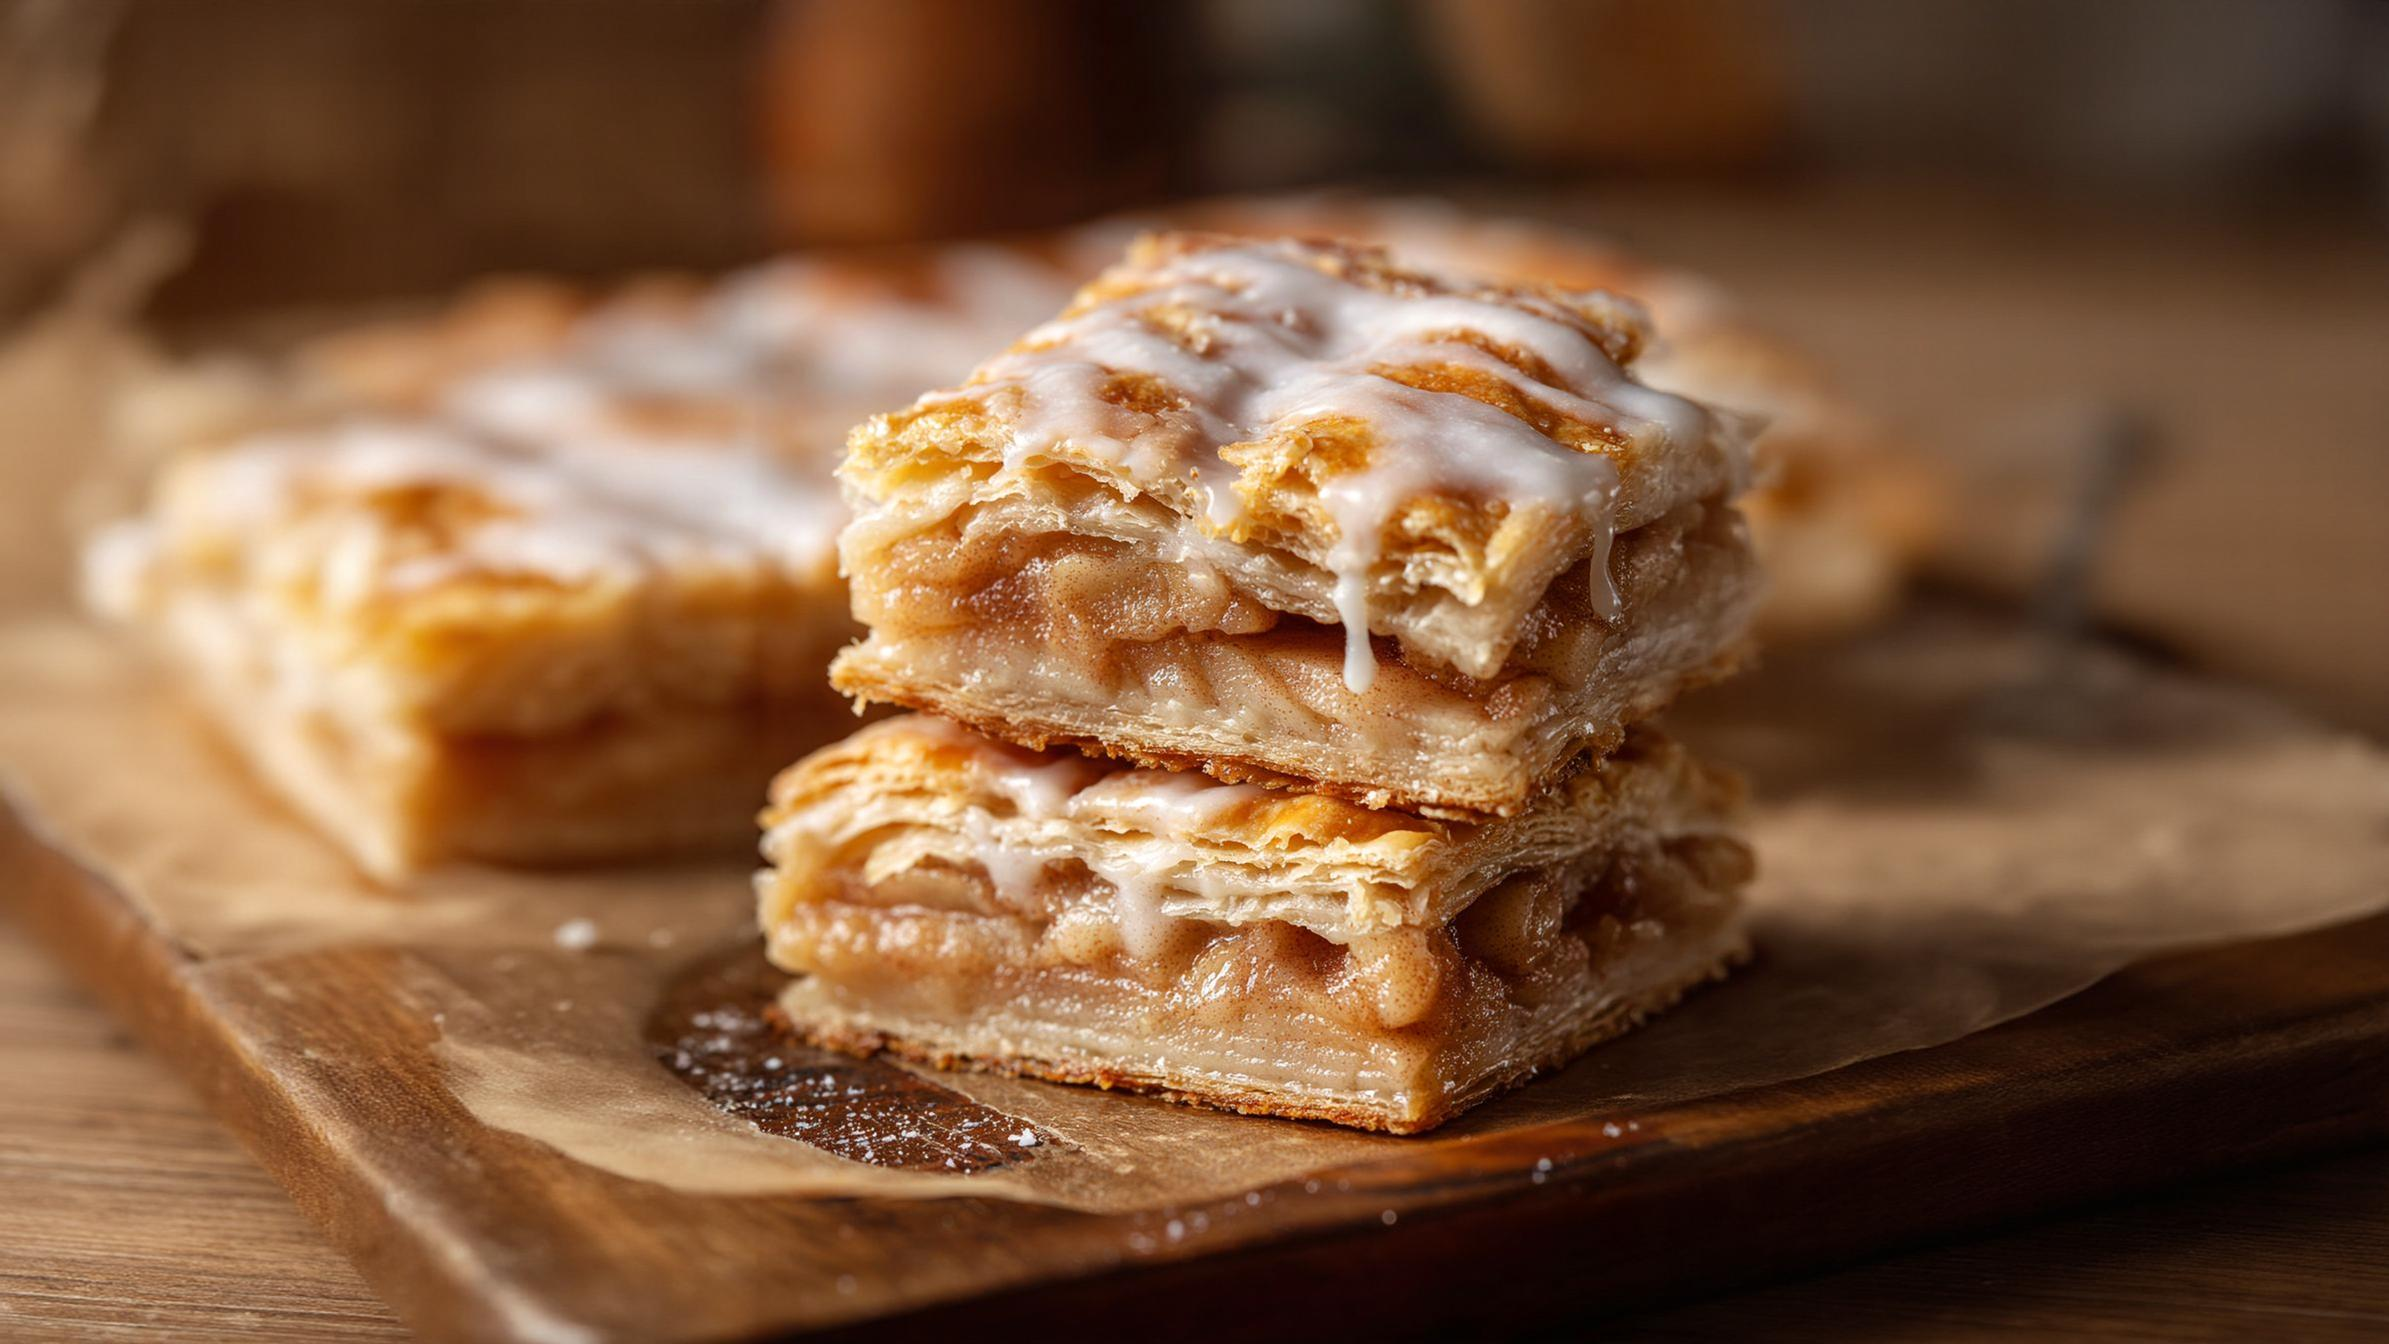
Mastering Flaky Apple Pie Bars: A Pastry Revelation
These Flaky Apple Pie Bars are the pinnacle of American autumn baking, marrying the structure of a shortbread base with the comforting warmth of classic apple pie. We use a specialized technique involving cold butter and shortening to create a truly laminated, shatteringly crisp crust that contrasts beautifully with the tender, cinnamon-spiced apple filling. Finished with a simple, sweet vanilla glaze, these ooey gooey bars are perfect for serving at gatherings or enjoying with a cup of coffee on a cool morning. Every bite delivers unparalleled texture and flavor.
restaurant_menu Ingredients
For the Flaky Crust and Filling
For the Vanilla Glaze
hardware Essential Tools
9x13 inch metal baking pan
Parchment paper
Large mixing bowl
Pastry blender or two knives
Rolling pin
Wire cooling rack
Small whisk
Rubber spatula
format_list_numbered Preparation
Crust Preparation and Assembly
Preheat your oven precisely to 350°F (175°C). Prepare the 9x13-inch pan by greasing it well and lining it with parchment paper, leaving an overhang for easy removal later.In the large bowl, whisk together the gluten-free flour, 1/4 cup of the granulated sugar, and 1/2 teaspoon of salt. Cut in the ice-cold butter and shortening using a pastry blender until the mixture resembles coarse crumbs with some pea-sized pieces of fat still visible.Gently fold in the chilled egg whites and 1/2 cup of cold milk until the dough *just* comes together into a shaggy mass; avoid overmixing at all costs to maintain flakiness.Divide the dough in two equal portions, wrap each tightly in plastic wrap, and chill in the refrigerator for a minimum of 30 minutes to allow the fat to firm up.
Filling and Layering
While the dough chills, toss your thinly sliced apples in a separate bowl with the remaining 1/2 cup of sugar and the cinnamon powder until evenly coated; set aside.Remove one dough portion and roll it out on a lightly floured surface to fit the base of your prepared 9x13 pan. Carefully transfer this base to the pan and gently press it into the bottom and slightly up the sides.Arrange the spiced apple slices evenly over the bottom crust. Roll out the second dough portion to form the top layer, place it over the apples, and gently crimp the edges shut with the bottom crust.Brush the entire surface of the top crust with a very light, even layer of egg white wash—this promotes excellent browning and a slight seal.
Baking and Glazing
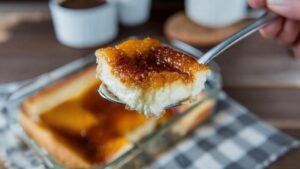
Bake the assembled bars in the 350°F (175°C) oven for 40 to 45 minutes, or until the top crust achieves a deep, rich golden-brown color indicating full caramelization.Remove the pan from the oven and allow the Flaky Apple Pie Bars to cool completely on a wire rack—this cooling time is mandatory before glazing to prevent the glaze from melting into the crust.To prepare the glaze, whisk the sifted powdered sugar, 3 teaspoons of milk, vanilla, and a pinch of salt vigorously until perfectly smooth and flowing; add milk drop by drop if it is too thick to drizzle.Once the bars are stone cold, drizzle the glaze artfully over the entire surface, allow it to set for 15 minutes until firm, then slice into 16 neat squares and serve.
favorite You Might Also Love
Browse All arrow_forward
Chef's Secrets for Perfect Kolache Cookies
Sun-Kissed Pineapple Dessert: Tropical Sweetness Simplified
Irresistible Peanut Butter Cracker Candy Crunch
The Ultimate Butterfinger Puppy Chow: A Crunchy Masterpiece
Effortless Custard Cream Almond Cake Ready Fast
Irresistible 4-Ingredient Blueberry Dump Cake: Easiest Dessert Recipe
Try These Variations
Introducing a subtle twist with Butterscotch Pie inspiration
After assembling the apple layer but before placing the top crust, sprinkle 1/2 cup of high-quality butterscotch chips evenly over the apples. This adds a deep, caramelized richness that complements the cinnamon beautifully, transforming the flavor profile entirely while maintaining that essential flaky texture.
For a bright, zesty counterpoint, try substituting half of the apples with thinly sliced pears and adding the zest of two lemons to the apple filling mixture. This variation leans toward the profile of Lemon Crumb Bars, offering a lighter, tangier experience. You might also consider replacing the vanilla in the glaze with almond extract for a nuttier, more sophisticated finish.
To mimic the comforting texture of Fried Apple Or Peach Pies 2, slightly underbake the bars by about 5 minutes. Once cooled, brush the top crust lightly with melted butter immediately after removing them from the oven, then apply the glaze. This imparts a slightly softer, more ‘fried-dough’ mouthfeel to the pastry, though it sacrifices some of the crisp flakiness.
Chef's Pro Tips
When cutting the cold fat into the flour, use a back-and-forth rocking motion with your pastry blender rather than a purely downward chop. This action helps create longer, flatter pieces of fat rather than small, uniform pebbles, which is the mechanical secret to achieving long, distinct layers of flakiness in your Flaky Apple Pie Bars.
If you find your dough tearing significantly when transferring the top layer, briefly place the rolled-out dough back into the freezer for just five minutes. Cold dough is more rigid and less prone to stretching and breaking when handled, allowing you to patch seams easily and ensure a fully sealed filling.
For an extra layer of flavor development in the crust, substitute 1/4 cup of the gluten-free flour with finely ground almond flour. This adds a subtle, nutty depth that pairs wonderfully with the apple and cinnamon, enhancing the overall richness without interfering with the necessary structure provided by the main flour blend.
The glaze consistency is critical for the final look. If your glaze is too thin, sift in more powdered sugar, one tablespoon at a time, whisking thoroughly between additions. If it is too thick, add milk only 1/2 teaspoon at a time. Aim for a viscosity where it drips slowly off the whisk, creating distinct lines on the bar without immediately soaking into the crust.
Storage Guide
Room Temperature Storage
For optimal flakiness, store the fully cooled and glazed Flaky Apple Pie Bars in an airtight container lined with parchment paper to prevent sticking. Keep them in the coolest part of your pantry or kitchen, ideally below 70°F (21°C). Humidity is the enemy here; if your kitchen feels damp, refrigeration is the safer choice, as prolonged room-temperature storage in humid conditions will cause the crust to absorb ambient moisture and soften.
Refrigerator Storage
If your kitchen is warm or you need extended storage (up to one week), place the bars in a rigid, airtight container, ensuring you place a sheet of wax paper or parchment between each layer to prevent the glaze from sticking to the crust above it. Before serving refrigerated bars, transfer them to a baking sheet and warm them in a 325°F (160°C) oven for 8-10 minutes; this gentle heat helps evaporate surface moisture and restores some of the crust’s original crispness.
Freezing for Later
These bars freeze beautifully, especially when frozen unglazed. Cut the baked and cooled bars into individual squares, place a small square of parchment paper between each one, and arrange them snugly in a heavy-duty freezer bag or container, pressing out as much air as possible. They maintain peak quality for up to three months; thaw overnight in the refrigerator before glazing and serving.
Avoid These Mistakes
✕ The single most common error when making any flaky pastry, including these Flaky Apple Pie Bars, is using fat that is too warm. If the butter or shortening begins to soften or melt before it is fully incorporated into the flour, the fat coats the flour particles too thoroughly, resulting in a dense, cookie-like base rather than a layered, tender crust. Always ensure your fat is hard straight from the refrigerator or freezer, and work quickly with your hands if necessary.
✕ Another frequent pitfall is overmixing the dough once the liquid is added. When you mix the milk and egg whites into the dry ingredients, you are activating the starches in the gluten-free flour blend. Excessive stirring leads to a tough, chewy texture because the mixture becomes overworked, similar to kneading bread dough. Stop mixing the moment you see no pockets of dry flour remaining; the dough should look imperfect and slightly crumbly before you chill it.
✕ Failing to let the bars cool completely before applying the glaze guarantees a sticky, messy result. The glaze is essentially a sugar suspension in liquid. If the underlying pastry is even slightly warm, the heat will cause the liquid in the glaze to steam off too rapidly or melt the sugar into the crust pores, preventing that beautiful, opaque, set finish that characterizes professional-looking dessert bars.
✕ Using apples that are too soft or watery, like Red Delicious, is problematic for baking. Softer apples break down quickly, releasing excessive moisture that steams the bottom crust, leading to a dense, soggy layer beneath the apples. Always select a firm, tart variety like Granny Smith, which maintains its structure and releases moisture more slowly, allowing the bottom crust time to set properly during the bake.
nutrition Nutrition Facts
Per serving: 1 bar
Nutrition estimates based on 16 servings and standard ingredient measurements. These bars are rich in flavor and fat due to the pastry base.
flag Conclusion
We have successfully navigated the nuances of pastry science to create a dessert that is both deeply satisfying and remarkably easy to manage. These Flaky Apple Pie Bars are a testament to the idea that complexity in flavor does not require complexity in technique. Whether you are serving them warm after a family meal or packing them neatly for a potluck, they carry the unmistakable sign of a dish made with care. Don’t be afraid to experiment with the apples or the glaze next time, but always honor the cold temperature of the dough—that is the secret handshake of all great pastry chefs. Enjoy every single, perfectly flaky bite!
sell Related Topics
Frequently Asked Questions
Can I use regular all-purpose flour instead of gluten-free flour in this recipe? expand_more
Absolutely, you can! However, be aware that standard wheat flour contains gluten proteins that develop when mixed with liquid. If you substitute, you must adjust your mixing technique drastically. With wheat flour, you must mix the liquid in *even less*—only until the dough barely holds together. Overmixing wheat flour here will result in a tough, chewy bar rather than the tender, flaky texture we achieve with the gluten-free blend. If using wheat flour, I recommend using a pastry flour, which has a lower protein content, for the best results when aiming for flakiness.
My apple filling seems watery after baking. What went wrong with my Flaky Apple Pie Bars? expand_more
This is a common issue stemming from two primary sources: the apples themselves or insufficient coating. If you used very juicy apples (like McIntosh or Gala), they release more liquid. To combat this, you must pre-treat the apples. Before sprinkling them with sugar and cinnamon, toss the slices in 1 tablespoon of cornstarch or arrowroot powder. This acts as a stabilizer, binding the released moisture during baking and preventing it from turning your bottom crust soggy. Also, ensure you are not skipping the initial egg white wash on the bottom crust, as it creates a moisture barrier.
Why do I need both butter and shortening in the crust? Can I just use all butter? expand_more
While you certainly *can* use all butter—and many traditionalists insist on it for flavor—the blend is superior for texture in a bar format. Butter melts lower than shortening (around 90°F vs. 117°F). Using 100% butter means the fat releases its steam and melts faster, often leading to a shorter, more crumbly texture rather than distinct, long flakes. Shortening, due to its higher melting point and lack of water content, stays solid longer, creating those beautiful, defined layers we associate with true flakiness. It’s a trade-off: butter for taste, shortening for structure.
How can I make these bars ahead of time? Can they be frozen? expand_more
These Flaky Apple Pie Bars freeze exceptionally well, which is a huge bonus for holiday prep! It is best to freeze them *before* glazing. Once baked and completely cooled, slice them into individual squares. Place a small square of parchment paper between each bar, then arrange them snugly in a freezer-safe, airtight container, pressing out as much air as possible. They will hold their quality for up to 3 months. To thaw, simply remove the desired amount and let them come to room temperature on the counter for about 2 hours. Once thawed, apply the glaze just before serving for the freshest flavor and texture.
Are there any substitutions for the egg whites in the dough? expand_more
Since the egg whites in the dough are acting primarily as a binder to bring the crumbly mixture together into a rollable dough, you need a binder that doesn't add too much richness or moisture. You can substitute the two egg whites with 3 tablespoons of cold water or use a commercial egg replacer mixed according to package directions. If using water, you may need to chill the resulting dough for an extra 15 minutes as it might be slightly stickier than the egg white version. The flakiness might be marginally reduced, but the bar will still hold together beautifully.
More Recipes You'll Love
Velvety Slow Cooker Rice Pudding Masterpiece
Astonishingly Easy Pumpkin Spice Muffins Recipe
Slow Cooker Lemon Puff Pastry Custard Dream
Copycat Olive Garden Chocolate Lasagna
Community Kitchen