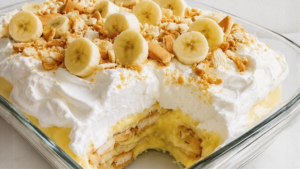
This Banana Pudding Dream Cake is a delightful, no-fuss dessert that brings together the comforting flavors of banana, vanilla, and pineapple in a spectacularly easy-to-make package. Starting with a moist banana muffin cake base, it's layered with sweet, tangy crushed pineapple, a rich and velvety vanilla pudding-cream cheese blend, and finished with a cloud of light Cool Whip. It’s the perfect make-ahead treat for potlucks, family gatherings, or any occasion where you need a crowd-pleasing dessert that tastes like it came from a professional bakery, but is surprisingly simple to assemble.
Ingredients
Cake Base
Creamy Topping
Essential Tools
9x13-inch baking dish
Large mixing bowl (2)
Medium mixing bowl (1)
Electric mixer (stand or hand-held)
Whisk
Rubber spatula
Fine-mesh sieve (optional, for pineapple)
Offset spatula (optional, for spreading)
Plastic wrap
favorite You Might Also Love
Browse All arrow_forward
Savory Cheddar Cheese Quick Bread Masterpiece
Crispy Peach Cobbler Egg Rolls: A Sweet Fusion
Copycat Olive Garden Chocolate Lasagna
Tropical Coconut Dream Cake: Southern Summer Indulgence
The Ultimate Halal Piña Colada Dip: Tropical Bliss at Home
Golden Fried Peach Cobbler Egg Rolls
Preparation
Prepare the Banana Cake Base
Preheat your oven to 350°F (175°C) and generously grease a 9x13-inch baking dish. This ensures your cake releases easily and cleanly after baking.
In a large mixing bowl, combine the two packages of Jiffy banana muffin mix, 2 large eggs, and 2/3 cup of whole milk. Mix with a whisk or rubber spatula just until the ingredients are combined and no dry streaks remain; avoid overmixing to keep the cake tender.
Pour the batter evenly into the prepared baking dish, spreading it to the edges for uniform thickness. Bake for 25-30 minutes, or until a wooden skewer inserted into the center comes out clean and the top is golden brown.
Remove the cake from the oven and place it on a wire cooling rack. Allow it to cool completely to room temperature before proceeding. This step is critical to prevent the creamy layers from melting.
Craft the Creamy Topping Layers
While the cake cools, prepare your creamy layers. In a large mixing bowl, beat the room temperature cream cheese with an electric mixer until it is smooth and creamy, about 2-3 minutes. Scrape down the sides of the bowl as needed to ensure no lumps.
In a separate medium mixing bowl, combine the instant vanilla pudding mix with 3 cups of cold milk. Whisk vigorously for about 2 minutes until the mixture begins to thicken and becomes custardy. Let it sit for another 2-3 minutes to fully set.
Gently fold the prepared vanilla pudding into the beaten cream cheese using a rubber spatula until just smooth and well combined. Be careful not to overmix, as this can thin the pudding.
Assemble and Chill the Dream Cake
Once the banana cake base is completely cool, spread the thoroughly drained crushed pineapple evenly over the entire surface of the cake, pressing it gently into the crumb.
Carefully spread the cream cheese and pudding mixture over the pineapple layer, using an offset spatula or the back of a spoon to create a smooth, even layer right to the edges.
Finally, gently spread the defrosted Cool Whip over the pudding layer, creating a light and airy top. You can make soft peaks or a smooth finish, as desired.
Cover the baking dish tightly with plastic wrap and refrigerate for a minimum of 2 hours, but preferably overnight, to allow the flavors to meld and the layers to set perfectly. Slice and serve chilled.
Recipe Variations

Tropical Coconut Twist
For an extra layer of tropical flavor in your Banana Pudding Dream Cake, try adding 1/2 cup of toasted shredded coconut to the top of the Cool Whip layer before chilling. You can also mix 1/4 cup of finely shredded coconut into the cream cheese-pudding mixture for a more integrated flavor. To toast coconut, spread it on a baking sheet and bake at 325°F (160°C) for 5-7 minutes, watching carefully until golden brown. This adds a delightful chewiness and nutty aroma that complements the banana and pineapple beautifully, evoking a more pronounced island vibe.
Nutty Crunch Addition
If you enjoy a textural contrast, sprinkle 1/2 cup of finely chopped pecans or walnuts over the pineapple layer before adding the pudding mixture. The nuts will absorb some of the moisture from the pineapple and soften slightly, but still provide a lovely crunch. Toasting the nuts lightly in a dry skillet beforehand will enhance their flavor significantly, adding a deeper, more aromatic dimension to your Banana Pudding Dream Cake. Ensure the nuts are unsalted to control the overall sweetness and balance of the dessert.
Spiced Banana Cake
To add a warm, comforting twist to the cake base, gently fold 1/2 teaspoon of ground cinnamon and 1/4 teaspoon of ground nutmeg into the Jiffy banana muffin mix along with the eggs and milk. These spices will deepen the flavor of the banana cake, making it even more aromatic and reminiscent of classic banana bread. This subtle spice addition works wonderfully with the vanilla and pineapple, creating a more complex and cozy flavor profile for your Banana Pudding Dream Cake, especially appealing during cooler months.
Chef's Tips
Ensure Ingredients are at the Right Temperature: This might seem like a small detail, but it’s paramount for success in your Banana Pudding Dream Cake. Specifically, your cream cheese must be at room temperature for at least an hour before you begin. Cold cream cheese will resist mixing, leading to stubborn lumps in your creamy layer that no amount of beating can fully smooth out. Room temperature cream cheese, on the other hand, emulsifies beautifully, creating a silky, consistent texture that is a hallmark of a professional-level dessert. Don’t rush this step!
The Art of Gentle Folding
When combining the vanilla pudding with the cream cheese, use a gentle folding motion with a rubber spatula rather than vigorous beating. The instant pudding relies on its chemical structure to set, and overmixing can break down this structure, leading to a thinner, less stable creamy layer. Folding gently preserves the airy texture of the beaten cream cheese and the set of the pudding, ensuring your layers remain distinct and firm, rather than a soupy mess. This technique is often overlooked but critical for layered desserts.
Chill Time is NOT Optional
I cannot stress this enough: the chilling period for your Banana Pudding Dream Cake is non-negotiable. While 2 hours is the minimum, an overnight chill is truly transformative. This extended time allows the cake to absorb moisture and flavor from the pineapple and creamy layers, making it incredibly moist and cohesive. More importantly, it gives the pudding and cream cheese ample time to fully set and firm up, ensuring clean slices and preventing the layers from sliding when served. Patience here is rewarded with a superior dessert experience.
Thoroughly Drain Pineapple
This is a common pitfall for many home bakers. Crushed pineapple, straight from the can, contains a significant amount of liquid. If you don’t drain it thoroughly, this excess moisture will seep into your delicate cake base, turning it soggy and compromising the entire texture of your Banana Pudding Dream Cake. Use a fine-mesh sieve and press down on the pineapple with the back of a spoon to extract as much liquid as possible. You can even place it between layers of paper towels for a few minutes. A drier pineapple layer ensures a perfectly textured cake.
Storage & Conservation
Refrigerator Storage
This Banana Pudding Dream Cake must always be stored in the refrigerator due to its dairy-based layers. Cover the baking dish tightly with plastic wrap or aluminum foil to prevent it from drying out and absorbing other food odors. Stored correctly, the cake will remain fresh and delicious for 3-4 days. In fact, many find its flavors meld and deepen even further on the second day, making it an ideal make-ahead dessert for gatherings.
Not Suitable for Freezing
Unfortunately, this Banana Pudding Dream Cake is not recommended for freezing once assembled. The dairy-based cream cheese and Cool Whip layers, as well as the moist cake base, tend to separate and become watery or develop an unpleasant texture upon thawing. The delightful creaminess and structural integrity of the cake will be compromised. It’s best to enjoy this cake fresh from the refrigerator within its recommended storage period.
Common Mistakes
Overmixing the Cake Batter
A frequent error in baking, overmixing the banana muffin batter develops too much gluten, leading to a tough, dense cake that lacks the desired tender crumb. Mix only until the dry ingredients are just incorporated into the wet, and stop as soon as no streaks of flour are visible. A few small lumps are acceptable and will bake out smoothly. Remember, the goal is a light, airy base for your Banana Pudding Dream Cake, not a rubbery one.
Applying Toppings to a Warm Cake
This is a recipe for disaster. If your banana cake base is still warm when you apply the creamy layers, the heat will cause the cream cheese, pudding, and Cool Whip to melt and become runny. This results in a messy, unstable cake with soupy layers that won’t set properly. Always ensure the cake is completely cooled to room temperature, or even slightly chilled, before you begin assembling the top layers of your Banana Pudding Dream Cake.
Not Draining Pineapple Sufficiently
Crushed pineapple is packed in juice, and if not thoroughly drained, this excess liquid will leach into your cake. This makes the cake base soggy and watery, ruining the intended texture and integrity of your Banana Pudding Dream Cake. Use a fine-mesh sieve and press firmly to remove as much liquid as possible. A drier pineapple layer ensures a delightful burst of fruit without compromising the cake’s structure.
Using Cold Cream Cheese
Attempting to beat cold cream cheese will inevitably result in a lumpy, inconsistent creamy layer. Cold cream cheese does not emulsify properly, and you’ll struggle to achieve the smooth, velvety texture desired for this Banana Pudding Dream Cake. Always allow your cream cheese to soften at room temperature for at least 30-60 minutes before you start mixing. This ensures a beautifully smooth and luxurious topping.
Recipe Keywords
Conclusion
And there you have it, my friends – a truly remarkable Banana Pudding Dream Cake that brings together convenience, comfort, and incredible flavor. This isn’t just a recipe; it’s an invitation to create memories around your own kitchen table. The joy of seeing faces light up as they take that first bite, the satisfaction of a perfectly balanced dessert – these are the moments we live for as home cooks. I encourage you to try this recipe, make it your own, and share its deliciousness with those you love. Here at HomeRecipes.com, we believe that every meal is an opportunity to connect and celebrate. Happy baking!
Frequently Asked Questions
Can I use fresh bananas instead of the Jiffy banana muffin mix? expand_more
While fresh bananas are wonderful, this particular Banana Pudding Dream Cake recipe relies on the Jiffy banana muffin mix for its specific texture and ease. The mix provides a consistent, moist cake base with a subtle banana flavor that complements the other layers without being overpowering. Substituting with fresh bananas would require adjusting the entire cake batter recipe, including flour, sugar, leavening agents, and liquid, which would fundamentally change the structure and flavor profile of this specific dessert. For this recipe, stick with the convenience and reliability of the muffin mix to achieve the intended results.
Can I use homemade whipped cream instead of Cool Whip? expand_more
You certainly can use homemade whipped cream, but be aware that it will change the cake's stability and shelf life. Cool Whip is a non-dairy whipped topping designed to be very stable and hold its shape for extended periods, even when chilled. Homemade whipped cream, made from heavy cream, will be delicious but tends to soften and deflate more quickly, especially if the cake sits for a long time or isn't kept consistently cold. If you opt for homemade, I recommend adding it just before serving to ensure the best texture and appearance. Use 2 cups of heavy cream, whipped with 1/4 cup powdered sugar and 1 teaspoon vanilla extract until stiff peaks form.
What if I don't have instant vanilla pudding mix? Can I use cook-and-serve? expand_more
No, it's crucial to use instant vanilla pudding mix for this Banana Pudding Dream Cake recipe. The instant variety contains specific starches that thicken rapidly when combined with cold milk, creating a stable, custardy texture that sets quickly and holds up well when mixed with cream cheese. Cook-and-serve pudding, on the other hand, requires heat to activate its thickening agents and would result in a runny, unstable layer that would not set properly within the cake. Stick to the instant variety for the best and most reliable results.
Can I make this cake in a different size pan? expand_more
This recipe is specifically designed for a 9x13-inch baking dish, which yields a generous cake suitable for 12-15 servings. If you use a different size, you'll need to adjust baking times and potentially ingredient quantities. A smaller pan will result in a thicker cake, requiring a longer baking time and potentially a denser texture. A larger pan would create a thinner cake, which might bake too quickly and become dry. For optimal results and the intended layer proportions, I highly recommend sticking to the specified 9x13-inch pan.
How far in advance can I make this Banana Pudding Dream Cake? expand_more
This Banana Pudding Dream Cake is a fantastic make-ahead dessert! You can prepare and assemble the entire cake up to 24 hours in advance. In fact, chilling it overnight is highly recommended by Chef HomeRecipes. This allows all the flavors to meld beautifully, the cake to absorb moisture from the pineapple, and all the creamy layers to fully set, resulting in a more cohesive and delicious dessert. Just ensure it's tightly covered with plastic wrap and stored in the refrigerator until ready to serve.
Suggested Recipes
Rich Chocolate Depression Cake Mastered
timer 25 minutes

The Ultimate Strawberry Tres Leches Cake Recipe for Home Cooks
timer 20 minutes
Southern Jewel: Perfect Condensed Milk Pecan Pie
timer 20 minutes
Ultimate No Bake Chocolate Oat Bars: Rich & Chewy
timer 15 minutes
Slow Cooker Lemon Puff Pastry Custard Dream
timer 10 minutes
Velvet Layered Banana Pudding Masterpiece
timer 25 minutes