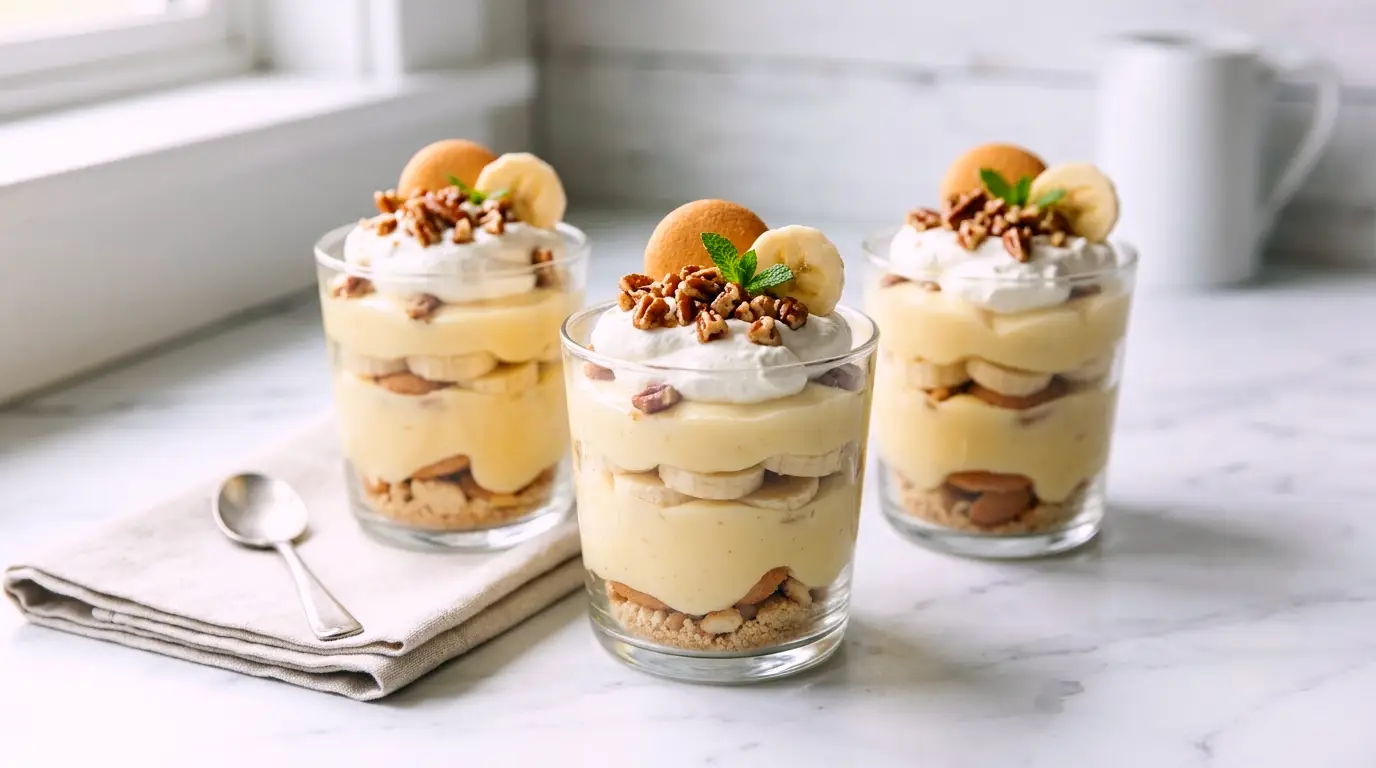
Banana Pudding Cups Recipe (No-Bake Dessert)
These delightful banana pudding cups are the ultimate no-bake dessert, featuring layers of velvety vanilla instant pudding, sweet ripe bananas, and classic NILLA Wafers that soften into a cake-like texture. Finished with a light whipped topping and a crunchy, maple-pecan mixture, they offer a perfect balance of creamy, soft, and nutty flavors in every convenient, individually portioned serving, ideal for parties or a comforting treat.
restaurant_menu Ingredients
Pudding and Topping
Layers and Garnish
hardware Essential Tools
Large mixing bowl
Whisk
Rubber spatula
Small skillet
12 individual serving cups (8-10 ounce capacity)
Measuring cups and spoons
Cutting board
Sharp knife
Plastic wrap
format_list_numbered Preparation
Prepare the Base
In a large mixing bowl, combine the vanilla instant pudding mix with the very cold whole milk. Whisk vigorously for 2 minutes, or until the pudding visibly thickens to a creamy consistency. Gently fold 1 cup of the thawed frozen lite whipped topping into the prepared pudding mixture using a rubber spatula, until just combined and airy.
Prepare Topping and Bananas
Spread the chopped pecans in a single layer in a small, dry skillet over medium heat. Toast for 3-5 minutes, stirring frequently, until fragrant and lightly golden brown. Immediately remove from heat and let cool completely. In a small bowl, combine the cooled toasted pecans with the maple-flavored or pancake syrup, stirring until the pecans are evenly coated. Slice the ripe bananas into 1/4-inch thick rounds.
Assemble the Banana Pudding Cups
Place 2 NILLA Wafers at the bottom of each of the 12 individual serving cups. Spoon approximately 2 tablespoons of the pudding mixture over the wafers in each cup, spreading gently to cover. Arrange a layer of sliced bananas over the pudding layer in each cup. Repeat with another NILLA Wafer, another spoonful of pudding, and more banana slices. Top each cup with a generous dollop of the remaining whipped topping. Sprinkle the maple-pecan mixture evenly over the whipped topping on each banana pudding cup.
favorite You Might Also Love
Browse All arrow_forward
Hasty Pudding Dessert Recipe (Classic American Comfort)
Ultimate Crispy Nacho Egg Rolls: A Fusion Masterpiece
Flaky Sopapilla Cheesecake: Layered Dessert Dream
Homemade Rainbow Cone Recipe (Ice Cream Dessert)
Authentic Greek Orange Cake
Apple Cake Recipe (Classic British Delight)
Try These Variations
Chocolate Banana Pudding Cups
For a delightful twist, substitute vanilla instant pudding mix with chocolate instant pudding mix. You can also swap out half of the NILLA Wafers for chocolate wafers, and sprinkle mini chocolate chips on top instead of pecans. This creates a richer, more indulgent banana pudding cups experience, perfect for chocolate lovers.
Caramel Banana Pudding Cups
Elevate the sweetness by drizzling a thin layer of caramel sauce over the banana slices before adding the next layer of pudding. You can also use a caramel-flavored whipped topping or add a teaspoon of caramel extract to your vanilla pudding mix for an extra layer of flavor. This variation adds a wonderfully buttery, rich note to your banana pudding cups.
Tropical Banana Pudding Cups
Introduce a tropical flair by adding a thin layer of finely diced pineapple or mango slices along with the bananas. Ensure the fruit is well-drained if canned. A sprinkle of shredded coconut on top, either toasted or untoasted, will complete this exotic take on the classic banana pudding cups, offering a bright and refreshing flavor profile.
Peanut Butter Banana Pudding Cups
For a hearty and satisfying version, swirl 2 tablespoons of smooth peanut butter into the prepared vanilla pudding before layering. You can also add a few crushed roasted peanuts to the maple-pecan mixture for an extra crunch and nutty flavor. This variation is a fantastic option for those who love the classic peanut butter and banana combination.
Gluten-Free Banana Pudding Cups
To make these banana pudding cups suitable for gluten-sensitive guests, simply swap the NILLA Wafers for your favorite brand of gluten-free vanilla or butter cookies. Ensure your instant pudding mix is also certified gluten-free, as some may contain hidden gluten ingredients. The rest of the recipe remains naturally gluten-free, allowing everyone to enjoy this delicious dessert.
Chef's Pro Tips
Don’t skimp on the chill time
I can’t stress this enough! The magic of banana pudding cups truly happens in the refrigerator. The extended chilling allows the NILLA Wafers to absorb the pudding’s moisture, transforming them from crispy cookies into tender, cake-like layers that are essential to the dish’s texture. Rushing this step will result in hard wafers and a less cohesive dessert. Aim for at least 4 hours, or ideally overnight, for optimal flavor melding and texture development.
Slice bananas just before assembly
Bananas oxidize quickly when exposed to air, leading to unsightly browning. To keep your banana pudding cups looking fresh and appealing, slice your bananas right before you begin the layering process. If you need to slice them a little in advance, a very light toss in a tiny amount of lemon juice (and I mean tiny, just a few drops!) can help prevent browning without imparting a strong citrus flavor. This ensures your banana pudding cups have vibrant, fresh-looking fruit.
Use a light hand when folding in whipped topping
When incorporating the thawed whipped topping into the pudding, use a rubber spatula and fold gently. The goal is to lighten the pudding, not to deflate the whipped topping. Overmixing will knock out the air, resulting in a denser, less airy pudding. This gentle technique ensures your banana pudding cups have that delicate, creamy texture that melts in your mouth.
Toast your pecans for maximum flavor
While raw pecans are fine, taking a few minutes to toast them truly elevates their flavor profile. The heat brings out their natural oils, intensifying their nuttiness and adding a deeper, more complex aroma. This makes a significant difference in the overall taste of your banana pudding cups, providing a richer contrast to the sweet pudding and bananas. Just be sure to watch them closely, as nuts can burn quickly.
Storage Guide
Refrigerator
To store your banana pudding cups, cover each individual cup tightly with plastic wrap or an airtight lid. This is crucial to prevent air exposure, which can cause the bananas to brown and the pudding to dry out or absorb refrigerator odors. Store them in the main body of the refrigerator, not the door, where temperatures fluctuate more. When properly covered and refrigerated, these banana pudding cups will maintain their optimal freshness, texture, and flavor for up to 2 days. After this period, the bananas may become too soft and the wafers overly soggy.
Freezer
I do not recommend freezing these banana pudding cups. The delicate texture of the bananas and the pudding does not hold up well to freezing and thawing. Upon thawing, the bananas tend to become mushy and discolored, and the pudding can develop an unpleasantly watery and grainy texture due to the separation of liquids. This will compromise the overall quality and enjoyment of this dessert. It’s best to enjoy these fresh and within the recommended refrigerated storage time.
Avoid These Mistakes
✕ Using under-ripe bananas
A common mistake is using bananas that aren’t quite ripe enough. Under-ripe bananas are starchy, less sweet, and have a firmer texture that won’t meld well with the creamy pudding. For the best banana pudding cups, look for bananas that are fully yellow with a few small brown speckles, indicating they are sweet and tender, perfect for softening in the pudding and releasing their full flavor. This ripeness level ensures a harmonious balance of sweetness and texture in every bite.
✕ Not chilling long enough
Patience is a virtue, especially with banana pudding cups. Many home cooks rush the chilling process, leading to a less-than-ideal result. If not chilled for at least 4 hours, the NILLA Wafers won’t have enough time to soften and absorb the pudding, leaving them crunchy and out of place. The flavors also won’t have fully melded, resulting in a less cohesive and satisfying dessert. Proper chilling is crucial for achieving that classic, tender banana pudding texture.
✕ Overmixing the instant pudding
While it seems counterintuitive, instant pudding can become thin and watery if overmixed. The starches in the mix need a specific amount of agitation to hydrate and thicken properly. Whisking beyond the recommended 2 minutes can actually break down the newly formed gel structure, preventing it from setting firmly. Stick to the package instructions for whisking time to ensure your banana pudding cups have a lusciously thick and creamy pudding layer.
✕ Layering too heavily with bananas
While bananas are essential, using too many slices in your banana pudding cups can overwhelm the other flavors and make the dessert too mushy. Bananas also release moisture, and an excessive amount can make the pudding watery. Aim for a balanced layer that complements the pudding and wafers, allowing all components to shine without any single one dominating the texture or flavor profile.
nutrition Nutrition Facts
Per serving: 1 cup
Nutritional information is an estimate and may vary based on specific brands and preparation methods.
flag Conclusion
And there you have it, fellow food enthusiasts – a recipe for banana pudding cups that’s not just easy, but truly exceptional. These individual portions are a testament to how simple ingredients, handled with a little chef’s insight, can create something truly memorable. Whether you’re whipping them up for a family treat or as the star of your next potluck, these banana pudding cups are guaranteed to bring smiles and satisfied sighs. I encourage you to try this recipe, make it your own, and share the joy of homemade goodness. Remember, here at HomeRecipes.com, we believe every meal cooked with love is a masterpiece.
sell Related Topics
Frequently Asked Questions
Can I make these banana pudding cups ahead of time for a party? expand_more
Absolutely! These banana pudding cups are an excellent make-ahead dessert. In fact, I recommend preparing them at least 4 hours in advance, or even the night before, to allow the NILLA Wafers to soften and the flavors to fully meld. This extended chilling time is crucial for developing the best texture and taste. Just be sure to cover them tightly with plastic wrap before refrigerating to keep everything fresh and prevent the bananas from browning. They will be perfectly delightful for up to 2 days after assembly.
What can I use if I don't have NILLA Wafers? expand_more
While NILLA Wafers are the classic choice for their unique texture and flavor, if you can't find them or prefer an alternative, you have a few options. Plain, thin vanilla cookies or even shortbread biscuits can work as a substitute. The key is to choose a cookie that is relatively neutral in flavor and has a texture that will soften nicely when exposed to the pudding. Avoid overly crunchy or heavily flavored cookies, as they might overpower the delicate banana and vanilla notes. You could also try a simple butter cookie for a slightly richer base.
Why did my instant pudding turn out too thin? expand_more
There are a couple of common culprits if your instant pudding ends up too thin. First, ensure you are using very cold milk; cold milk helps the pudding set properly. Second, be careful not to overmix the pudding. Instant pudding typically requires vigorous whisking for about 2 minutes, and then it should be left to set. Overmixing can actually break down the starches that help it thicken. Also, double-check the milk-to-pudding mix ratio on your package, as ratios can sometimes vary slightly between brands. If it still seems a little thin after whisking, give it some extra time in the refrigerator to firm up.
How do I prevent the bananas from browning? expand_more
Bananas naturally brown when exposed to air due to oxidation. While some browning is inevitable, you can minimize it. A classic chef's trick is to lightly brush or dip your banana slices in a tiny bit of lemon juice or pineapple juice before layering them. The acidity helps slow down the oxidation process. Don't overdo it, as you don't want a strong citrus flavor. Also, ensuring your banana pudding cups are tightly covered with plastic wrap when chilling will significantly reduce their exposure to air, keeping them looking fresher for longer.
Can I use fresh whipped cream instead of frozen whipped topping? expand_more
Absolutely, and I highly encourage it for an even more luxurious banana pudding cup! If you opt for fresh whipped cream, make sure it's lightly sweetened and whipped to medium peaks. This will give your dessert a richer, more natural dairy flavor and a beautiful, airy texture. When folding it into the pudding, be gentle to maintain its volume. You can also use fresh whipped cream for the top layer instead of the frozen whipped topping, which will elevate the dessert to a more gourmet level. Just remember that fresh whipped cream tends to be a bit more delicate and might not hold its shape as long as stabilized frozen whipped topping, so plan to serve these cups within a day or so.
More Recipes You'll Love
Ultimate Chewy Cowboy Cookies: A Kitchen Classic
The Ultimate Pig Pickin Cake: A Southern Dessert Legend
Slow Cooker Blueberry Butter Recipe (Sweet & Spiced)
Gooey Golden Southern Banana Cobbler Perfection
Flaky Sopapilla Cheesecake: Layered Dessert Dream

Community Kitchen