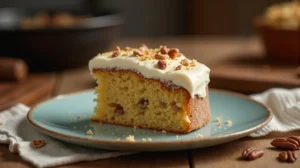
Ultimate Flaky Apple Pie Bars with Brown Butter Crust
These aren't just baked goods; they are an architectural triumph of texture. Our recipe for Flaky Apple Pie Bars delivers the nostalgic comfort of a classic double-crust pie, but in an infinitely more manageable, sturdy square format. The combination of cold butter and shortening creates a truly ethereal, shatteringly tender crust that contrasts perfectly with the sweet, subtly tart, cinnamon-spiced apple filling. Topped with a simple, opaque vanilla bean glaze, these bars are perfect for potlucks, picnics, or elevating your everyday dessert repertoire. They redefine what a simple baked bar can achieve.
restaurant_menu Ingredients
For the Flaky Crust (Base and Top)
For the Spiced Apple Filling
For the Vanilla Glaze
hardware Essential Tools
9x13 inch metal baking pan
Parchment paper
Large mixing bowl
Pastry blender or food processor
Rolling pin
Wire cooling rack
Small whisk
Sharp chef's knife
format_list_numbered Preparation
Preparing the Dough and Filling
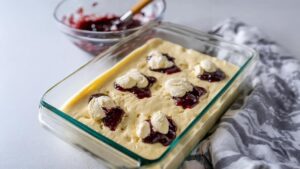
Preheat your oven to 350°F (175°C) and prepare a 9x13 inch pan by lining it with parchment paper, leaving a generous overhang on two sides for easy removal lift later. In a large bowl, combine the flour, 2 tablespoons of sugar, and salt. Cut in the cold butter and shortening using a pastry blender until the mixture resembles coarse meal with some visible pea-sized fat chunks remaining; this ensures maximum flakiness in your Flaky Apple Pie Bars base. Gently incorporate the egg whites and cold milk until a shaggy dough just forms—stop mixing immediately once it holds together when pressed.
Assembly and Baking
Divide the dough in half. Press the first half evenly into the prepared pan, compacting it slightly to form the bottom crust. Toss the sliced apples with the remaining 3/4 cup sugar, cinnamon, and cornstarch until fully coated, then spread this filling evenly over the base. Roll out the second dough half and carefully place it over the apples, sealing the edges by pressing the top dough against the bottom dough along the perimeter. Brush the entire top surface lightly with any reserved egg white for a beautiful golden finish. Bake for 45 to 55 minutes until the crust is deeply golden brown and the filling is actively bubbling, then remove and let cool completely on a wire rack—this cooling time is crucial for structural integrity.
favorite You Might Also Love
Browse All arrow_forwardRainbow Layer Cake: Ultimate Chaos Centerpiece
The Ultimate Halal Mexican Wedding Cakes Recipe
Golden Mini Donut Bites: Restaurant Texture at Home
Ultimate Fluffy Japanese Cheesecake Recipe
Festive Swirls: The Ultimate Christmas Chaos Cake
Velvety Soft Maple Cookies With Maple Icing
Try These Variations
Spiced Caramel Swirl Variation
Before placing the top crust layer on the apples, drizzle 1/2 cup of high-quality, thick caramel sauce (ensure it is alcohol-free) over the apples in a random, swirling pattern. Then, gently roll out the top crust and place it over the top. This adds a deep, molasses note that complements the cinnamon beautifully, resulting in a bar reminiscent of a sophisticated Butterscotch Pie, though the texture will be slightly denser due to the caramel’s viscosity. Bake as directed, perhaps adding 5 minutes to the cook time to ensure the caramel heats through completely.
Tropical Pineapple Bliss Bars
Substitute the apples entirely with 3 cups of finely chopped fresh or well-drained canned pineapple, tossed with 1/4 cup brown sugar and 1 tablespoon of cornstarch. To enhance the tropical profile, replace the vanilla extract in the glaze with 1/2 teaspoon of almond extract (if nut-free is not required) or use coconut milk instead of regular milk in both the crust and the glaze. This variation provides a bright, tangy counterpoint to the rich, buttery crust, making it a wonderful summer dessert alternative.
High-Protein Crust Alternative
For those seeking a more balanced macronutrient profile without sacrificing texture, replace 1/2 cup of the all-purpose flour with an equal volume of unflavored whey or casein protein powder (ensure it is very finely milled). This substitution requires careful chilling, as protein powder can make the dough crumbly. You must ensure the dough is very cold before pressing, and you might need an extra splash of milk (1 teaspoon at a time) to bring it together. This modification yields a similar flakiness while boosting the protein content significantly, making these Flaky Apple Pie Bars a more substantial treat.
Savory Herb Crust Twist
For a less sweet profile, omit the cinnamon entirely from the filling. In the crust dough, incorporate 1 tablespoon of finely minced fresh rosemary or thyme along with the flour. Reduce the sugar in the crust by half. This savory-sweet combination pairs exceptionally well with tart apples, offering a sophisticated flavor profile that bridges the gap between dessert and an elevated side dish, providing a complex flavor profile similar to a rustic tart.
Chef's Pro Tips
When cutting the cold butter and shortening for the crust, use a food processor only if you pulse it aggressively and stop immediately when the pieces are pea-sized; otherwise, the friction generates heat, melting the fat and guaranteeing a shortbread-like, tough crust instead of a flaky one. The visual cue you are looking for is mixture that resembles coarse cornmeal with distinct, visible chunks of cold fat suspended within it—these chunks are your future steam pockets for spectacular Flaky Apple Pie Bars.
To achieve that clean, professional slice after baking, employ the ‘warm knife’ technique. Before slicing the cooled bars, dip a long, sharp serrated knife into a tall glass of very hot water, wipe it nearly dry, and then make your first cut. The heat melts the sugary glaze and the butter in the crust just enough to allow a clean passage without dragging or crumbling the layers. Reheat the knife between every two cuts for the cleanest possible presentation of your beautiful Flaky Apple Pie Bars.
The choice of apples dictates the final moisture level. If you use very watery apples (like McIntosh), you must increase the cornstarch in the filling to 1.5 tablespoons. Conversely, if you use very dry apples, you can add one tablespoon of apple cider (not juice) to the filling mixture to ensure enough moisture for proper caramelization during baking. Getting the moisture content right is the difference between a perfectly set filling and a soupy mess in your bars.
For an extra layer of flavor depth in the crust—a professional touch—brown half of your butter before chilling it. Melt the butter over medium heat until the milk solids toast to a deep hazelnut color, then immediately pour it into a bowl over ice to cool it rapidly before cubing and cutting it into the flour. This nutty, browned butter flavor permeates the crust, adding richness that pairs wonderfully with the cinnamon in the apple filling.
Storage Guide
Room Temperature Storage
For the best texture retention of the crust, store the completely cooled Flaky Apple Pie Bars in a single layer within an airtight plastic container, ideally lined with parchment paper sheets between layers if stacking. Keep them away from direct sunlight or heat sources, as warmth can cause the glaze to soften and the crust to become overly tender. At a consistent 68°F (20°C), they will maintain peak quality for up to 3 days, though the flakiness will diminish slightly after the first 24 hours.
Refrigerator Storage
If you anticipate needing the bars for longer than 3 days, or if your kitchen runs warm, move them to the refrigerator. Wrap the bars tightly, first in plastic wrap, and then in a layer of heavy-duty aluminum foil to prevent the cold, dry air from leaching moisture out of the pastry and making it hard. They remain safe to eat for up to 10 days this way, though the crust will firm up considerably. Always bring them back to room temperature for 30 minutes before serving, or reheat gently in the oven.
Freezing for Future Baking
These bars freeze exceptionally well, making them perfect for making ahead of holidays. Once completely cooled and glazed, wrap individual bars tightly in plastic wrap, followed by a layer of foil or place them in a heavy-duty freezer bag, squeezing out all excess air. They maintain excellent quality when frozen for up to 3 months. Thaw overnight in the refrigerator, then allow them to sit on the counter for 1 hour before serving, or reheat as described below to refresh the texture.
Avoid These Mistakes
✕ Using room temperature or melted fat when mixing the crust ingredients is the number one cause of tough, sandy pastry. The goal of cutting in the fat is to coat the flour particles with fat without fully integrating them. When the cold fat hits the hot oven, the water content inside turns instantly to steam, forcing the layers of flour apart, creating the ‘flaky’ texture. If the fat is already melted, this crucial steam reaction cannot occur, resulting in a dense, heavy base for your Flaky Apple Pie Bars.
✕ Failing to blind-bake the bottom crust, especially when using a very moist filling like apples, often leads to a soggy bottom. The raw dough sitting directly underneath the wet fruit layer steams rather than bakes, preventing the necessary Maillard reaction on the bottom surface. To avoid this, par-bake the bottom crust for 15 minutes at 350°F (175°C) until it looks dry and slightly set before adding the filling and the top crust. This step creates a barrier that allows the bottom to crisp up properly.
✕ Overmixing the dough after adding the liquid (milk/egg whites) is another common pitfall. Once you add the wet ingredients, you are activating gluten in the flour. Even with the fat inhibiting development, excessive mixing will create too much gluten, making the dough tough and elastic, which resists rolling and results in a chewy rather than flaky texture. Mix only until the dough just barely holds together—it should look messy and slightly under-mixed when you form the two balls.
✕ Applying the glaze while the bars are still warm is a mistake that ruins the visual appeal and texture of the topping. Warmth causes the powdered sugar to dissolve into the moisture on the surface, turning the beautiful, opaque white layer into a thin, transparent, sticky syrup that soaks in. Always wait until the bars have reached room temperature (or even slightly cooler) before applying the glaze so it sets up with its characteristic matte, slightly thick finish.
nutrition Nutrition Facts
Per serving: 1 bar (1/18th of pan)
Nutritional information is estimated based on standard ingredient measurements and excludes added ice cream or heavy toppings.
flag Conclusion
There you have it—my definitive guide to creating truly magnificent Flaky Apple Pie Bars. We’ve respected the classic flavors of Americana while applying professional techniques to conquer texture and structure. This recipe is proof that you don’t need to fuss over a tricky pie dish to achieve that perfect balance of buttery crust and spiced fruit. Whether you are serving them alongside a tall glass of sweet tea or enjoying one as an afternoon treat, these bars are guaranteed to impress. Don’t be afraid to experiment with the spices or the fruit filling; make this recipe your own signature creation. Happy baking, and enjoy the pride of serving something truly spectacular from your own kitchen!
Frequently Asked Questions
Why did my crust turn out soft instead of flaky? expand_more
This is almost always due to two factors: overworking the dough or using fat that was too warm. When you incorporate the fat into the flour, you must stop mixing the moment the dough comes together. Overworking develops gluten strands, leading to a tough, biscuit-like texture rather than the delicate, layered structure required for true Flaky Apple Pie Bars. Furthermore, if your butter and shortening were soft, they melted into the flour before baking, resulting in a shortbread consistency rather than steam-leavened flakes. Ensure all refrigerated ingredients are genuinely cold.
Can I use different fruits in this bar recipe? expand_more
Absolutely! While the title focuses on apple, this pastry base is incredibly versatile. You can substitute the apples entirely with firm berries mixed with a thickener, or use sliced peaches, similar to what you might find in a Fried Apple Or Peach Pies 2 recipe. If you use berries, you must increase the dry thickener (like cornstarch or tapioca starch) in the filling by about 1 tablespoon to manage the extra liquid they release during baking. For a different flavor profile altogether, consider making a variation inspired by Lemon Crumb Bars by using lemon curd as the filling base, though you would omit the top crust layer.
My glaze is too thin and runs everywhere. What went wrong? expand_more
The consistency of the glaze is dictated by the ratio of powdered sugar to liquid. If your glaze is too thin, it means you added too much milk, or your powdered sugar was not finely milled enough to absorb the liquid properly. The fix is simple: gradually whisk in additional powdered sugar, one tablespoon at a time, until the mixture coats the back of a spoon thickly. Wait for the bars to be completely cool before glazing; if the bars are warm, the heat will thin the sugar instantly, making it appear runny even if the ratio was correct.
How do I ensure the bottom crust bakes through without burning the top? expand_more
This is a common challenge with thicker bar recipes. The solution involves a two-stage baking approach. First, after pressing in the bottom crust, I recommend par-baking (or blind baking) the bottom layer for 15 minutes at 350°F (175°C) before adding the apple filling. This sets the base so it doesn't become gummy from the apple moisture. After adding the filling and the top crust, continue baking. If the top browns too rapidly before the bottom is cooked, gently tent the entire pan with aluminum foil for the final 15-20 minutes of the bake time. This shields the top from direct heat while allowing the center to finish cooking.
Can I make a non-gluten-free version of these Flaky Apple Pie Bars? expand_more
Yes, and frankly, if you aren't avoiding gluten, you will likely achieve a more traditional flakiness. Substitute the 2½ cups of gluten-free flour with 2½ cups of standard all-purpose flour. You may need slightly less milk or egg white to bring the dough together, as regular flour absorbs liquid differently than many GF blends. Keep the fat ratios exactly the same. The resulting dough will be more elastic and easier to handle when rolling out the top layer, providing that classic, tender bite usually associated with the best American pastries.
More Recipes You'll Love
The Ultimate Halal Cuppa Cuppa Cake Recipe
The Ultimate Peach Pretzel Salad: A Retro Dessert Masterpiece
Sun-Kissed Pineapple Dessert: Tropical Sweetness Simplified
Baked Strawberry Dessert Recipe (Easy 4-Ingredient)
Divine Peaches Cream Cheese Loaf: Your New Favorite Dessert
Community Kitchen