Roasted Turkey in a Bag Recipe (Juicy & Flavorful)
Discover the ultimate secret to a perfectly moist and tender turkey with this incredible roasted turkey in a bag recipe. This chef-approved technique traps all the juices and infuses the bird with a rich blend of savory spices, ensuring a succulent result every time. Ideal for holiday feasts or any special occasion, this method simplifies the roasting process, guarantees a delicious outcome, and makes cleanup a breeze. Say goodbye to dry turkey forever!
restaurant_menu Ingredients
For the Turkey
For the Seasoning Blend
hardware Essential Tools
Large roasting pan (at least 2 inches deep)
Large mixing bowl
Whisk
Meat thermometer
Paper towels
Small knife or scissors
Carving board
Carving fork and knife
format_list_numbered Preparation
Initial Preparation
Preheat your oven to 350°F (175°C) to ensure it's ready when the turkey is.
Remove the thawed turkey from its packaging, carefully extract the giblets and neck from both cavities, then rinse the turkey thoroughly under cold running water and pat it completely dry with paper towels.
In a medium-sized bowl, whisk together the coarse salt, black pepper, poultry seasoning, paprika, crushed red pepper flakes, ground ginger, and dried thyme until well combined; set this flavorful blend aside.
Bagging and Seasoning
Sprinkle 1 tablespoon of all-purpose flour inside the oven roasting bag and shake it gently to coat the interior evenly, then place the floured bag into your large, 2-inch deep roasting pan.
Arrange the quartered onion, peeled garlic cloves, and 1-inch carrot pieces in a single layer at the bottom of the roasting bag, creating an aromatic bed for the turkey.
Rub the entire turkey surface generously with the melted butter, ensuring an even coating to help the seasoning adhere and promote browning.
Take your prepared seasoning mix and rub it thoroughly over the entire turkey, including under the skin where possible, to infuse maximum flavor.
Roasting and Resting
Carefully place the seasoned turkey into the roasting bag, ensuring it rests on top of the vegetables, and position the bag's opening to face one end of the roasting pan, not upwards.
Close the bag securely with the provided cooking twine or a heat-safe tie, then use a small knife or scissors to cut 4-6 small slits in the top of the bag to allow steam to vent.
Transfer the roasting pan to your preheated 350°F (175°C) oven and bake according to the turkey's weight: 8-12 lbs for 2-2.5 hours, 12-16 lbs for 2.5-3 hours, 16-20 lbs for 3-3.5 hours, and 20-24 lbs for 3.5-4 hours, until a meat thermometer inserted into the thickest part of the thigh reads 165°F (74°C).
Once cooked, remove the pan from the oven, but leave the turkey in the bag to rest for at least 15-20 minutes, allowing the juices to redistribute for a supremely moist bird.
After resting, carefully cut open the bag, use a carving fork to lift the turkey onto a carving board, then carve, serve, and enjoy your perfectly juicy roasted turkey!
favorite You Might Also Love
Browse All arrow_forward
Creamy Baked Poor Man's Steak: 4-Ingredient Comfort

Deviled Egg Potato Salad Recipe (Creamy Classic)
Turkey Giblet Gravy Recipe (Rich & Savory)
Gourmet Taco Stuffed Shells: Comfort Redefined
The Best Candied Yams Recipe: A Southern Thanksgiving Classic
Layered Comfort: The Ultimate Ravioli Lasagna Recipe
Try These Variations
Herb-infused Turkey
For an even more aromatic bird, add fresh sprigs of rosemary, sage, and thyme directly into the turkey cavity along with a lemon half before placing it in the bag. The steam will carry these fresh herb essences throughout the meat, creating a brighter, more complex flavor profile. This is especially delightful if you’re serving it with a simple pan gravy made from the drippings. Adjust the dried herbs in the seasoning blend slightly to complement the fresh additions, perhaps reducing the dried thyme by half.
Citrus-Garlic Turkey
Introduce a vibrant citrus note by adding the zest of one orange or lemon to your seasoning blend, and quarter two citrus fruits (orange or lemon) to place inside the turkey cavity. The citrus acids will not only tenderize the meat slightly but also add a wonderful brightness that cuts through the richness of the turkey. This variation works beautifully with the existing garlic and onion base, making for an incredibly fragrant bird that’s perfect for a celebratory meal. Ensure the citrus is washed thoroughly before use.
Spicy Chipotle Turkey
For those who love a little heat, incorporate 1-2 teaspoons of chipotle powder into your seasoning blend, along with an additional 1/2 teaspoon of smoked paprika for depth. This will give your turkey a smoky, spicy kick that’s distinctly American Southwest inspired. You can also add a few whole dried chipotle peppers (rehydrated in hot water for 15 minutes) to the bed of vegetables in the roasting bag for an extra layer of smoky flavor. This variation pairs wonderfully with a side of cornbread stuffing.
Maple-Glazed Turkey
While the bag keeps it moist, you can add a touch of sweetness. After the turkey has cooked and rested for 15 minutes in the bag, carefully remove it and place it on a rack in your roasting pan. Brush generously with a glaze made from 1/2 cup maple syrup mixed with 1 tablespoon Dijon mustard and 1/2 teaspoon black pepper. Roast at 400°F (200°C) for 10-15 minutes, until the glaze is caramelized and the skin is golden. Watch carefully to prevent burning.
Vegetable Medley Turkey
Expand the aromatic bed by adding other root vegetables like parsnips, celery stalks, or small potatoes (cut into 1-inch pieces) alongside the carrots, onions, and garlic. These vegetables will roast beautifully in the flavorful turkey drippings, becoming tender and infused with the turkey’s essence. They can then be served as a delicious side dish, soaking up all the savory goodness. Ensure the vegetables are cut to a similar size for even cooking within the bag.
Chef's Pro Tips
Always pat your turkey completely dry before seasoning. Excess moisture on the skin will create steam, hindering any potential for browning or crisping, even in a bag. A dry surface allows the butter and seasonings to adhere better and promotes a more golden finish, even in the steamy environment of the roasting bag. This simple step makes a significant difference in both flavor and appearance.
Don’t crowd the roasting pan. Ensure there’s ample space around the roasting bag in the pan for proper air circulation. If the bag is pressed against the sides of the oven or pan, it can prevent even cooking and potentially lead to the bag sticking or tearing. Airflow is key to heat distribution, even within the sealed environment of the bag.
Use a reliable meat thermometer. This is your best friend in the kitchen when roasting poultry. Visual cues can be deceiving, but an accurate thermometer ensures your turkey is cooked to a safe 165°F (74°C) without overcooking and drying it out. Insert it into the thickest part of the thigh, avoiding the bone, for the most accurate reading. This prevents both undercooked and dry turkey.
Let the turkey rest, and do it in the bag! Resting is critical for a juicy turkey. The heat of cooking causes muscle fibers to contract and push juices to the center. Resting allows these fibers to relax and reabsorb those juices, ensuring a tender and moist bird when carved. Resting it in the bag helps to maintain its warmth and keep the juices contained for redistribution.
Save those pan drippings! The liquid left in the roasting bag after cooking is liquid gold. It’s packed with incredible flavor from the turkey, butter, and aromatics. Strain it, skim off excess fat, and use it as the base for a rich, delicious gravy. The flour you added at the beginning will already be working to thicken it slightly, making your gravy preparation even easier.
Storage Guide
Refrigerator
Completely cool leftover turkey meat, then carve it off the bone and store in an airtight container or tightly wrapped in plastic wrap and aluminum foil. It will stay fresh and delicious in the refrigerator for 3-4 days. For optimal freshness, try to store larger pieces or slices rather than shredded meat, as this helps retain moisture. Always label with the date for easy tracking.
Freezer
For longer storage, freeze carved turkey meat in freezer-safe airtight containers or heavy-duty freezer bags. Remove as much air as possible from the bags to prevent freezer burn. You can also freeze whole pieces of meat in the bag with a little gravy or broth to keep it moist. Frozen turkey will maintain its quality for 2-3 months. Thaw overnight in the refrigerator before reheating.
Reheating (Oven)
To reheat larger portions or slices, preheat your oven to 275°F (135°C). Place the turkey in an oven-safe dish with a splash of chicken broth or water, cover tightly with foil, and heat for 15-20 minutes, or until warmed through. The low temperature and added moisture prevent the turkey from drying out. Check the internal temperature to ensure it’s at least 165°F (74°C).
Reheating (Stovetop)
For smaller amounts of sliced turkey, gently reheat in a skillet over medium-low heat. Add a tablespoon or two of chicken broth or gravy to the pan, cover, and heat until just warmed through. This method is quick and effective for maintaining moisture. Avoid high heat, which can toughen the meat and dry it out quickly. Stir occasionally to ensure even heating.
Avoid These Mistakes
✕ Not patting the turkey dry
Many home cooks skip this crucial step, but a wet turkey will steam rather than develop a golden-brown skin, even in a bag. The moisture on the surface prevents the Maillard reaction, which is responsible for those rich, savory browned flavors. Always use paper towels to thoroughly dry the exterior before applying butter and seasonings.
✕ Over-seasoning or under-seasoning
It’s easy to get the balance wrong. Too little seasoning results in a bland bird, while too much can make it overly salty or overpowering. Follow the recipe’s measurements as a guide, but also taste your seasoning blend (if safe to do so) and adjust to your preference. Remember, a whole turkey needs a substantial amount of seasoning to penetrate the meat.
✕ Not using flour in the bag
This is a common oversight that can lead to a messy situation. The flour isn’t just for gravy; it’s essential for preventing the bag from bursting in the oven. It absorbs steam, regulating the pressure inside the bag and preventing dangerous ruptures. Without it, the bag can inflate excessively and tear, releasing all the precious juices and creating a huge cleanup.
✕ Opening the oven or bag too frequently
Every time you open the oven door, the temperature drops, extending the cooking time. More importantly, opening the roasting bag during cooking releases the trapped steam and moisture, defeating the purpose of cooking in a bag and potentially leading to a drier turkey. Trust the process and your meat thermometer.
✕ Not letting the turkey rest
This is perhaps the most common mistake leading to a dry turkey. Carving immediately after cooking causes all the accumulated juices to run out onto the board, leaving the meat dry. Resting allows the muscle fibers to relax and reabsorb these juices, resulting in a much more tender and succulent bird. The 15-20 minutes of resting time is non-negotiable for a perfect turkey.
nutrition Nutrition Facts
Per serving: 1 serving
Nutritional values are estimates and can vary based on specific ingredients and portion sizes. This calculation is for a serving of turkey meat only, without gravy or skin.
flag Conclusion
There you have it, my culinary companions – the HomeRecipes guide to mastering the roasted turkey in a bag. No more dry, disappointing turkey! This method, with its scientific approach to moisture retention and flavor infusion, guarantees a succulent, aromatic centerpiece that will impress everyone at your table. It’s a testament to the fact that restaurant-quality results are absolutely achievable in your home kitchen with just a few chef’s secrets. So go ahead, embrace this foolproof technique, and enjoy the pride of serving a truly magnificent homemade meal. We can’t wait to see what you create. Happy cooking, from my kitchen to yours, here at HomeRecipes.com!
sell Related Topics
Frequently Asked Questions
How long to cook a turkey in a bag? expand_more
The cooking time for a roasted turkey in a bag depends on its weight. As a general guideline, for an 8-12 pound turkey, expect 2 to 2.5 hours. A 12-16 pound bird will typically need 2.5 to 3 hours. For larger turkeys, a 16-20 pound turkey takes 3 to 3.5 hours, and a 20-24 pound turkey will require 3.5 to 4 hours. Always rely on a meat thermometer inserted into the thickest part of the thigh (avoiding the bone) to ensure it reaches a safe internal temperature of 165°F (74°C). This is the most accurate way to determine when your turkey is perfectly cooked and juicy.
Do you need to baste a turkey when cooking in a bag? expand_more
One of the greatest advantages of cooking a turkey in a roasting bag is that basting becomes largely unnecessary! The bag creates its own steamy, self-basting environment, circulating moisture and juices around the bird throughout the cooking process. This means you can essentially set it and forget it, freeing up your time for other holiday preparations. The natural juices and melted butter within the bag keep the turkey moist and flavorful without you having to open the oven door repeatedly, which can lower the oven temperature and prolong cooking time.
Can I put stuffing inside the turkey when cooking in a bag? expand_more
While it's traditional for many, I generally advise against stuffing a turkey when cooking it in a bag. The moist environment inside the bag is fantastic for the turkey meat, but it can make it difficult for the stuffing to reach a safe internal temperature (165°F / 74°C) without overcooking the turkey. If you prefer a moist, flavorful stuffing, I recommend baking it separately in a casserole dish. This ensures both your turkey and your stuffing are perfectly cooked and safe to eat, without compromising the juiciness of your bird.
How do you get crispy skin when cooking a turkey in a bag? expand_more
Achieving truly crispy skin when cooking a turkey in a bag can be a bit challenging due to the steamy environment. However, there's a chef's trick to get closer to that desired crispness. Once your turkey has reached its internal temperature and has rested in the bag for 15-20 minutes, carefully remove it from the bag and place it directly on a roasting rack in your pan. Increase your oven temperature to 400-425°F (200-220°C) and roast for an additional 10-15 minutes, or until the skin is golden brown and crispy to your liking. Keep a close eye on it to prevent burning.
What kind of roasting bag should I use? expand_more
For cooking a turkey, it's crucial to use an oven roasting bag specifically designed for poultry and high temperatures. Look for large, turkey-sized bags, typically 19x23.5 inches, often found in the baking aisle of your grocery store next to aluminum foil and parchment paper. Brands like Reynolds Oven Bags are excellent choices. These bags are made from food-safe, heat-resistant nylon and are engineered to withstand oven temperatures up to 400°F (200°C) without melting or leaching chemicals into your food. Avoid using regular plastic bags or trash bags, as these are not safe for high-heat cooking.
More Recipes You'll Love

Zesty Mexican Shrimp Cocktail: A Refreshing Classic
4-Ingredient Slow Cooker Imitation Crab Bake Mastery
Ultimate Chicken Cordon Bleu Lasagna Bake
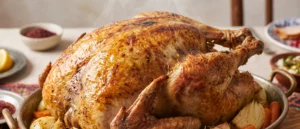
Roasted Turkey in a Bag Recipe (Juicy & Tender)

Garlic Butter Shrimp Pasta: A Quick and Delicious Recipe
Community Kitchen