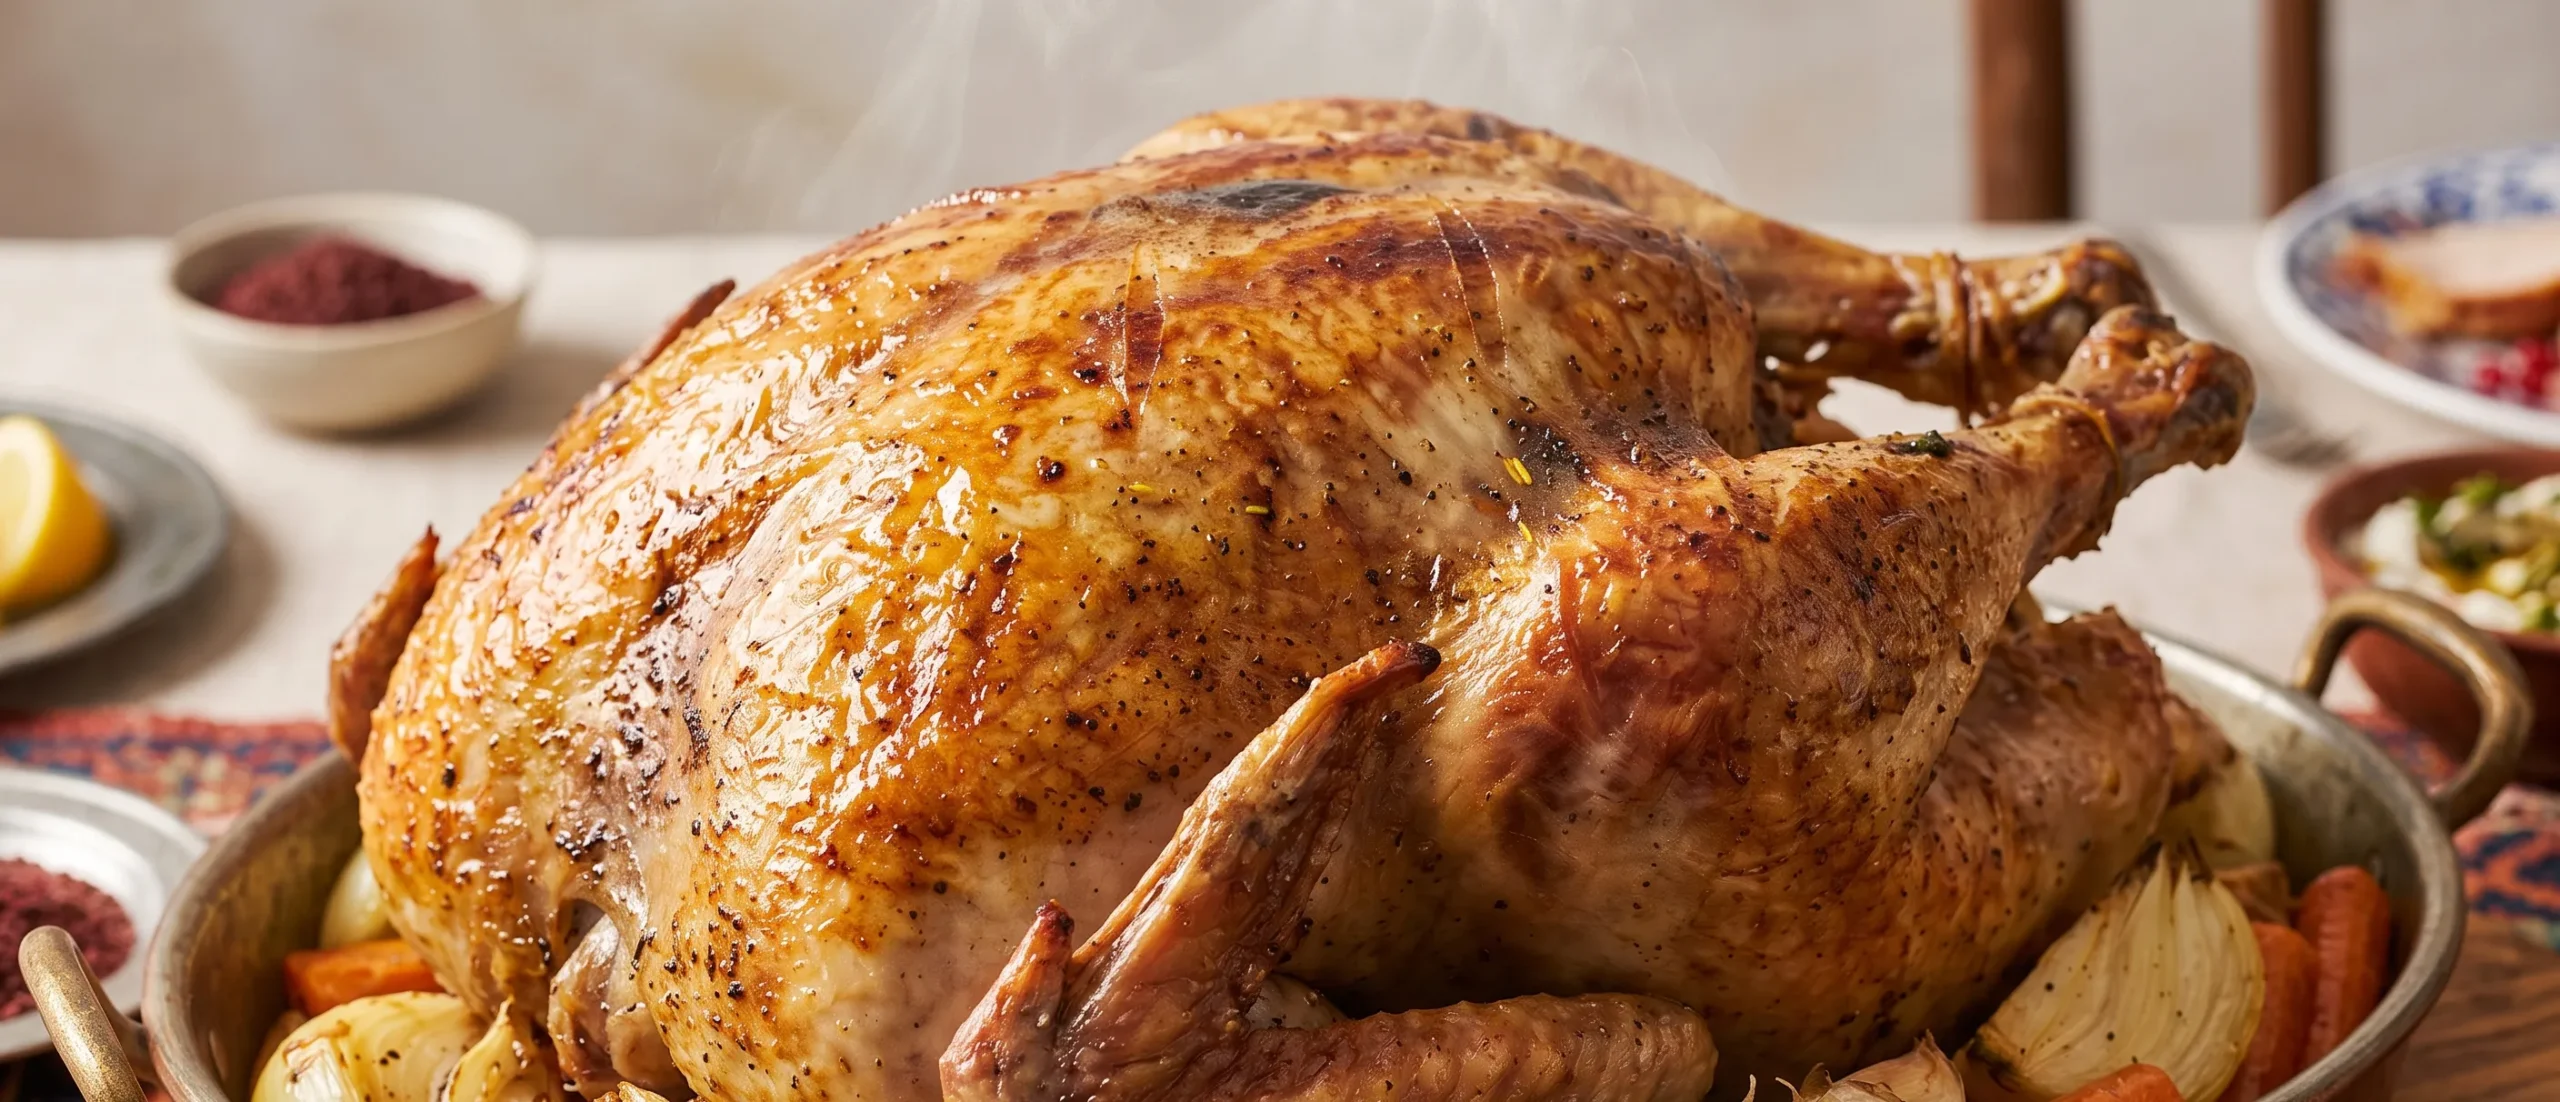
Roasted Turkey in a Bag Recipe (Juicy & Tender)
Discover the ultimate secret to a consistently juicy and tender roasted turkey with this incredible turkey in a bag recipe! Chef HomeRecipes guides you through a simple yet highly effective method that guarantees a perfectly cooked, flavorful bird with minimal effort and easy cleanup. This technique locks in moisture and infuses every bite with aromatic spices, making it the ideal centerpiece for any holiday feast or special family dinner. Prepare to impress everyone with the most succulent roasted turkey you've ever made, thanks to the magic of the roasting bag.
restaurant_menu Ingredients
Main Turkey Ingredients
Aromatic Bed & Seasoning Blend
hardware Essential Tools
Large roasting pan (2-inch deep)
Medium mixing bowl
Meat thermometer
Carving board
Sharp chef's knife or carving set
Kitchen shears or sharp knife for bag slits
format_list_numbered Preparation
Roasting Turkey in a Bag
Preheat your oven to 350°F (175°C) and prepare your roasting bag by shaking 1 tablespoon of all-purpose flour inside to coat evenly, then place the bag into a large, sturdy 2-inch deep roasting pan. This flour coating is essential for preventing the bag from bursting and helping the skin to brown.
In a medium bowl, thoroughly combine the coarse salt, black pepper, poultry seasoning, paprika, crushed red pepper flakes, ground ginger, and dried thyme, ensuring all spices are well mixed to create a balanced flavor profile. This blend will infuse your turkey with incredible aroma and taste.
Arrange the quartered onion, peeled garlic cloves, and 1-inch carrot pieces inside the floured roasting bag, forming a natural bed for the turkey to rest upon. These aromatics will not only flavor the bird but also lift it slightly for more even cooking. Rub the entire surface of the very dry turkey with the melted butter, then generously and evenly spread the prepared seasoning mix all over the bird, ensuring every part is coated. Carefully place the seasoned turkey into the roasting bag, centering it on top of the vegetables. The bag's opening should face one end of the roasting pan. Securely close and seal the roasting bag using the provided tie or cooking twine, then cut 4-6 small (about 1/2-inch) slits into the top of the bag to allow steam to escape and promote browning. Transfer the roasting pan to your preheated oven and bake according to the turkey's weight: for an 8-12 lb turkey, roast for 1.5-2 hours; for 12-16 lb, 2-2.5 hours; for 16-20 lb, 2.5-3 hours; and for 20-24 lb, 3-3.5 hours. Always use a meat thermometer inserted into the thickest part of the thigh (avoiding bone) to confirm doneness at 165°F (74°C), though I prefer 180°F (82°C) in the thigh for maximum tenderness. Once the turkey reaches the desired internal temperature, remove the roasting pan from the oven and allow the turkey to rest undisturbed in the roasting bag for 15 minutes. This crucial resting period allows the juices to redistribute, ensuring a moist and tender result. Carefully lift the turkey from the bag using a carving fork and transfer it to a carving board. The flavorful pan drippings left in the bag are perfect for making gravy. Carve your perfectly roasted turkey and serve immediately.
favorite You Might Also Love
Browse All arrow_forward
Potato Hamburger Casserole Recipe (Cheesy Comfort)
Herb-Crusted Prime Rib Recipe (Perfectly Roasted)
Slow Cooker Potato Broccoli Cheddar Comfort Bowl
Ultimate Sheet Pan Parmesan Chicken Dinner Recipe
Paprika Steak Shells Recipe (Hearty Stuffed Pasta)
Turkey Giblet Gravy Recipe (Rich & Savory)
Try These Variations
Herb Garden Turkey
For a more pronounced herbal aroma, finely chop 2 tablespoons of fresh rosemary and 2 tablespoons of fresh sage, and mix them directly into the seasoning blend. You can also tuck a few sprigs of fresh herbs, like thyme and rosemary, inside the turkey cavity along with a halved lemon for an extra layer of bright, fresh flavor that permeates the meat during cooking. This variation adds a traditional, rustic touch to your turkey bag.
Spicy Citrus Turkey
Amp up the zest by adding 1 tablespoon of finely grated orange or lemon zest to your spice rub. Increase the crushed red pepper flakes to 1 teaspoon for a noticeable kick. You can also place orange or lemon halves inside the turkey cavity before roasting. The citrus notes will brighten the richness of the turkey and add a subtle tang that complements the spices beautifully, creating a more vibrant flavor profile in your turkey bag.
Garlic Herb Butter Turkey
Instead of just melted butter, create a compound butter by mixing the 2 tablespoons of softened butter with 2 cloves of minced garlic, 1 tablespoon of chopped fresh parsley, and 1/2 teaspoon of onion powder. Gently loosen the skin over the turkey breast and spread about half of this compound butter directly onto the breast meat under the skin. Use the remaining butter to rub over the exterior. This technique ensures maximum flavor and moisture retention in the breast, making your turkey bag feast even more luxurious.
Smoked Paprika & Cumin Turkey
For a deeper, more earthy flavor profile, substitute 1 teaspoon of smoked paprika for the sweet paprika in the seasoning blend and add 1/2 teaspoon of ground cumin. These spices introduce a smoky, warm depth that pairs wonderfully with turkey, offering a Southwestern-inspired twist. This variation works particularly well for those who enjoy a more robust and complex flavor in their holiday bird, enhancing the turkey bag experience.
Maple Glazed Turkey (last 30 mins)
For a hint of sweetness and a beautiful sheen, prepare a glaze by whisking together 1/4 cup of pure maple syrup, 1 tablespoon of Dijon mustard, and 1/2 teaspoon of apple cider vinegar. During the last 30 minutes of roasting, carefully open the turkey bag and brush this glaze over the turkey skin. The sugars will caramelize, creating a gorgeous, slightly sweet, and tangy crust. Close the bag loosely and continue roasting. This adds a delightful sticky-sweet finish to your roasted turkey in a bag.
Chef's Pro Tips
Always pat your turkey thoroughly dry with paper towels before seasoning. Excess moisture on the skin prevents the Maillard reaction from occurring efficiently, which is the chemical process responsible for the golden-brown, crispy skin and rich, savory flavors. A dry surface ensures the skin crisps up beautifully instead of steaming, even within a turkey bag. This is a fundamental step often overlooked by home cooks.
Invest in a good quality instant-read meat thermometer. This is your most valuable tool for ensuring a perfectly cooked turkey and preventing dry, overcooked meat. Temperature, not time, is the true indicator of doneness. The thickest part of the thigh should reach 165°F (74°C) for safety, but I often aim for 180°F (82°C) in the thigh, as carryover cooking will bring the breast to perfect doneness, guaranteeing a juicy turkey from end to end.
Do not overcrowd your roasting pan. Ensure there’s ample space around the roasting bag within the pan for heat to circulate evenly. Overcrowding can lead to uneven cooking and may prevent proper browning of the turkey. A well-sized pan allows for consistent heat distribution, which is crucial for a uniformly cooked turkey, especially when using the turkey bag method.
Let your turkey rest, rest, rest! This is perhaps the most critical step for any roasted poultry. After removing it from the oven, allow the turkey to rest in the roasting bag for at least 15-20 minutes. This resting period allows the muscle fibers to relax and reabsorb all those delicious juices, resulting in an incredibly moist and tender turkey. Skipping this step means juices will run out when you carve, leaving you with dry meat.
Utilize the pan drippings for gravy. The juices and rendered fat collected in the turkey bag are incredibly flavorful and are the absolute best base for a homemade gravy. Carefully pour them into a fat separator, then use the rich broth to create a savory gravy that will perfectly complement your roasted turkey. It’s a simple way to elevate your meal and ensure no flavor goes to waste.
Storage Guide
Refrigerator (3-4 days)
Once your roasted turkey in a bag has cooled completely, carve all the meat off the bones. Store the carved turkey in shallow, airtight containers or resealable bags. Placing the meat in shallow containers helps it cool down more quickly, which is crucial for food safety. Keep it covered to prevent it from drying out and absorbing other odors in the refrigerator. This method ensures your turkey remains fresh and delicious for up to 3 to 4 days.
Freezer (up to 3 months)
For longer storage, freeze the carved turkey meat. Place individual portions or family-sized servings into freezer-safe airtight containers or heavy-duty freezer bags. Remove as much air as possible from the bags to prevent freezer burn, which can affect both flavor and texture. Label with the date. Thaw frozen turkey overnight in the refrigerator before reheating. This method is excellent for meal prepping and ensuring you have delicious turkey available for future meals.
Reheating (Oven)
To reheat turkey from the refrigerator and maintain its moisture, place the carved slices in a baking dish with a splash of chicken broth or turkey stock. Cover the dish tightly with aluminum foil to trap moisture. Reheat in a preheated oven at 300°F (150°C) for about 15-20 minutes, or until just heated through. Avoid high temperatures or prolonged reheating, which can dry out the meat. The added liquid and foil create a steamy environment, mimicking the turkey bag effect and keeping your turkey tender.
Reheating (Microwave – small portions)
For very small portions, you can use a microwave, but exercise caution to prevent drying. Place a few slices of turkey on a microwave-safe plate, add a tablespoon of broth or water, and cover with a microwave-safe lid or damp paper towel. Heat on medium power in short bursts (30-60 seconds), checking frequently, until warmed through. This method is best for quick individual servings rather than larger quantities, as it can be difficult to maintain even heating and tenderness. The turkey bag method ensures initial juiciness, but reheating needs care.
Avoid These Mistakes
✕ Not patting the turkey dry
Many home cooks skip the crucial step of thoroughly patting the turkey dry with paper towels. If the skin is moist, it will steam rather than crisp and brown, even in a turkey bag. The Maillard reaction, which creates those desirable savory flavors and golden crust, requires a dry surface, so take the extra few minutes to ensure your bird is as dry as possible before seasoning. This also helps the seasoning adhere better.
✕ Overcooking the turkey
Relying solely on cooking time charts instead of an internal meat thermometer is a common mistake that leads to dry turkey. Different ovens, turkey sizes, and starting temperatures can all affect cooking duration. Always use a reliable instant-read thermometer inserted into the thickest part of the thigh (avoiding bone) to ensure the turkey reaches 165°F (74°C) for safety, or 180°F (82°C) for optimal tenderness in the thigh, preventing an overcooked bird.
✕ Not resting the turkey
Immediately carving the turkey after it comes out of the oven is a common error. This causes all the delicious juices to run out onto the carving board, leaving you with dry, less flavorful meat. Resting allows the muscle fibers to relax and reabsorb these juices, ensuring a tender and moist final product. Always allow at least 15-20 minutes of resting time, preferably in the turkey bag, before carving.
✕ Forgetting to flour the roasting bag
Skipping the step of shaking flour inside the roasting bag can lead to two problems: the bag might burst due to steam pressure, and the turkey’s skin might not brown as effectively. The flour absorbs excess fat and moisture, which helps stabilize the bag and promotes a beautiful golden-brown finish on the turkey. It’s a small but vital detail for a successful turkey bag roast.
✕ Cutting too many or too large slits in the bag
While vents are necessary for steam release, cutting too many or excessively large slits can lead to too much moisture escaping. This defeats the purpose of cooking in a bag, potentially resulting in a drier turkey. Aim for 4-6 small (about 1/2-inch) slits, strategically placed, to allow just enough steam to escape while retaining the majority of the moisture for a succulent bird. Don’t compromise the integrity of the turkey bag.
nutrition Nutrition Facts
Per serving: 4 ounces
Nutritional values are approximate and may vary based on specific ingredient brands and preparation methods.
flag Conclusion
There you have it—a truly exceptional roasted turkey in a bag recipe that promises a juicy, flavorful bird with minimal fuss. This method, endorsed by years of professional kitchen experience, empowers you to create a holiday centerpiece that will impress everyone at your table. The beauty of cooking a turkey in a bag lies in its simplicity and its consistent results, transforming what can often be a daunting task into an enjoyable culinary triumph. So go ahead, embrace this technique, and savor the pride of serving a perfectly cooked, tender turkey. Head over to HomeRecipes.com for more chef-tested recipes that bring gourmet quality right into your home!
sell Related Topics
Frequently Asked Questions
How do I ensure my turkey skin gets crispy when cooking in a bag? expand_more
Achieving crispy skin on a turkey cooked in a roasting bag involves a few key steps. First, ensure you thoroughly pat the turkey dry before seasoning. Any surface moisture will steam rather than crisp. Second, the flour coating inside the bag is essential; it absorbs excess moisture and fats, preventing the bag from bursting and allowing for better browning. Finally, those small slits you cut in the top of the bag are not just for steam release, but also allow some dry heat to reach the skin, promoting that beautiful golden-brown crispness we all desire. If you want it even crisper, you can carefully snip open the bag for the last 20-30 minutes of cooking.
Can I use this turkey bag method for a smaller turkey or turkey breast? expand_more
Absolutely! This roasted turkey in a bag method is incredibly versatile and works wonderfully for smaller turkeys or even just a bone-in turkey breast. For smaller birds (under 8 pounds) or breasts, you'll simply need to adjust the cooking time downwards. Always rely on an internal meat thermometer inserted into the thickest part of the meat (avoiding bone) to ensure it reaches 165°F (74°C). The general rule of thumb for turkey breast is about 20 minutes per pound, but the bag can slightly reduce this, so start checking earlier, ensuring a moist turkey. The principles of seasoning and resting remain the same for delicious results.
What can I do with the pan drippings from the roasting bag? expand_more
The pan drippings left in the roasting bag are liquid gold and are the foundation for an incredibly flavorful homemade gravy! Once you've removed the turkey, carefully pour the contents of the bag into a fat separator. Allow the fat to separate from the flavorful turkey broth. You can then use this rich broth as the base for your gravy, thickening it with a roux (butter and flour) and seasoning to taste. It will be far superior to any store-bought gravy and will beautifully complement your roasted turkey. Don't let those precious juices go to waste, as they are key to a truly complete meal from your turkey bag.
Is it safe to cook a turkey in a plastic bag? expand_more
Yes, it is perfectly safe to cook a turkey in an oven roasting bag, provided you use bags specifically designed for oven use. These bags are made from food-grade, heat-resistant nylon that can withstand high oven temperatures without melting or leaching harmful chemicals into your food. It's crucial not to use regular plastic bags or garbage bags, as they are not tested for oven safety and can melt, ruin your food, and release dangerous substances. Always follow the manufacturer's instructions for the roasting bag and ensure you cut the necessary steam vents to prevent pressure buildup. This turkey bag method is a popular and safe cooking technique.
Can I stuff the turkey when cooking it in a roasting bag? expand_more
While you technically can stuff a turkey cooked in a roasting bag, I generally advise against it for food safety and cooking quality reasons. Stuffing inside the turkey acts as an insulator, making it very difficult for the turkey's internal temperature to rise quickly and evenly, especially in the center of the stuffing. This can lead to undercooked stuffing, which poses a food safety risk, or an overcooked, dry turkey by the time the stuffing is safely cooked. For the best results and safest practices, I recommend cooking your stuffing separately in a baking dish. This allows both the turkey and the stuffing to cook perfectly and efficiently, ensuring both are delicious and safe to eat. The turkey bag will still infuse the meat with incredible flavor.
More Recipes You'll Love
Velvet Crockpot Mac And Cheese Mastery
Homemade Hamburger Helper Recipe (Hearty One-Pot Meal)
Crock Pot Chicken and Dumplings Recipe (Southern Comfort)
Baked Pesto Salmon Recipe (Easy Weeknight Meal)
Diced Chicken Breast Recipe (Stovetop Perfection)

Community Kitchen