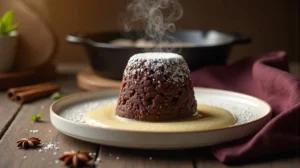
Wondrous Chocolate Depression Cake Mastered at Home
This legendary Chocolate Depression Cake is the epitome of simple, resourceful American baking. It delivers an unbelievably moist, dark chocolate experience without a single egg, stick of butter, or drop of milk in the cake batter itself. Relying on the perfect chemical marriage of cocoa, vinegar, and baking soda, this recipe transforms pantry staples into a deeply satisfying dessert. It remains tender for days, making it an ideal choice for meal prepping or serving a crowd when you need maximum flavor with minimal effort. It’s comfort food rooted in history, perfected for the modern home baker.
restaurant_menu Ingredients
For the Wacky Cake Batter
For the Fudgy Glaze Frosting
hardware Essential Tools
8-inch by 8-inch square baking pan
Large mixing bowl
Whisk
Rubber spatula
Small saucepan
Wire cooling rack
format_list_numbered Preparation
Mixing and Preparing the Chocolate Depression Cake
Preheat your oven precisely to 350°F (175°C). Lightly grease and flour (or dust with cocoa) your 8x8 inch baking pan to ensure easy release later. In your large mixing bowl, thoroughly whisk together the flour, sugar, 1/4 cup cocoa powder, salt, and baking soda until no dry pockets remain. This step is vital for even leavening in this classic Chocolate Depression Cake.
Activating and Baking
Create three small indentations in the dry mixture. Pour the vanilla extract into one, the white vinegar into the second, and the vegetable oil into the third. Let this sit for 30 seconds to allow the vinegar to begin reacting with the baking soda. Immediately pour the 1 cup of hot water over everything and use the rubber spatula to gently fold the ingredients until just barely combined; stop mixing as soon as the flour disappears to maintain cake tenderness.
Baking and Frosting
Pour the batter into the prepared pan and bake on the center rack for 30 to 35 minutes, or until a wooden skewer inserted near the center comes out clean. Allow the cake to cool in the pan on a wire rack for a full 20 minutes before preparing the glaze. For the glaze, melt the butter in a small saucepan over low heat, remove from heat, and whisk in the remaining 1/4 cup cocoa powder, powdered sugar, milk, and vanilla until completely smooth and fudgy. Spread evenly over the slightly warm cake.
favorite You Might Also Love
Browse All arrow_forwardEffortless 2 Ingredient Orange Sherbet Masterpiece

Cowboy Cookie Recipe (Chewy & Loaded)

Mastering the Most Iconic Dishes Ap: A Culinary Road Trip

Apple Hand Pie Recipe (Flaky Golden Crust)
Easy Pecan Pastry Bars Recipe (Southern Classic)

Coastal Lemon Dream: My Atlantic Beach Pie Masterpiece
Try These Variations
The Coffee Infusion Variation
For an incredible depth of flavor that enhances the chocolate notes, substitute the 1 cup of hot water in the batter with 1 cup of very hot, freshly brewed black coffee. Coffee contains natural acids that interact beautifully with the cocoa, deepening the color and complexity, making this version taste remarkably like a high-end bakery item, far removed from its humble origins. You will notice the aroma during baking is intensely rich, reminiscent of a great Chocolate Basque Cheesecake base.
The Spice Cabinet Upgrade
To introduce warmth that echoes flavors found in a Cinna Bun Cake or autumnal bakes, add 1 teaspoon of ground cinnamon and a scant 1/4 teaspoon of cayenne pepper to the dry ingredients. The cinnamon offers a comforting, familiar spice, while the cayenne provides a barely detectable warmth on the finish, balancing the sweetness without making the cake taste spicy. This variation works exceptionally well when paired with the optional butter in the frosting.
Citrus Zest Enhancement
If you enjoy the brighter notes sometimes found in a Peach Upside Down Cake, add the zest of one full orange to the dry ingredients along with the vanilla and vinegar wells. The orange zest provides aromatic oils that lift the heavy chocolate flavor profile, creating a sophisticated flavor pairing that is unexpected in a Chocolate Depression Cake. Be careful not to include the white pith, as it will introduce bitterness.
Chef's Pro Tips
When incorporating the hot water, ensure it is truly hot—near boiling, but not aggressively boiling (which can scorch the cocoa). The heat is essential for dissolving the cocoa solids fully, a process known in professional kitchens as ‘blooming.’ This hydration step is what prevents a gritty texture and maximizes the dark, rich color and flavor payoff in your Chocolate Depression Cake.
Pay meticulous attention to your baking vessel. Because this cake lacks the structural support of eggs and butter, if you use a glass or ceramic pan instead of metal, you must reduce the oven temperature by 25°F (about 15°C) and test for doneness 5 minutes earlier. Glass retains heat much more aggressively than metal, and higher heat can cause the edges to set too quickly while the center remains raw, ruining the delicate crumb required for a successful Chocolate Depression Cake.
For the fudgy glaze, I recommend using a high-quality, European-style butter substitute if you are omitting dairy for maximum shine and mouthfeel. When mixing the powdered sugar into the melted butter/cocoa base, do not rush this process. Add the sugar slowly, ensuring each addition is fully incorporated before adding the next. This prevents air from being whipped into the frosting, which can cause it to become grainy or dry out prematurely once it sets on the cake.
If you decide to bake this as cupcakes (fill liners 2/3 full), reduce the baking time significantly—check them starting at 16 minutes. The increased surface area means they cook much faster, and you want them slightly underdone to maintain that signature moistness associated with the Chocolate Depression Cake. Underbaked cupcakes are easier to save than overbaked ones.
Storage Guide
Room Temperature Storage
For optimal texture, store the fully cooled and frosted Chocolate Depression Cake in the original 8×8 pan, covered tightly with plastic wrap followed by a layer of aluminum foil to block air exchange. Keep it in a cool, dark pantry away from heat sources. Because of the oil content, it maintains its superior moisture for a full three days this way, which is highly unusual for an eggless cake.
Refrigerator Storage (Use with Caution)
If your kitchen is extremely warm or humid (above 75°F), you may refrigerate. However, refrigeration will accelerate starch retrogradation, making the crumb firmer. To combat this, wrap the cake extremely well—slice first, then wrap individual portions tightly in plastic wrap, then place them inside a zip-top freezer bag, pressing out all the air. Thaw slices on the counter for at least 2 hours before serving.
Freezing for Future Enjoyment
This cake freezes exceptionally well, making it perfect for holiday baking preparation. Once cooled completely, frost the cake, then chill uncovered for 30 minutes so the glaze firms up. Wrap the entire cake tightly in two layers of plastic wrap, followed by a heavy-duty foil layer to prevent freezer burn. Freeze for up to 60 days. When ready to serve, move the wrapped cake to the refrigerator overnight (about 12 hours) to thaw slowly, then allow it to come to room temperature before serving for the best texture.
Avoid These Mistakes
✕ Using Dutch-processed cocoa powder instead of natural unsweetened cocoa powder is a frequent error that compromises structure. Natural cocoa powder is acidic, and it requires a base (baking soda) to create lift. Dutch-processed cocoa has been neutralized, meaning it needs a different leavening system (like baking powder). If you use Dutch-process here, your Chocolate Depression Cake will likely collapse into a dense, heavy brick because the chemical reaction necessary for rising will not occur properly.
✕ Failing to properly whisk the dry ingredients before adding any liquid is a recipe for uneven baking. Since this cake relies entirely on the baking soda/vinegar reaction for its aeration, if the baking soda is clumped in one corner, that area will rise aggressively while the rest of the cake remains flat, leading to a lopsided final product. Take the extra 60 seconds to ensure the salt, soda, flour, and cocoa are perfectly integrated before moving on to the liquid additions.
✕ Overmixing the batter after the wet and dry ingredients meet is the most common structural mistake. Once the liquid hits the flour, gluten development begins. Because this recipe has no eggs or butter to tenderize the developing gluten strands, overmixing results in a tough, chewy, and noticeably dense crumb that completely misses the light, tender goal of the original Chocolate Depression Cake. Mix only until the last visible streak of dry ingredient vanishes—no more, no less.
✕ Not using hot water for the final liquid component is a missed opportunity for flavor development. The heat from the water is crucial for blooming the cocoa powder. Cold water will leave the cocoa particles partially dry and flavorless, resulting in a cake that tastes flat or dusty. Hot water ensures the cocoa fully dissolves into the batter, yielding that deep, complex, almost burnt-sugar note that makes this simple Chocolate Depression Cake so beloved.
nutrition Nutrition Facts
Per serving: 1/9th of cake
Nutrition facts are estimated based on ingredients listed and do not account for optional substitutions.
flag Conclusion
There you have it—the Chocolate Depression Cake, transformed from a recipe of necessity into a centerpiece of modern home baking. This cake is proof that culinary excellence doesn’t require expensive ingredients; it requires understanding the science and respecting the few components you do use. I hope you feel the pride I feel every time I pull this dark, moist beauty from the oven, knowing I’ve honored a true piece of American culinary history right here in my own kitchen. Go ahead, make it your own, perhaps try that coffee variation next time, and share the joy of this simple, profound dessert!
Visit HomeRecipes.com often for more foundational recipes that unlock world-class flavor using everyday ingredients. Happy Baking!
Frequently Asked Questions
Why do I need vinegar in a chocolate cake recipe? expand_more
The vinegar is absolutely essential in this specific Chocolate Depression Cake because it acts as the primary leavening agent, replacing the function of eggs. When the acidic vinegar comes into contact with the alkaline baking soda, it triggers a rapid chemical reaction that produces carbon dioxide gas. These gas bubbles get trapped within the batter, expanding when heated in the oven to give the cake its lift and light texture. Since the flavor of the vinegar completely bakes off, you are left only with the structural benefit, making it a crucial, non-negotiable ingredient.
Can I skip the hot water and use cold water or milk instead? expand_more
You must use hot water, or at minimum, very warm water. The reason we rely on heat here is to 'bloom' the cocoa powder. Cocoa powder is quite stubborn; if added cold, it tends to remain powdery and result in a dusty, underdeveloped flavor. Hot water dissolves the cocoa solids completely, allowing the flavor compounds to release fully into the batter, yielding that deep, signature dark chocolate richness that defines a perfect Chocolate Depression Cake. Using milk instead introduces dairy fat, which changes the chemical balance and will likely result in a denser cake texture.
What is the difference between this and a 'Wacky Cake'? expand_more
Functionally, there is virtually no difference; 'Wacky Cake' and 'Depression Cake' are often used interchangeably for this exact recipe structure. The term 'Wacky Cake' sometimes refers to the method of mixing directly in the pan (creating little wells for the wet ingredients), while 'Depression Cake' emphasizes the historical context of ingredient scarcity. Both terms refer to a quick, eggless, dairy-free cake reliant on the vinegar/baking soda reaction. If you see a recipe called 'War Cake,' it is also the same concept, often originating from wartime rationing periods when ingredients were limited.
Can I use this batter to make a layer cake? expand_more
While the texture is fantastic, I advise against using this recipe for traditional stacked layer cakes. As mentioned, the structure relies solely on chemical leavening, which produces a very tender, somewhat fragile crumb compared to cakes leavened with creamed butter and eggs. If you were determined to make layers, I would recommend reducing the liquid slightly and using two 8-inch round pans, baking for a shorter time (around 25 minutes). However, for the best results and structure, this Chocolate Depression Cake shines brightest as a single-layer sheet cake.
My cake is too sweet—how can I balance the flavor? expand_more
If the sweetness is overpowering, it usually means the cocoa powder you used was not robust enough, or you need more acid to balance it out. In the cake batter, try reducing the granulated sugar by 2 tablespoons and increasing the vinegar by 1/2 teaspoon. For the frosting, which is often the sweetest component, reduce the powdered sugar by 1/4 cup and replace it with 1 tablespoon of strong, cooled espresso powder whisked into the mixture. This adds bitterness and complexity, mirroring the profile found in high-end desserts like a Chocolate Basque Cheesecake, thereby balancing the overall presentation of your Chocolate Depression Cake.
More Recipes You'll Love

Mastering What Is Chantilly Cream: The Ultimate Guide
Ultimate No Bake Chocolate Oat Bars Masterclass
Tropical Coconut Dream Cake: Southern Summer Indulgence
The Definitive Guide: What is Figgy Pudding? (Holiday Classic)

The Ultimate Christmas Fruitcake Recipe: A Festive Delight

Community Kitchen