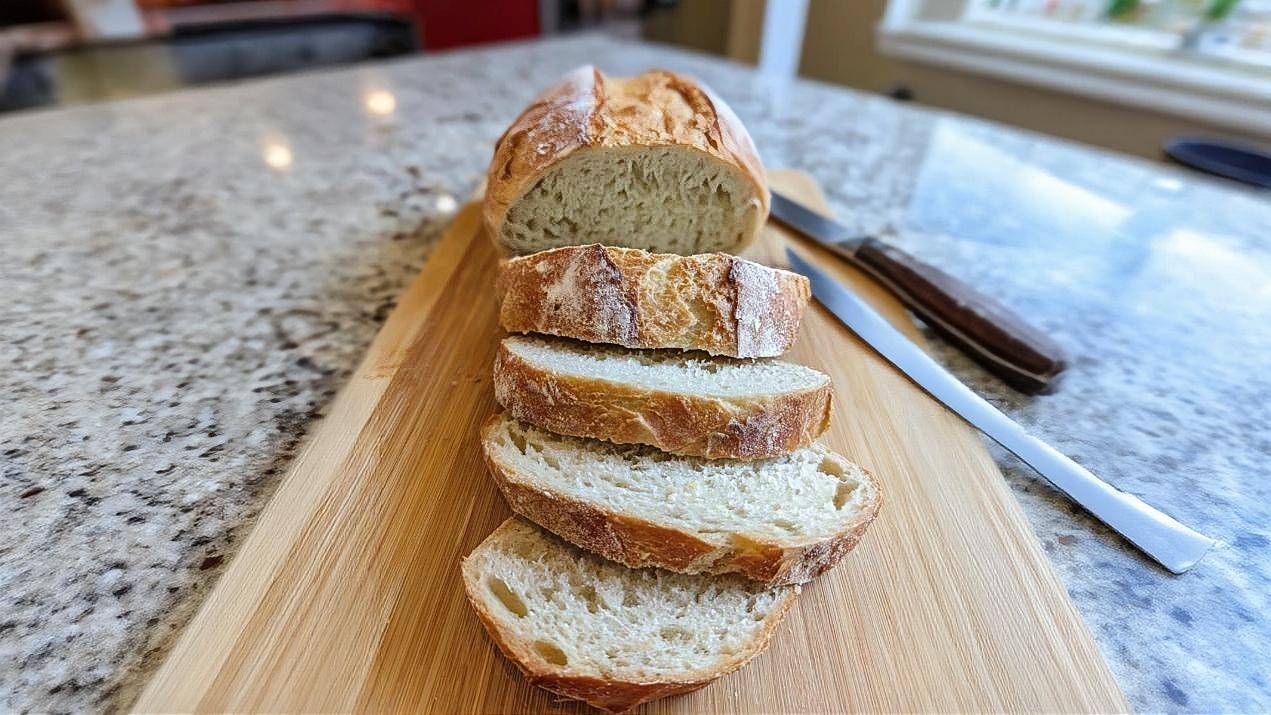
Farmhouse Style Sourdough Bread Recipe (Rustic & Hearty)
Unlock the secrets to baking a truly authentic Farmhouse Style Sourdough Bread. This recipe, crafted by a Michelin-trained chef, guides you through creating a rustic, hearty loaf featuring a wonderfully tangy flavor, a perfectly chewy crumb, and a crisp, golden-brown crust. Ideal for both novice and experienced bakers, it transforms simple ingredients into a masterpiece of home baking, perfect for any meal.
restaurant_menu Ingredients
Dough Ingredients
For Dusting
hardware Essential Tools
Large mixing bowl
Damp kitchen towel or plastic wrap
Bench scraper
Banneton (proofing basket) or bowl lined with a floured kitchen towel
Plastic bag or shower cap for covering dough
Dutch oven with lid (or baking stone/heavy baking sheet with a metal pan for steam)
Sharp lame or razor blade
Wire cooling rack
Oven mitts
format_list_numbered Preparation
Making the Dough
In a very large mixing bowl, combine the bread flour and lukewarm water until a shaggy dough forms and no dry spots remain.
Cover the bowl with a damp kitchen towel or plastic wrap and let it rest at room temperature for 30 minutes to 1 hour for the autolyse.
Add the active sourdough starter to the dough, dimpling it in with wet fingers, then gently folding to distribute.
Sprinkle the fine sea salt over the dough, and with wet hands, gently squeeze and fold the dough for 2-3 minutes to incorporate the salt.
Cover the bowl again and let the dough rest for another 30 minutes.
Building Strength (Bulk Fermentation)
Over the next 2-3 hours, perform 4 sets of stretch and folds, spaced 30 minutes apart.
For each set, with wet hands, grab a portion of dough from the edge, stretch it upwards, and fold it over to the center.
Rotate the bowl a quarter turn and repeat this process 3-4 times until you've gone all the way around the dough.
After the last set of stretch and folds, cover the bowl and let the dough continue bulk fermenting at room temperature (ideally 75-80°F / 24-27°C) for another 2-4 hours, or until it has increased in volume by about 20-30% and looks visibly gassy.
Shaping and Baking
Lightly flour your work surface and gently turn the dough out. Pre-shape it into a loose round or rectangle using a bench scraper, then let it rest uncovered for 20-30 minutes to relax the gluten.
Lightly flour your banneton or a bowl lined with a floured kitchen towel with whole wheat or rice flour.
Gently shape the dough into its final round or oval form, then transfer it, seam-side up, into the prepared banneton.
Cover the banneton with plastic wrap or place it in a plastic bag and refrigerate for a cold proof of 12-18 hours (up to 24 hours).
Preheat your oven to 450°F (232°C) with your Dutch oven inside for at least 30-45 minutes.
Carefully remove the hot Dutch oven. Gently invert the cold dough from the banneton directly into the Dutch oven.
Score the top of the dough with a sharp lame or razor blade, about 1/2 inch deep.
Cover with the lid and bake for 20 minutes.
Remove the lid, reduce the oven temperature to 425°F (218°C), and continue baking for another 25-35 minutes, or until the crust is a deep golden-brown and the internal temperature reaches 200-210°F (93-99°C).
For an extra crispy crust, turn off the oven and leave the bread inside with the door slightly ajar for an additional 10-15 minutes.
Immediately transfer the baked Farmhouse Style Sourdough Bread to a wire cooling rack and let it cool completely for at least 2-3 hours before slicing.
favorite You Might Also Love
Browse All arrow_forward
Ultimate Creamy Chicken and Gnocchi Recipe: A Family Favorite

Texas Steak Rolls Recipe (Grilled & Juicy)
Mastering Trash Bread: The Ultimate Comfort Food Bake
Traditional Spotted Dick Recipe: A Classic English Pudding

Creamy Buckeye Dip Recipe

Unearthing 5 Classic General Mills Discontinued Cereals
Try These Variations
Seeded Sourdough
For a delightful texture and nutty flavor in your Farmhouse Style Sourdough Bread, incorporate 1/4 cup of mixed seeds (such as sesame, poppy, sunflower, or flax seeds) into the dough during the initial mixing phase with the salt. You can also sprinkle some on the outside of the loaf just before the cold proof for a beautiful visual appeal. The seeds add a lovely crunch and extra nutritional value, making each bite more interesting.
Herb & Garlic Sourdough
Infuse your farmhouse style sourdough bread with aromatic herbs and garlic. During the second set of stretch and folds, gently fold in 2 tablespoons of finely chopped fresh rosemary or thyme, and 1-2 cloves of minced garlic. The herbs will release their oils and meld beautifully with the tangy sourdough, creating an incredibly fragrant and flavorful loaf that pairs wonderfully with Italian or Mediterranean dishes.
Whole Wheat Blend
For a heartier, more robust Farmhouse Style Sourdough Bread, substitute 1/4 to 1/2 cup of the bread flour with whole wheat flour. This will increase the fiber content and add a deeper, nuttier flavor profile. Be aware that whole wheat flour absorbs more water, so you might need to add an extra tablespoon or two of water to achieve the desired dough consistency during the autolyse phase.
Chef's Pro Tips
Don’t Be Afraid of Hydration
Many home bakers fear wet dough, but higher hydration is key to an open, airy crumb in your Farmhouse Style Sourdough Bread. While it might be sticky at first, developing gluten through gentle stretch and folds will transform it. Lightly wet your hands instead of flouring them constantly to avoid incorporating too much extra flour, which can lead to a dense crumb. The stickiness is a sign of good hydration, which ultimately yields a more tender and flavorful loaf.
Listen to Your Dough, Not Just the Clock
Sourdough baking is more about observing your dough than strictly adhering to timings. Factors like ambient temperature, starter strength, and flour type can significantly alter fermentation speed. Instead of relying solely on the time given in the recipe, look for visual cues: Has the dough increased in volume by 20-30% during bulk fermentation? Does it feel light and airy? Does it pass the float test? These observations are far more reliable than a timer for your farmhouse style sourdough bread.
Master the Scoring Technique
A proper score not only looks beautiful but also dictates how your Farmhouse Style Sourdough Bread will expand in the oven. Use a very sharp razor blade or a specialized lame. Make a swift, confident cut about 1/2 inch deep. Don’t hesitate or saw at the dough, as this can tear the surface. A clean, decisive cut allows the steam to escape in a controlled manner, preventing unwanted blowouts and encouraging the formation of a gorgeous ‘ear’ on your loaf. Practice makes perfect!
Storage Guide
Room Temperature
Once your Farmhouse Style Sourdough Bread has completely cooled, store it at room temperature for optimal freshness. For the first 1-2 days, simply place the cut side down on a clean cutting board, or wrap the entire loaf loosely in a clean linen towel. This allows air circulation while preventing the cut surface from drying out too quickly. Avoid airtight containers immediately after baking, as this can trap moisture and soften the crust. Stored this way, your farmhouse style sourdough bread will maintain its excellent flavor and texture for up to 3 days.
Airtight Container/Bread Box
For longer storage at room temperature (up to 4-5 days), transfer your cooled Farmhouse Style Sourdough Bread to a dedicated bread box or a large, airtight container. This helps to slow down the staling process by limiting exposure to air. If the crust starts to soften, a quick refresh in a hot oven (350°F or 175°C for 5-10 minutes) can often bring back some of its crispiness. Ensure the bread is fully cooled before placing it in an airtight container to prevent condensation and mold.
Freezer
Sourdough freezes exceptionally well, making it perfect for meal prepping. To freeze, allow the bread to cool completely. For a whole loaf, wrap it tightly in aluminum foil, then place it in a large freezer-safe plastic bag. For individual servings, slice the bread first, then wrap each slice tightly in plastic wrap before placing them in a freezer bag. This prevents freezer burn and makes it easy to grab just what you need. Frozen Farmhouse Style Sourdough Bread can be stored for up to 3 months. To reheat, you can toast slices directly from frozen, or for a whole loaf, remove foil and thaw at room temperature for an hour, then refresh in a 350°F (175°C) oven for 10-15 minutes until warmed through and crusty.
Avoid These Mistakes
✕ Using an Inactive Sourdough Starter
One of the most common pitfalls in sourdough baking is using a starter that isn’t at its peak activity. If your starter hasn’t at least doubled in size after feeding, or if it sinks in water during the float test, it won’t have enough leavening power to make your Farmhouse Style Sourdough Bread rise properly. This leads to a dense, flat, and often gummy loaf. Always ensure your starter is robust and bubbly before mixing your dough, feeding it 4-8 hours prior to use.
✕ Under- or Over-Proofing
This is a delicate balance. Under-proofed dough hasn’t developed enough gas, resulting in a dense crumb and poor oven spring. Over-proofed dough, on the other hand, has exhausted its fermentable sugars, causing the gluten structure to weaken and collapse, also leading to a dense loaf or one that spreads rather than rises. Learn to recognize the signs: a properly proofed dough should be jiggly, slightly domed, and show some bubbles on the surface, increasing in volume by about 20-30% during bulk fermentation for your farmhouse style sourdough bread.
✕ Not Hydrating Flour Properly (Skipping Autolyse)
Rushing the initial mixing of flour and water (autolyse) can lead to a less extensible dough and a tougher crumb. The autolyse step allows the flour to fully hydrate and enzymes to start breaking down starches, which initiates gluten development without any mechanical kneading. Skipping this step means you’ll have to work the dough harder later, potentially tearing the delicate gluten network and hindering the open crumb structure of your farmhouse style sourdough bread.
✕ Cutting the Bread Too Early
It’s incredibly tempting to slice into a warm loaf of Farmhouse Style Sourdough Bread straight from the oven, but resist! The bread continues to cook as it cools, and the internal structure is still setting. Slicing it too early allows steam to escape too quickly, resulting in a gummy, wet interior texture. Always let your sourdough cool completely on a wire rack for at least 2-3 hours. This patience is rewarded with a superior texture and flavor.
nutrition Nutrition Facts
Per serving: 1 slice
Nutritional values are estimates and may vary based on specific ingredient brands and preparation.
flag Conclusion
And there you have it, my friends! A step-by-step guide to baking a magnificent Farmhouse Style Sourdough Bread right in your own kitchen. This isn’t just about following a recipe; it’s about embracing a process, understanding your ingredients, and connecting with a timeless culinary art. There’s immense joy and satisfaction in pulling a perfectly baked loaf from your oven, filling your home with that incredible aroma. I encourage you to try this recipe, experiment, and make it your own. Share it with loved ones, and savor every wholesome bite. Here at HomeRecipes.com, we believe everyone can be a master baker, and this farmhouse style sourdough bread is your next delicious triumph. Happy baking!
sell Related Topics
Frequently Asked Questions
How do I know my sourdough starter is active enough for baking Farmhouse Style Sourdough Bread? expand_more
A truly active sourdough starter, often referred to as 'ripe,' is crucial for a successful loaf. After feeding your starter, it should show significant signs of life within 4-8 hours. Look for abundant bubbles on the surface and throughout the mixture, indicating robust yeast activity. A good test is the 'float test': drop a small spoonful of your starter into a glass of water. If it floats, it's ready to go! If it sinks, it likely needs more time to develop strength, or perhaps another feeding. A strong starter ensures good oven spring and a light, airy crumb in your farmhouse style sourdough bread.
Why is my Farmhouse Style Sourdough Bread dense and not airy? expand_more
A dense sourdough loaf is a common frustration, and it usually points to one of a few issues. The most frequent culprit is an under-active starter that didn't provide enough leavening power. Ensure your starter passes the float test before using. Another common reason is under-proofing during bulk fermentation or cold proofing – the dough didn't have enough time to develop sufficient gas. Conversely, over-proofing can also lead to a dense crumb, as the gluten structure weakens and can't hold the gas. Lastly, insufficient gluten development due to not enough stretch and folds, or overworking the dough, can prevent it from trapping gas effectively, resulting in a brick-like texture.
Can I make this Farmhouse Style Sourdough Bread without a Dutch oven? expand_more
Absolutely! While a Dutch oven is highly recommended for creating that perfect steamy environment for oven spring, you can achieve excellent results without one. The key is to create steam in your oven. You can place your shaped dough on a preheated baking stone or heavy baking sheet. To generate steam, place a metal pan on the bottom rack of your oven while preheating. Just before you put the bread in, carefully pour 1 cup of boiling water into the hot pan to create a burst of steam. Be cautious when doing this to avoid steam burns. Bake with steam for the first 20 minutes, then remove the steam pan for the remainder of the bake to achieve a crisp crust on your farmhouse style sourdough bread.
What's the ideal temperature for bulk fermentation of sourdough? expand_more
The ideal temperature for bulk fermentation, also known as the first rise, for your Farmhouse Style Sourdough Bread is typically between 75-80°F (24-27°C). This temperature range encourages optimal activity from both the wild yeast and lactic acid bacteria in your sourdough starter, leading to good gas production and complex flavor development. If your kitchen is cooler, fermentation will take longer; if it's warmer, it will be faster. I often use my oven with just the light on as a makeshift proofing box if my kitchen is chilly, or place the bowl in a warm spot, like on top of the refrigerator. Monitoring the dough's expansion and texture, rather than just the clock, is crucial.
My sourdough crust is too pale or not as crispy as I'd like. What can I do? expand_more
A pale or soft crust on your Farmhouse Style Sourdough Bread can be disappointing, but it’s usually an easy fix. Several factors contribute to a deep, crispy crust. First, ensure your oven and Dutch oven (if using) are fully preheated to the specified high temperature. A hot start is vital for that initial burst of steam and rapid crust development. Second, make sure you're baking long enough after removing the lid. If the crust isn't golden brown, continue baking for an additional 5-10 minutes, or even more, watching it closely. For extra crispiness, try turning off the oven after the main bake and leaving the bread inside with the door slightly ajar for an extra 10-15 minutes. Also, ensure there's enough steam during the initial bake; this keeps the crust pliable, allowing for maximum expansion before it sets.
More Recipes You'll Love

Baked Roasted Garlic Dip Recipe

Mastering Homemade Hibachi Vegetables: Restaurant Flavor Now
Mastering Fluffy 2 Ingredient Biscuits: Ultimate Southern Shortcut

No-Bake Biscoff Cheesecake: A Dreamy 5-Ingredient Dessert

Homemade Pickle Salsa Recipe

Community Kitchen