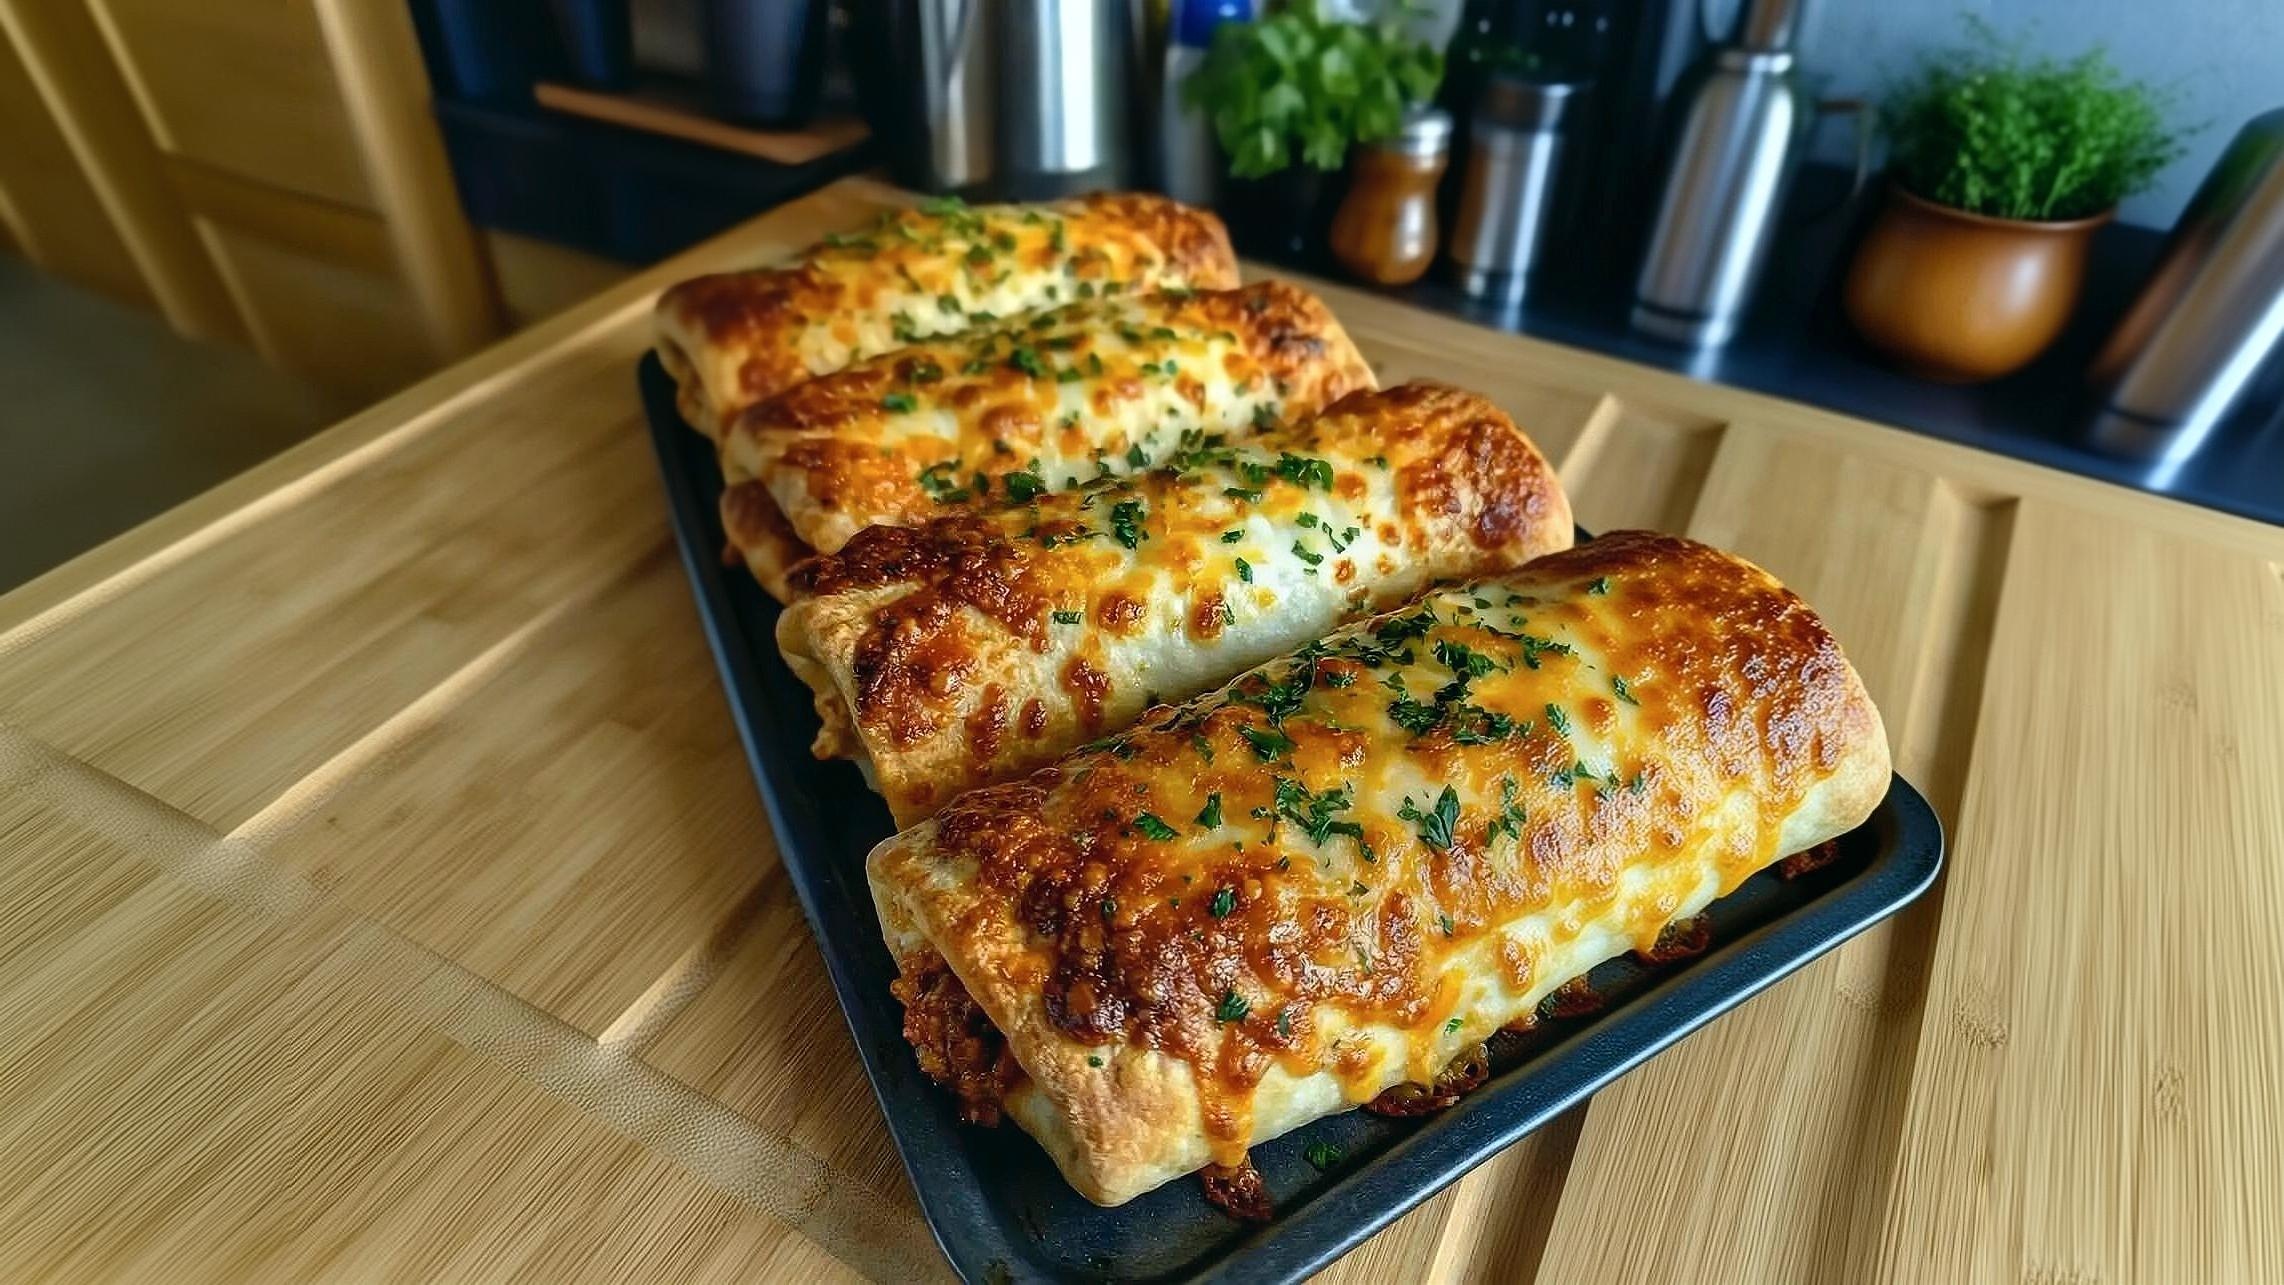
Cheesy Taco Sticks Recipe (Family Favorite)
Experience the ultimate comfort food fusion with these Cheesy Taco Sticks! Savory, perfectly seasoned ground beef and a melty blend of mozzarella and cheddar cheese are encased in a golden, crispy pizza dough crust. Brushed with garlic butter and baked to perfection, these handheld delights are an absolute crowd-plepleaser for any occasion, from game nights to quick family dinners. This recipe brings restaurant-quality Tex-Mex flavor straight to your American kitchen with minimal fuss and maximum deliciousness.
restaurant_menu Ingredients
For the Taco Filling
For Assembling & Topping
Optional for Serving
hardware Essential Tools
Large skillet
Wooden spoon or spatula
Cutting board
Sharp knife or pizza cutter
Rolling pin
Large baking sheet
Parchment paper
Small bowl
Pastry brush
format_list_numbered Preparation
Crafting the Taco Filling
Heat 1 tbsp olive oil in a large skillet over medium heat. Add the finely diced onion and cook for 2-3 minutes until softened and translucent, stirring occasionally.
Add the minced garlic and cook for an additional 30 seconds, being careful not to burn it.
Add the 1 lb ground beef to the skillet. Break it up with a wooden spoon as it cooks until fully browned and no pink remains, about 6-8 minutes.
Tilt the skillet and carefully drain off any excess fat from the browned beef.
Stir in 1 tbsp chili powder, 1 tsp ground cumin, 1/2 tsp smoked paprika, 1/2 tsp kosher salt, and 1/4 tsp black pepper. Cook for 1 minute, stirring constantly, allowing the spices to toast and become fragrant.
Pour in 1/4 cup water. Bring the mixture to a gentle simmer and cook for 2-3 minutes, or until most of the liquid has evaporated and the filling has thickened.
Remove the skillet from the heat and let the taco filling cool slightly for 10-15 minutes.
Assembling the Cheesy Taco Sticks
Preheat your oven to 375°F (190°C). Line a large baking sheet with parchment paper.
Unroll the 1 can of refrigerated pizza dough onto a lightly floured surface. Using a rolling pin, gently roll it into a rectangle, roughly 10x15 inches.
Using a sharp knife or pizza cutter, cut the dough into 10 equal strips, each about 1 1/2 inches wide.
Spoon a generous line of the cooled taco filling down the center of each dough strip.
Top the filling with a sprinkle of 1 1/2 cups shredded mozzarella cheese and 1 cup shredded cheddar cheese.
Carefully fold one side of the dough over the filling, then fold the other side over, overlapping slightly. Firmly pinch the edges together along the entire length of the stick to create a tight seal.
Place the assembled sticks seam-side down onto the prepared baking sheet, ensuring they have at least an inch of space between them.
Baking to Golden Perfection
In a small bowl, melt 2 tbsp unsalted butter. Stir in 1/2 tsp garlic powder and 1/2 tsp dried parsley.
Brush this butter mixture generously over the tops of each taco stick.
Transfer the baking sheet to your preheated oven. Bake for 12-15 minutes, or until the dough is puffed, golden brown, and cooked through, and the cheese is bubbly and melted.
Remove the cheesy taco sticks from the oven and let them cool on the baking sheet for 5 minutes before serving.
favorite You Might Also Love
Browse All arrow_forwardMastering Weeknight Wonders: Six Essential Recipes
Homestyle Cornbread Chicken Casserole Masterpiece
Velvet Chicken Alchemy: Slow Cooker Million Dollar Chicken
Savory Cottage Cheese Pie Recipe (Versatile & Easy)

Hearty German Cabbage and Dumplings

Deviled Egg Potato Salad Recipe (Creamy Classic)
Try These Variations
Spicy Kick Cheesy Taco Sticks
For those who love a little heat, add 1/2 to 1 teaspoon of finely minced jalapeño or serrano pepper to the ground beef filling along with the garlic and onion. You can also mix in a pinch of cayenne pepper with the other spices. Alternatively, serve with a side of your favorite hot sauce or a spicy crema made with sour cream and a dash of chipotle powder. This variation adds a vibrant, fiery dimension to the classic cheesy taco sticks.
Vegetarian Black Bean & Corn Cheesy Taco Sticks
Replace the ground beef with 1 can (15 ounces) of drained and rinsed black beans, mashed slightly, and 1/2 cup of sweet corn kernels. Sauté the onion and garlic, then add the beans, corn, and all the taco seasonings, cooking until heated through and slightly thickened. This makes for a hearty, flavorful, and equally satisfying vegetarian version of cheesy taco sticks.
Chicken Fajita Cheesy Taco Sticks
Instead of ground beef, use 1 pound of finely diced cooked chicken breast or rotisserie chicken. Sauté bell peppers (red, yellow, green) and onions until tender, then add the diced chicken and the taco seasonings. This variation brings a fresh fajita flavor profile to your cheesy taco sticks, offering a lighter yet still incredibly delicious option. Serve with extra lime wedges for squeezing.
Chef's Pro Tips
Achieving the Perfect Golden Crust
For a truly golden-brown and crispy crust on your Cheesy Taco Sticks, ensure your oven is fully preheated to 375°F (190°C). Oven temperature fluctuations can lead to pale, undercooked dough. Also, the melted butter, garlic powder, and parsley mixture brushed on top isn’t just for flavor; the fat in the butter aids in browning through the Maillard reaction, giving you that desirable rich color and inviting aroma. Don’t skimp on this step!
Preventing Cheese from Oozing
The most common issue with cheesy fillings is leakage. To prevent your delicious cheese from oozing out of your Cheesy Taco Sticks during baking, it is paramount to firmly pinch and seal the edges of the pizza dough. Think of it like creating a strong seam on a pastry. A good seal ensures the cheese stays trapped inside, creating those satisfying gooey pockets when you bite in, and preventing a messy baking sheet.
Optimal Filling Consistency
The consistency of your taco filling is critical for easy assembly and a well-structured cheesy taco stick. After simmering with water and spices, the filling should be thick enough that it’s not watery or soupy. A drier, well-cooked filling will not make the dough soggy and will hold its shape better within the dough. If your filling seems too wet, continue to simmer it for a few more minutes until the liquid has mostly evaporated, ensuring a perfect texture for your cheesy taco sticks.
Storage Guide
Room Temperature (Short-Term)
While best served warm, leftover Cheesy Taco Sticks can be kept at room temperature for up to 2 hours. After this time, for food safety reasons, they should either be refrigerated or discarded. Always ensure they are covered to prevent them from drying out or being exposed to contaminants, though the texture will soften considerably.
Refrigerator (3-4 Days)
To store leftover Cheesy Taco Sticks in the refrigerator, allow them to cool completely to room temperature first. Then, place them in an airtight container. For best results and to prevent sogginess, you can place a layer of paper towels at the bottom of the container to absorb any condensation. Reheat in the oven or air fryer for best texture, as microwaving can make them chewy.
Freezer (2-3 Months)
For longer storage, Cheesy Taco Sticks freeze beautifully. Once completely cooled, arrange the sticks in a single layer on a baking sheet and freeze until solid (about 1-2 hours). This prevents them from sticking together. Transfer the frozen sticks to a freezer-safe bag or container, separating layers with parchment paper. Label with the date. Thaw overnight in the refrigerator before reheating, or reheat directly from frozen in the oven, adding extra baking time.
Avoid These Mistakes
✕ Overfilling the Dough
A common mistake is spooning too much taco filling onto each dough strip. This makes it incredibly difficult to seal the edges tightly, leading to the filling bursting out during baking and creating a messy, less attractive cheesy taco stick. Aim for a moderate amount that allows the dough to comfortably overlap and seal, usually a tablespoon or two per strip, leaving about a half-inch margin on each side.
✕ Not Draining Excess Fat
Failing to drain the excess fat from the ground beef after browning is a critical error. Too much fat will saturate the pizza dough, making it greasy, heavy, and preventing it from baking up light and crispy. This results in a soggy, unappetizing texture rather than the desired crisp exterior of a perfect cheesy taco stick. Always tilt the pan and carefully pour off any rendered fat.
✕ Working with Hot Filling
As tempting as it is to rush, assembling the cheesy taco sticks with hot filling is a mistake. The heat from the filling can cause the refrigerated pizza dough to become overly soft, sticky, and difficult to work with, making it prone to tearing. This leads to a frustrating assembly process and potentially compromised seals. Always allow your taco filling to cool for at least 10-15 minutes before you begin filling the dough strips.
nutrition Nutrition Facts
Per serving: 1 taco stick
Nutritional values are estimates and may vary based on specific ingredient brands and preparation methods.
flag Conclusion
There you have it, my friends – a recipe for Cheesy Taco Sticks that’s sure to become a cherished part of your family’s meal rotation. These delightful handheld treats are proof that comfort food can be both exciting and easy to make. Whether you’re serving them for a game night, a casual dinner, or packing them in a lunchbox, they’re guaranteed to disappear quickly. Don’t be afraid to experiment with different cheeses or add a touch more heat if you dare! Here at HomeRecipes.com, we encourage you to make every dish your own. Happy cooking!
sell Related Topics
Frequently Asked Questions
How do I prevent the Cheesy Taco Sticks from getting soggy? expand_more
The key to preventing soggy taco sticks lies in a few crucial steps. First, ensure you thoroughly drain the fat from the ground beef filling. Excess grease is the main culprit. Second, allow the filling to cool slightly before assembling; hot filling can prematurely soften the dough. Finally, don't overcrowd your baking sheet; proper air circulation is vital for a crispy crust. If storing, place a paper towel in the container to absorb moisture.
Can I make Cheesy Taco Sticks ahead of time? expand_more
Absolutely! You can prepare the taco filling up to 2-3 days in advance and store it in an airtight container in the refrigerator. When you're ready to bake, simply assemble the cheesy taco sticks with the chilled filling and bake as directed. You can also assemble the unbaked sticks, place them on a parchment-lined baking sheet, and freeze until solid. Once frozen, transfer to a freezer bag and bake from frozen, adding an extra 5-10 minutes to the baking time.
What kind of ground beef is best for these taco sticks? expand_more
For this cheesy taco sticks recipe, I recommend using a lean ground beef, such as 90/10 or 93/7. This ratio ensures you get plenty of rich, beefy flavor without an excessive amount of fat, which can make the filling greasy and lead to a less desirable texture in the finished product. If you use a higher fat content, be extra diligent about draining the fat after browning.
Can I use homemade pizza dough instead of refrigerated? expand_more
Yes, you certainly can! If you have a favorite homemade pizza dough recipe, feel free to use it. Just ensure it's rolled out to a similar thickness and dimensions as the refrigerated dough (roughly 10x15 inches) before cutting into strips. Homemade dough can sometimes be a bit more elastic, so allow it to rest for a few minutes after rolling if it springs back too much. The beauty of these cheesy taco sticks is their adaptability!
Are there any vegetarian options for the filling? expand_more
Of course! You can easily adapt this cheesy taco sticks recipe for a vegetarian diet. Instead of ground beef, use a plant-based ground substitute, or a mixture of finely diced mushrooms and black beans seasoned with the same taco spices. Cook it down until it's thick and flavorful, just like the beef filling. Lentils or crumbled firm tofu would also work wonderfully as a hearty, protein-rich vegetarian option for your cheesy taco sticks.
More Recipes You'll Love

Creamy Baked Poor Man’s Steak: 4-Ingredient Comfort
Mastering Homemade Spaghetti with Rich Meat Sauce
Crispy Chicken Fingers Recipe (Southern-Style)
Garlic Butter Shrimp Pasta: A Quick and Delicious Recipe

Community Kitchen