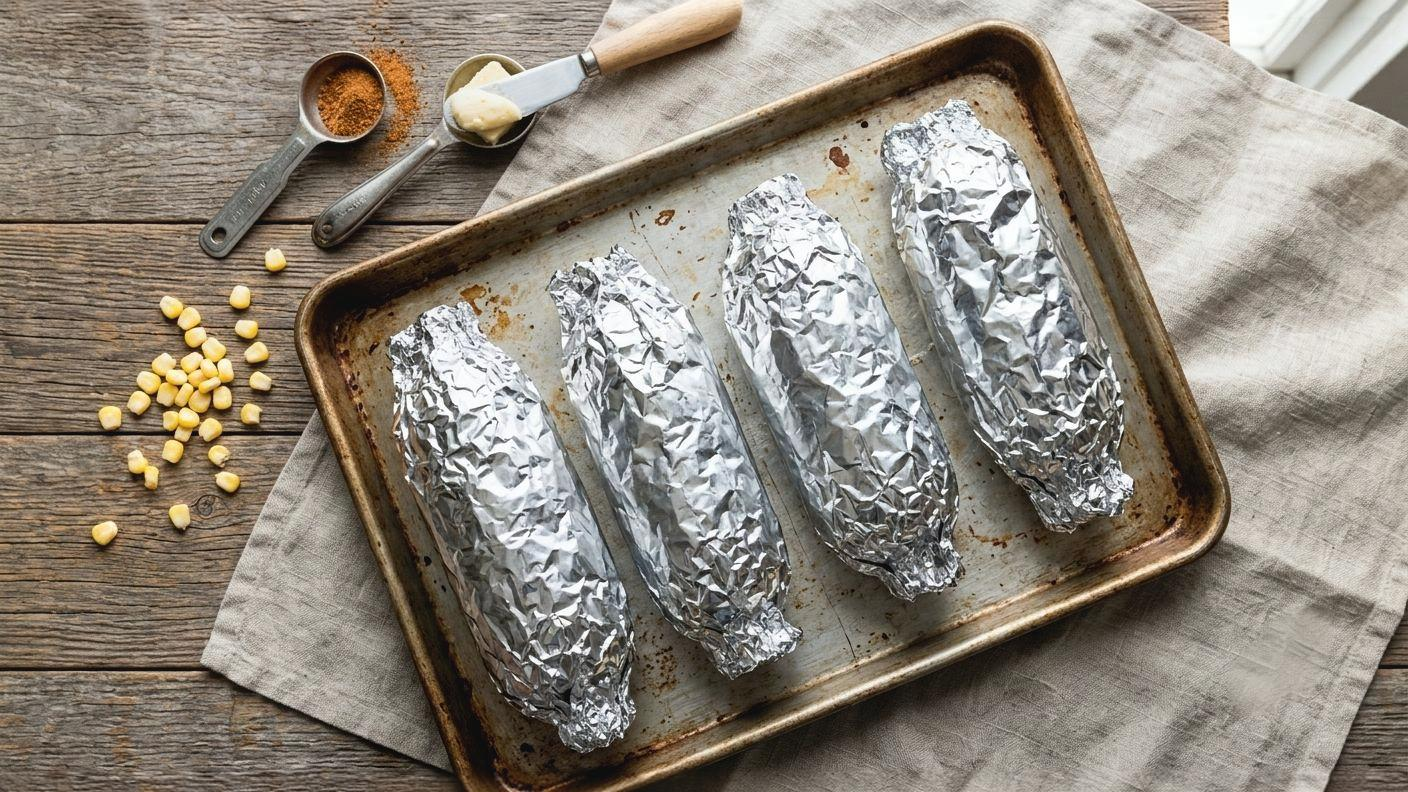
Roasted Corn on the Cob Recipe (Easy Oven)
Unlock the secret to incredibly tender and flavorful corn on the cob with this simple oven-roasting method. Each cob is lovingly coated in butter and seasonings, then baked to perfection within its own foil packet, ensuring every kernel is juicy and sweet. This fuss-free technique for how to bake corn on cob is a game-changer for weeknight dinners or entertaining, bringing that quintessential summer taste to your table any time of year.
restaurant_menu Ingredients
Main Ingredients
Optional Seasonings
hardware Essential Tools
Baking sheet
Aluminum foil
Small spatula or knife (for spreading butter)
Tongs (for turning corn)
Measuring spoons
format_list_numbered Preparation
Preparation & Baking
Preheat your oven to 425°F (220°C) and prepare a baking sheet.
Pat each shucked ear of corn dry with a paper towel.
Generously spread softened butter over each ear of corn, ensuring an even coating.
Season each buttered cob generously with kosher salt and black pepper, and any desired optional seasonings like Cajun spice, garlic powder, or cayenne pepper.
Individually wrap each seasoned ear of corn tightly in aluminum foil, sealing the ends to create a secure packet.
Place the wrapped corn cobs in a single layer on your prepared baking sheet.
Bake in the preheated oven for 25 minutes, carefully turning each cob over halfway through the cooking time (around 12-13 minutes) to ensure even cooking.
Remove the baking sheet from the oven and let the wrapped corn rest for 5 minutes before carefully unwrapping and serving.
favorite You Might Also Love
Browse All arrow_forward
Au Gratin Potatoes vs Scalloped Potatoes Recipe (The Ultimate Guide)

Classic Creamy Coleslaw, Just Like Your Favorite Fast Food Spot
Ultimate Creamy Parmesan Oven Baked Potatoes Masterpiece
Heirloom Comfort: Victorian Stewed Potatoes Recipe

Air-Fried Crispy Parmesan Cauliflower: An Irresistible Recipe

Wisconsin North Woods Inn Salad: Creamy Gorgonzola Dream
Try These Variations
Spicy Chili-Lime Corn
For a vibrant, zesty kick, after baking, unwrap the corn and squeeze fresh lime juice over each cob. Sprinkle with chili powder and a pinch of smoked paprika. You can also mix a touch of chili powder into the butter before baking. This variation brings a delightful tang and warmth, perfect for a summer BBQ. The acidity of the lime brightens the corn’s natural sweetness, making every bite incredibly refreshing. This is a fantastic way to elevate your simple bake corn on cob.
Herbed Parmesan Corn
Elevate your corn with aromatic herbs and savory cheese. Before baking, mix the softened butter with 1 tbsp of finely chopped fresh parsley, chives, or thyme, and 1/4 cup of grated Parmesan cheese. Spread this mixture over the corn before wrapping and baking. The herbs infuse the corn with fresh, earthy notes, while the Parmesan adds a salty, umami richness that caramelizes slightly during baking. This creates a gourmet side dish that feels incredibly indulgent, enhancing the experience of how to bake corn on cob.
Garlic Herb Butter Corn
A classic for a reason! Before baking, combine the softened butter with 2 cloves of minced fresh garlic (or 1/2 tsp garlic powder), 1 tbsp of finely chopped fresh rosemary or dill, and a squeeze of fresh lemon juice. Spread this fragrant butter generously over each cob. The garlic mellows and sweetens as it bakes, while the herbs release their essential oils, creating a deeply aromatic and flavorful corn. This simple addition transforms your everyday bake corn on cob into a culinary delight.
Chef's Pro Tips
Selecting the Freshest Corn
Always prioritize quality when it comes to corn. Look for husks that are bright green, tightly wrapped, and slightly damp. The silk should be golden or brown, not dry or black, and feel slightly sticky. A good, fresh ear of corn will feel heavy for its size. Fresher corn means more natural sugars and a superior texture, which translates to a much more delicious end product and an easier process to bake corn on cob.
The Importance of Softened Butter
Using truly softened butter (at room temperature) is crucial. If your butter is too cold, it won’t spread evenly, leading to patchy flavor and potential dryness in spots. Softened butter melts more uniformly, creating a consistent coating that locks in moisture and distributes seasonings effectively. This ensures every kernel is perfectly tender and infused with rich, buttery goodness, which is vital for a successful bake corn on cob.
Don’t Skimp on the Foil Seal
The aluminum foil wrap isn’t just for neatness; it creates a crucial steaming environment. A tight, secure seal ensures that the moisture released from the corn and the melted butter are trapped inside the packet. This steams the corn, making it incredibly tender and juicy, rather than allowing it to dry out. Any gaps or loose wraps will result in a less succulent finished product, so pay attention to this detail when you bake corn on cob.
Storage Guide
Refrigerator Storage (On the Cob)
To store leftover roasted corn on the cob, allow it to cool completely to room temperature. Once cool, wrap each cob individually in fresh aluminum foil or plastic wrap, or place them in an airtight container. Stored this way, the corn will remain fresh and delicious in the refrigerator for up to 3-4 days. Ensure it’s sealed well to prevent it from drying out or absorbing other odors from the fridge, maintaining its juicy quality.
Refrigerator Storage (Kernels)
If you prefer to remove the kernels, let the cobs cool, then carefully slice the kernels off using a sharp knife. Place the kernels in an airtight container. They will keep well in the refrigerator for up to 3-4 days. This method is convenient for adding corn to salads, salsas, or quick side dishes later in the week. Ensure the container is truly airtight to preserve freshness and texture.
Freezer Storage (Kernels)
For longer storage, cooked corn kernels freeze beautifully. After slicing the kernels off the cob and allowing them to cool, spread them in a single layer on a baking sheet lined with parchment paper. Freeze for 1-2 hours, or until solid. This prevents them from clumping together. Once frozen, transfer the kernels to a freezer-safe bag or airtight container, removing as much air as possible. Frozen kernels will maintain their quality for up to 3 months. When ready to use, simply reheat from frozen.
Avoid These Mistakes
✕ Using Old or Dry Corn
The biggest mistake is starting with corn that isn’t fresh. Older corn has lost much of its natural sugar and moisture, resulting in a starchy, tough, and less flavorful end product, no matter how perfectly you bake it. Always choose corn with vibrant green husks and moist silks; if the silks are dry and black, or the kernels are shriveled, pass on it. The freshness of the corn is paramount to a sweet and tender bake corn on cob.
✕ Not Sealing the Foil Properly
A common error is wrapping the corn loosely in foil or not sealing the ends tightly. The foil creates a steam oven, trapping moisture and allowing the corn to cook in its own juices and butter. If the seal isn’t tight, the steam escapes, leading to dry, sometimes rubbery corn. Ensure each cob is wrapped snugly and completely sealed to guarantee a tender, juicy outcome when you bake corn on cob.
✕ Under-Seasoning
Many home cooks are hesitant with seasoning, but corn needs a good amount of salt to bring out its natural sweetness. Not seasoning generously enough with kosher salt and pepper will result in bland corn. Don’t be afraid to add a good pinch of salt to each cob; it enhances the flavor dramatically without making it taste salty. This simple step makes a huge difference in the overall enjoyment of your bake corn on cob.
nutrition Nutrition Facts
Per serving: 1 ear
Nutritional values are approximate and may vary based on specific ingredients and portion sizes.
flag Conclusion
And there you have it, a perfectly roasted corn on the cob, ready to delight your taste buds. This method of how to bake corn on cob is simple, efficient, and yields consistently delicious results, proving that restaurant-quality flavor is truly achievable in your own kitchen. I encourage you to try this recipe, experiment with your favorite seasonings, and make it a staple in your culinary repertoire. Share your creations with us at HomeRecipes.com – happy cooking!
sell Related Topics
Frequently Asked Questions
Can I use frozen corn on the cob for this recipe? expand_more
Yes, you absolutely can use frozen corn on the cob for this recipe! While fresh is always preferred for its superior flavor and texture, frozen corn on the cob is a fantastic alternative, especially when fresh isn't in season. There's no need to thaw it beforehand; simply proceed with the recipe as written, increasing the baking time by about 5-10 minutes, or until the corn is tender. The foil wrapper will help steam it beautifully, even from frozen, ensuring a delicious result for your bake corn on cob.
How do I know when the corn is perfectly cooked? expand_more
The best way to tell if your corn on the cob is perfectly cooked is by its tenderness. After the recommended 25 minutes of baking and resting, carefully unwrap one ear and gently poke a kernel with a fork. It should be tender and yield easily. The kernels should also appear plump and slightly translucent, with a vibrant yellow color. If it still feels a bit firm, re-wrap it and bake for another 5-7 minutes, checking again. Overcooked corn can become mushy, so keep an eye on it!
What are some other seasoning ideas for roasted corn? expand_more
The possibilities for seasoning roasted corn are endless! Beyond the basic salt and pepper, consider a sprinkle of smoked paprika for a smoky depth, chili powder for a mild kick, or even a dash of Old Bay seasoning for a coastal flair. For a Mexican-inspired twist, try a squeeze of lime juice and a sprinkle of cotija cheese and chili powder after baking. A touch of fresh herbs like chopped chives or cilantro adds brightness. Don't forget that a sprinkle of finely grated Parmesan cheese can also add a savory, umami note to your bake corn on cob.
Can I prepare the corn ahead of time? expand_more
You can certainly do some prep work ahead of time to make serving easier. You can shuck the corn up to a day in advance and store it in the refrigerator in a plastic bag. You can also mix your butter with any desired seasonings (like garlic powder or Cajun seasoning) and have it ready to spread. However, I recommend buttering, seasoning, and wrapping the corn just before baking to ensure the freshest flavor and prevent the corn from drying out. The actual baking process is so quick and hands-off, it doesn't add much stress to your meal prep.
Why is my corn sometimes tough or dry after baking? expand_more
Tough or dry corn after baking often comes down to two main factors: either the corn wasn't fresh to begin with, or the foil wasn't sealed tightly enough. Older corn loses its natural moisture and sugars, resulting in a tougher texture when cooked. Always start with the freshest corn you can find. Secondly, a loose foil wrap allows steam to escape, which dries out the corn instead of gently steaming it. Ensure each cob is wrapped snugly and completely sealed. Also, avoid overbaking; while the foil helps, excessive time in the oven can still lead to dryness. This is why paying attention to the initial quality and sealing the foil properly is crucial for a tender bake corn on cob.
More Recipes You'll Love

Stick Of Butter Baked Rice Recipe (Golden & Fluffy)
Corn on the Cob Oven Recipe (Perfectly Roasted)
Irish Colcannon Recipe (Creamy & Hearty)
Cool Cucumber and Sour Cream Salad Recipe (Creamy & Fresh)
Community Kitchen