
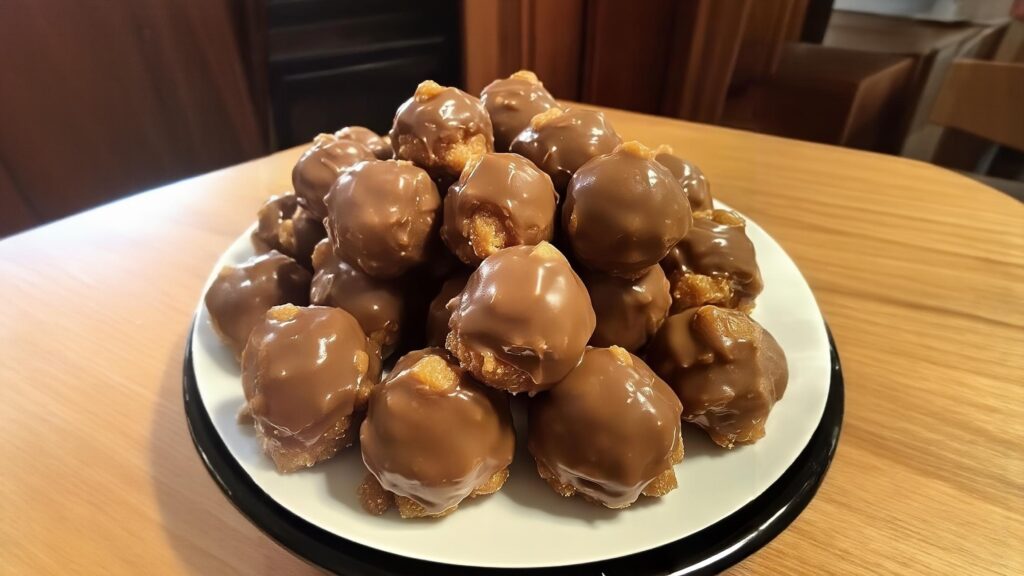
Crunchy Chocolate Peanut Butter Butterfinger Balls
This is the definitive butterfinger balls recipe for the ultimate no-bake confection. Imagine the irresistible crunch of a beloved candy bar suspended in a creamy peanut butter truffle, all enrobed in a thick, glossy layer of tempered chocolate. These sweet spheres are pure, unadulterated comfort, perfect for quick gifting or elevating your dessert spread. Achieving the ideal texture for these 24 butterfinger balls requires precision in chilling, which I detail below to ensure a professional finish.
restaurant_menu Ingredients
For the Crunchy Peanut Butter Center
For the Smooth Chocolate Coating
hardware Essential Tools
Large mixing bowl
Rubber spatula
Cookie scoop or teaspoon measure
Baking sheet
Parchment paper or silicone baking mat
Microwave-safe bowl
Small saucepan (if tempering chocolate manually)
Wire cooling rack
format_list_numbered Preparation
Creating the Truffle Base
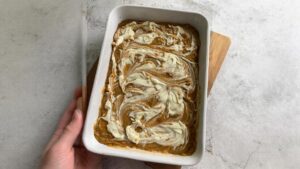
In your large mixing bowl, combine the sifted confectioners' sugar, the creamy peanut butter, and the finely crushed candy pieces. Using a sturdy rubber spatula or clean hands, mix thoroughly until a uniform, very stiff 'dough' forms. This mixture must be homogenous; any pockets of dry sugar will crack the shell later. Test the mixture by squeezing a small amount—it should hold its shape firmly without crumbling.
Shaping and Setting the Centers
Line a sturdy baking sheet with parchment paper. Use a small cookie scoop (about 1 tablespoon size) or roll by hand to form uniform balls, approximately 1 inch in diameter. Place these on the prepared sheet, ensuring there is at least 1 inch of space between each one. Transfer the sheet immediately to the freezer and chill for a minimum of 30 minutes until the centers are rock-solid. This chilling step is non-negotiable for a successful butterfinger ball recipe.
Coating and Finishing
While the centers chill, prepare the coating. Combine the chocolate chips and coconut oil (if using) in a microwave-safe bowl. Microwave in 30-second intervals, stirring well after each interval, until the mixture is completely smooth and glossy. The optional coconut oil helps lower the viscosity, allowing for a thinner, more professional-looking shell on your 24 butterfinger balls.
favorite You Might Also Love
Browse All arrow_forwardDecadent Southern Peach Dumplings: Effortless Comfort
Epic Carrot Earthquake Cake: A Chef's Guide
White Texas Almond Sheet Cake Recipe (Classic & Moist)
Sun-Kissed Pineapple Dessert: Tropical Sweetness Simplified
Velvet Vanilla Fruit Dip: The Ultimate Potluck Star

French Butter Cake Recipe
Try These Variations
Flavor Variations for Your Candy Truffles To truly customize your butterfinger balls recipes, think beyond the standard chocolate coating. For a sophisticated twist, try melting high-quality dark chocolate (70% cacao or higher) for the dipping. The slight bitterness of the dark chocolate provides a magnificent counterpoint to the intense sweetness of the peanut butter filling. Another excellent variation involves infusing the peanut butter base itself: before mixing, gently warm the peanut butter with 1/2 teaspoon of pure almond extract. This subtle addition elevates the nutty profile beautifully, transforming the simple butterfinger ball recipe into something unexpected. Furthermore, consider texture layering: after dipping the balls in chocolate but before they fully set, sprinkle the tops with finely crushed, salty pretzel pieces or flaky sea salt. This sweet-and-salty combination is addictive and provides an extra layer of textural complexity that guests adore. For a white chocolate version, use high-quality white chocolate chips, but be warned—white chocolate is notoriously temperamental and requires very low power microwaving and often a bit more coconut oil to prevent seizing. Remember, every variation builds upon the core success of the butterfinger balls recipe.
Chef's Pro Tips
The Science of the ‘Set’ and Coating Consistency
Temperature Control is Non-Negotiable: The absolute secret to professional-looking truffles, whether you are making butterfinger balls or any ganache-based treat, is temperature contrast. The filling MUST be deeply frozen (30 minutes minimum) before dipping. When the rock-hard, cold center hits the warm, liquid chocolate, the chocolate instantly begins to set on contact. This rapid setting prevents the chocolate from soaking into the filling and creates that signature, relatively thin, crisp shell. If the filling is merely chilled (not frozen), it will absorb the chocolate, resulting in a thick, soft, greasy coating that never truly snaps.
The Coconut Oil Emulsification Trick
While optional, adding 1 tablespoon of refined coconut oil to your chocolate chips is a technique I learned early in my pastry training to ensure a glossy, smooth dip, especially when using standard grocery store chocolate chips which often lack sufficient cocoa butter. The oil thins the chocolate just enough to make coating seamless, and because it solidifies at a slightly lower temperature than pure cocoa butter, it helps the chocolate set quickly and beautifully shiny. Do not substitute with vegetable oil; the flavor profile will be off, and the texture will be inferior.
The Perfect Crush
When crushing your candy bars for the butterfinger balls recipe, avoid turning them into a fine powder. You want a mixture of fine dust and small, pea-sized crunchy shards. Use a food processor but pulse it very sparingly—just 5 or 6 quick pulses. If you over-process, the peanut butter nougat component will melt from the friction, making your base mixture sticky and unworkable, defeating the purpose of the structure. We are aiming for texture, not paste.
Dipping Technique Mastery
When dipping, use a dipping fork or two regular forks. Submerge the frozen ball completely, lift it out, and gently tap the handle of the fork against the side of the bowl to shake off the excess chocolate. Do not scrape the bottom of the bowl, as this introduces air bubbles and leaves a messy ‘foot’ on the bottom of your butterfinger balls. Place them gently on the parchment paper.
Storage Guide
Storage and Reheating for Maximum Freshness
Room Temperature Storage: Although these are candy-like, they are best stored slightly cool due to the high fat content of the peanut butter and chocolate. If your kitchen is consistently below 70°F (21°C), you can store the butterfinger balls in a single layer on a parchment-lined plate, loosely covered with plastic wrap, for up to 2 days. However, if your kitchen is warmer, the chocolate shell will soften, leading to smudging and potentially compromising the structural integrity of the treats. For guaranteed texture, refrigeration is always superior for this butterfinger balls recipe.
Refrigerator Storage (Recommended Shelf Life)
For optimal texture and to maintain the crispness of the chocolate shell, store your finished butterfinger balls in an airtight, rigid container lined completely with parchment paper. Ensure there is a layer of parchment between any stacked layers. The cold temperature keeps the filling firm and the coating hard. Stored correctly, these will maintain peak quality for up to 10 days. When serving, allow them to sit at room temperature for just 10 minutes prior to eating; this slight warming enhances the flavor release without softening the shell too much.
Freezer Storage (Long-Term Preservation)
The freezer is your best friend for making large batches of these 24 butterfinger balls ahead of time. Arrange the fully set balls in a single layer on a baking sheet and place them in the freezer until they are solid (about 1 hour). Once frozen solid, transfer them to heavy-duty, freezer-safe zip-top bags or airtight containers, ensuring you place parchment paper between every layer to prevent sticking—a crucial step, as the oils can cause them to fuse permanently. They freeze beautifully for up to 3 months. To serve, thaw them slowly overnight in the refrigerator, then allow them to sit at room temperature for 15-20 minutes before enjoying the perfect butterfinger ball recipe crunch.
Avoid These Mistakes
✕ Avoiding Pitfalls in Your Butterfinger Balls Recipe
Mistake: Not Sifting the Powdered Sugar: Many home cooks skip sifting confectioners’ sugar, assuming it’s fine enough. However, powdered sugar contains cornstarch to prevent caking, and these tiny starch clumps do not dissolve into the peanut butter base. When you roll the balls, these clumps create weak points in the structure. When the frozen ball hits the warm chocolate, the temperature shock causes these weak points to fracture first, leading to cracked shells where the chocolate coating breaks apart prematurely, ruining the aesthetic of your butterfinger balls. Always sift!
✕ Mistake
Over-mixing the Base Dough: When combining the peanut butter, sugar, and crushed candy, stop mixing the moment everything is incorporated and holds together. Over-mixing, especially if you use your hands for too long, transfers excessive heat into the mixture. This heat melts the oils in the peanut butter and the coating in the candy bar, resulting in a soft, greasy mixture that is impossible to roll into neat spheres. It will feel heavy and oily rather than stiff and dough-like. If this happens, you must chill the entire bowl for 20 minutes before attempting to roll again.
✕ Mistake
Using Low-Quality Chocolate for Coating: Since the coating is such a prominent textural and flavor element in this recipe for butterfinger balls, using cheap, waxy chocolate chips is a culinary disservice. Lower-quality chips have a higher percentage of stabilizers and less cocoa butter. This means they melt poorly, result in a dull, thick coating, and often seize up or become streaky upon setting. Invest in a good brand of semi-sweet chips or, if feeling ambitious, use couverture chocolate for a true snap.
✕ Mistake
Dipping Too Slowly or Using Room Temperature Centers: If you attempt to dip the balls when they are merely cool, the chocolate coating will melt the surface of the filling upon contact. This instantly ruins the clean line of the coating and causes the filling to absorb the chocolate, resulting in a soft, fudgy exterior rather than a crisp shell. Remember the contrast: the filling should feel almost painfully cold to the touch when it enters the melted chocolate bath. This is the key to achieving the perfect texture in your butterfinger balls.
nutrition Nutrition Facts
Per serving: 1 ball
Note: Nutritional values are estimates based on standard commercial ingredients and serving size of one ball. Values will fluctuate based on the specific candy bar used.
flag Conclusion
There you have it—a recipe that proves the simplest concepts often yield the most profound satisfaction. This butterfinger balls recipe is more than just mixing and dipping; it’s about capturing a fleeting moment of joy and making it tangible. Whether you drizzle them with white chocolate, dust them with sea salt, or enjoy them exactly as planned, these treats are built for sharing, gifting, and savoring. I encourage you to make a double batch; trust me, they disappear faster than you think! Head back to HomeRecipes.com for more ways to turn nostalgic snacks into gourmet delights. Happy rolling!
sell Related Topics
Frequently Asked Questions
Why are my chocolate coatings cracking when I bite into the butterfinger balls? expand_more
Cracking occurs almost exclusively due to temperature shock or structural weakness in the filling. If the filling balls are not frozen solid when they hit the warm chocolate, the filling softens instantly, and the chocolate coating, which sets much faster, is unable to stretch with the expanding filling. The result is a brittle shell that cracks upon the first bite. To fix this for your next batch of butterfinger balls, ensure your centers spend a full 30 minutes in the freezer. Secondly, ensure your filling isn't too dry; if you accidentally used too much powdered sugar, the filling lacks the necessary fat/moisture to expand slightly, leading to a rigid center that shatters the coating.
Can I substitute the creamy peanut butter with natural, runny peanut butter for this recipe? expand_more
I strongly advise against using natural, runny peanut butter for this specific butterfinger balls recipe. Natural peanut butter separates significantly because the oil is not emulsified with stabilizers like hydrogenated vegetable oils found in commercial brands (Jif, Skippy). When you mix natural peanut butter with powdered sugar, the resulting 'dough' will likely be far too soft, oily, and sticky to roll properly, even after chilling. If you absolutely must use natural peanut butter, you will need to add a binder, such as 1/4 cup of extra sifted powdered sugar or 2 tablespoons of melted, slightly cooled cocoa butter, to achieve the necessary stiffness for rolling those perfect 24 butterfinger balls.
What is the best way to get a perfectly smooth, glossy chocolate shell without tempering? expand_more
Achieving a high-gloss, satisfying snap without full tempering (which is complex for home cooks) relies heavily on the addition of fat, which is why the coconut oil is specified in the ingredients list. For the best non-tempered finish, use high-quality chocolate chips (which contain lecithin and emulsifiers) and melt them slowly over low heat or in short microwave bursts. Once completely melted, stir in the coconut oil until fully incorporated. The key is to dip the butterfinger balls when the chocolate is still quite warm but not hot. As it cools rapidly against the frozen center, the high fat content encourages a smooth, shiny set rather than a dull, streaky finish common with melted standard chips alone. This method ensures a beautiful coating every time you attempt this recipe for butterfinger balls.
My chocolate coating seized up and became thick and grainy; what happened? expand_more
Chocolate seizing is a common disaster, usually caused by the introduction of even a tiny amount of water or steam. If you were melting the chocolate over a double boiler, steam likely condensed into the chocolate. If you used the microwave, perhaps there was residual moisture in the bowl or on your stirring utensil. Chocolate is hydrophobic (repels water), and that tiny amount of moisture causes the cocoa solids to clump together instantly, resulting in a thick, grainy paste instead of a smooth liquid. If this happens, don't throw it out! You can often save it by stirring in 1 to 2 teaspoons of additional melted coconut oil or vegetable shortening until it smooths out again, allowing you to finish coating your butterfinger balls.
How can I make this recipe nut-free or peanut-free? expand_more
To adapt this classic butterfinger balls recipe for nut allergies, the peanut butter must be replaced with an equal volume of seed butter or soy butter. Sunflower seed butter (SunButter is a popular brand) works exceptionally well as it has a similar texture and fat content to peanut butter. You will need 1 cup of sunflower seed butter. For the candy bar component, you must carefully check the packaging of your chosen candy bar, as many crunchy candies are processed on shared equipment with peanuts. If you cannot find a certified peanut-free crunchy candy, you can substitute the crushed candy with 1 cup of crushed gluten-free pretzels or toasted, crushed sesame sticks for a satisfying salty crunch that complements the seed butter filling beautifully.
More Recipes You'll Love

Greek Orange Cake Recipe (Moist & Aromatic)
Zesty Sunshine: The Ultimate Lemon And Coconut Cake
Mastering Homemade Hobnobs: The Ultimate Oat Cookie
Easy Pecan Pastry Bars Recipe (Southern Classic)
Golden Mini Donut Bites: Restaurant Texture at Home
Community Kitchen