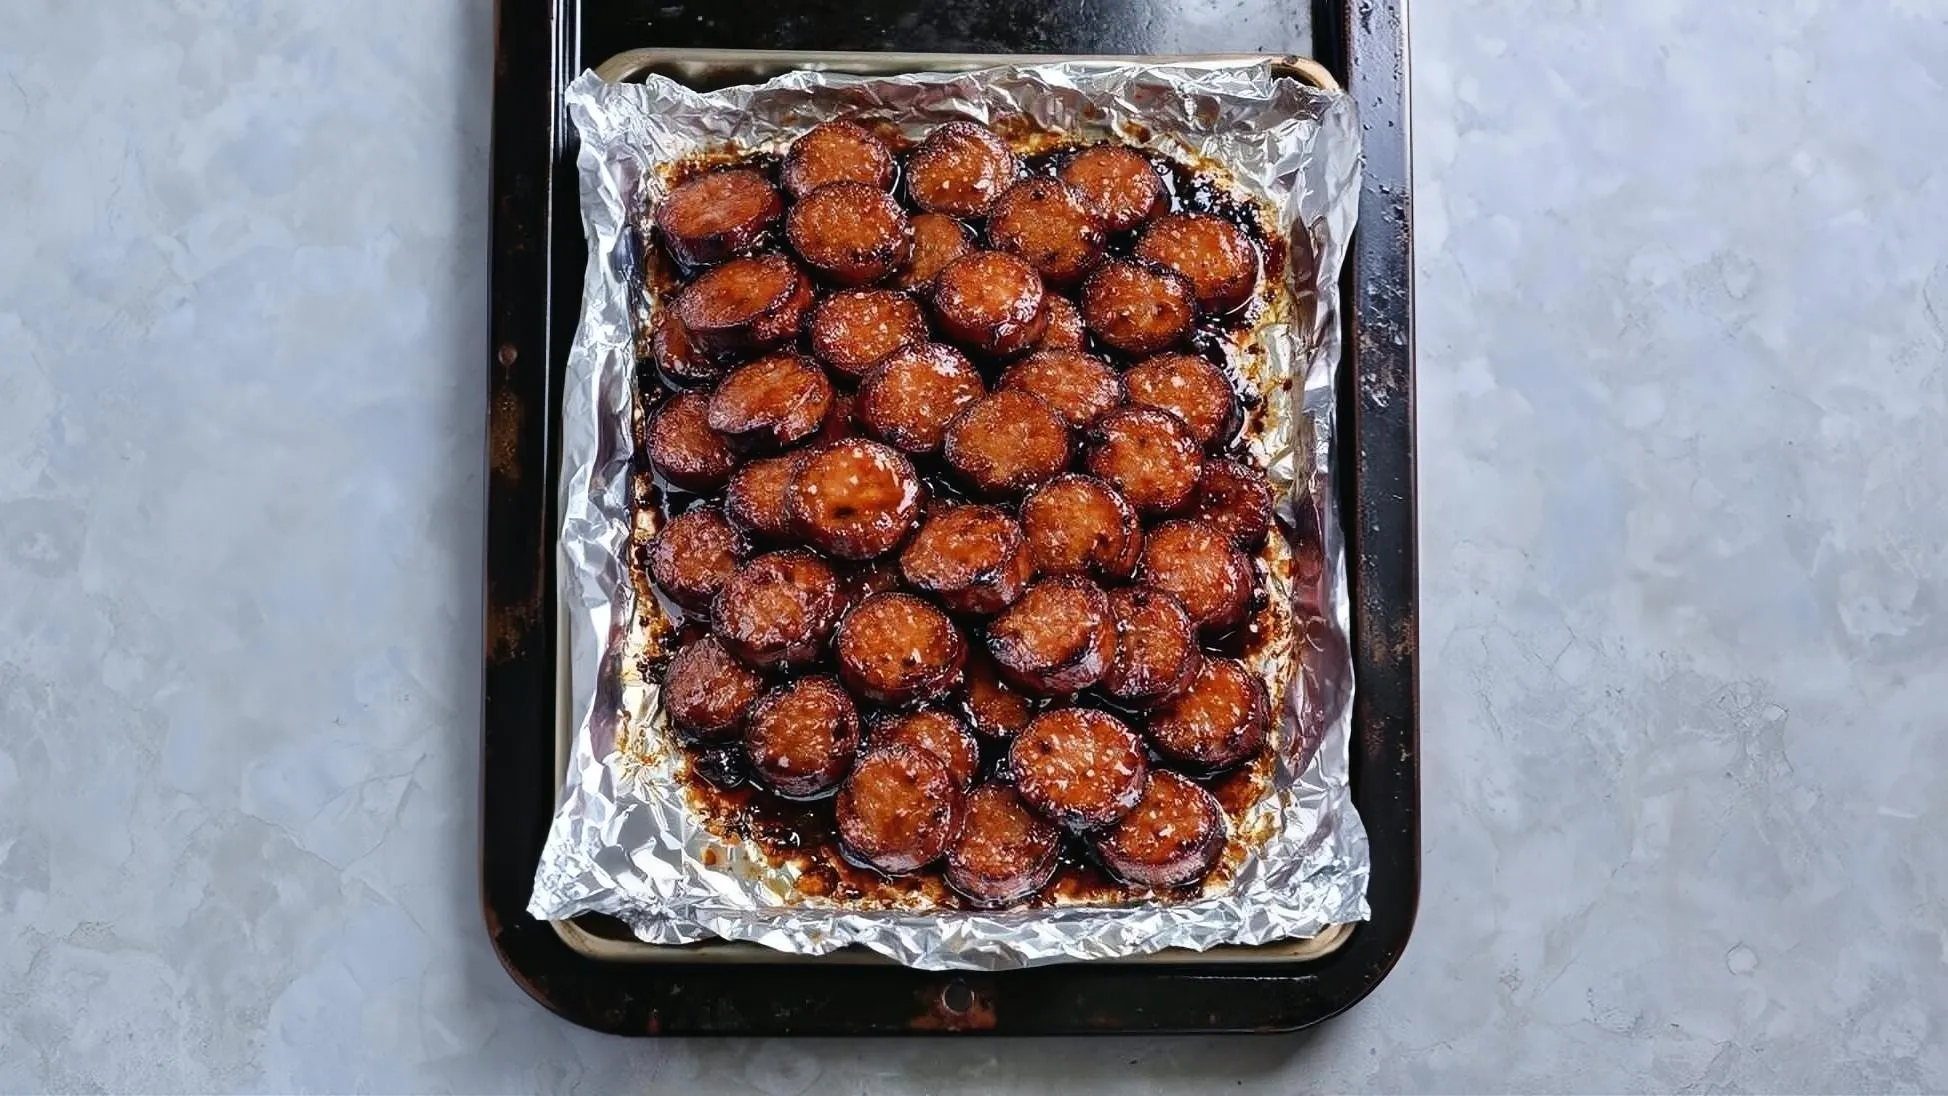
Sticky Brown Sugar Kielbasa Bites Recipe (Sweet & Savory Appetizer)
Transport your taste buds with these incredibly addictive Sticky Brown Sugar Kielbasa Bites, a HomeRecipes.com favorite! Each bite features tender, smoky kielbasa enveloped in a rich, buttery glaze infused with light brown sugar, tangy Dijon mustard, and a hint of garlic. Perfect for any occasion, these sweet and savory appetizers are effortless to prepare and vanish from the plate in record time, making them your go-to recipe for effortless entertaining and satisfying cravings.
restaurant_menu Ingredients
Main Ingredients
hardware Essential Tools
Sharp chef's knife
Cutting board
Medium saucepan
Whisk or spoon
Large baking sheet
Parchment paper
Tongs or spatula
Serving dish
Toothpicks (optional)
format_list_numbered Preparation
Preparation
Preheat your oven to 375°F (190°C) and line a large baking sheet with parchment paper for easy cleanup. This crucial step prevents sticking and makes cleanup a breeze, a trick I learned in busy Michelin-starred kitchens where efficiency is everything.
Crafting the Glaze
Slice the smoked kielbasa into 1/2-inch thick rounds. Aim for consistent thickness to ensure even cooking and presentation, as uniformity is key to professional results and allows each piece to caramelize perfectly.
In a medium saucepan, combine the light brown sugar, unsalted butter, Dijon mustard, and garlic powder over medium-low heat. Stir constantly until the butter is fully melted and the brown sugar is completely dissolved, forming a smooth, glossy glaze. This gentle heating allows the sugars to properly integrate without scorching, which is vital for a clear, sticky coating.
Baking and Serving
Arrange the sliced kielbasa in a single layer on the prepared baking sheet. Pour the warm glaze evenly over the kielbasa, then toss gently with tongs or a spatula to ensure every piece is thoroughly coated. A single layer is critical for caramelization; overcrowding will steam the sausage instead of browning it.
Bake for 20-25 minutes, or until the kielbasa is heated through and the glaze is bubbly and beautifully caramelized. Halfway through, give the kielbasa a gentle stir to ensure even coating and prevent sticking. You'll notice the edges becoming slightly crisp and the glaze thickening to a perfect sticky consistency.
Serve your Sticky Brown Sugar Kielbasa Bites warm, directly from the oven. You can arrange them on a platter with toothpicks for easy serving, allowing guests to enjoy these sweet and savory treats effortlessly.
favorite You Might Also Love
Browse All arrow_forwardUltimate Crispy Nacho Egg Rolls: A Fusion Masterpiece
Jalapeño Chicken Dip Recipe (Creamy & Spicy)
Jarlsberg Cheese Dip Recipe (Creamy & Easy Appetizer)
Cheesy Crab Roll-Ups Recipe (Classic Appetizer)
Crispy Crab Rangoon Egg Rolls: Ultimate Appetizer Upgrade
Festive Christmas Appetizers Recipe (Easy Holiday Bites)
Try These Variations
Spicy Kick
For those who love a little heat, add 1/4 to 1/2 teaspoon of red pepper flakes or a dash of cayenne pepper to the glaze mixture. The spice will offer a fantastic contrast to the sweet brown sugar, creating a more dynamic flavor profile that really wakes up the palate. Start with a small amount and adjust to your preference, as you can always add more but can’t take it away. This elevates the classic Sticky Brown Sugar Kielbasa Bites to a new level.
Pineapple Perfection
Introduce 1 cup of canned pineapple chunks (drained well) to the baking sheet along with the kielbasa before adding the glaze. The pineapple will caramelize beautifully and add a delightful tangy-sweet burst that complements the smoky sausage and rich glaze. The acidity of the pineapple also helps to cut through the richness, creating a more balanced bite.
Onion & Pepper Medley
For a heartier appetizer, add 1 cup of sliced bell peppers (any color) and 1/2 cup of thinly sliced yellow onion to the baking sheet with the kielbasa. These vegetables will soften and sweeten as they bake in the glaze, absorbing all those delicious flavors. This variation turns your Sticky Brown Sugar Kielbasa Bites into a more substantial dish, perfect for a casual meal.
Maple Glaze
Substitute half of the brown sugar with pure maple syrup for a different kind of sweetness. Maple syrup offers a distinct, woodsy sweetness that pairs exceptionally well with smoked meats. This will result in a slightly thinner, but equally delicious, glaze with a subtle autumn flavor, making your Sticky Brown Sugar Kielbasa Bites perfect for cooler weather gatherings.
Chef's Pro Tips
Achieving Uniform Slices
Use a very sharp knife to slice your kielbasa. This ensures clean, even cuts, which is vital for consistent cooking and a professional presentation. Ragged edges can lead to uneven browning and an unappealing texture. If your knife isn’t sharp enough, take a moment to hone it; it makes all the difference in the kitchen. This attention to detail will elevate your Sticky Brown Sugar Kielbasa Bites.
Preventing Over-Sweetness
If you prefer a less sweet glaze, consider reducing the brown sugar by about 1/4 cup and increasing the Dijon mustard by 1/2 teaspoon. The extra tang from the mustard will balance the sweetness without compromising the sticky texture. This is a common chef’s trick to adapt a recipe to different palates while maintaining its core appeal. It’s all about balancing the flavors in your Sticky Brown Sugar Kielbasa Bites.
Baking Sheet Management
Always use parchment paper on your baking sheet. This not only makes cleanup incredibly easy but also prevents the sticky glaze from adhering to the pan. For even browning, ensure the kielbasa pieces are in a single layer with a little space between them. Overcrowding traps steam, preventing the beautiful caramelization that makes these bites so special. This ensures every one of your Sticky Brown Sugar Kielbasa Bites develops that perfect crust.
Glaze Consistency Check
When melting the glaze ingredients, ensure the brown sugar is fully dissolved before adding the kielbasa. A grainy glaze means the sugar hasn’t properly melted, leading to a less appealing texture. Stir continuously over medium-low heat until the mixture is smooth and syrupy. This patience will be rewarded with a perfectly glossy and sticky coating for your Sticky Brown Sugar Kielbasa Bites.
Optimal Serving Temperature
These kielbasa bites are at their absolute best when served warm, straight from the oven. The glaze will be perfectly gooey and the kielbasa tender and juicy. If they cool too much, the glaze can firm up. If serving for a longer period, consider keeping them in a slow cooker on a ‘warm’ setting to maintain that irresistible sticky texture and temperature.
Storage Guide
Room Temperature
These Sticky Brown Sugar Kielbasa Bites are best enjoyed warm, directly from the oven. However, if left out for a short period (no more than 2 hours), they will be safe to consume. The glaze will firm up slightly as it cools, but they remain delicious. Keep them covered to prevent drying out and to protect them from airborne contaminants. Prolonged exposure at room temperature can encourage bacterial growth, especially with the sausage component.
Refrigerator
Once completely cooled to room temperature, transfer any leftover Sticky Brown Sugar Kielbasa Bites to an airtight container. They will keep well in the refrigerator for up to 3-4 days. Ensure the container is sealed tightly to prevent them from drying out and absorbing odors from other foods. Storing them properly maintains their flavor and prevents spoilage, making them convenient for meal prepping or quick snacks.
Freezer
Freezing is generally not recommended for these Sticky Brown Sugar Kielbasa Bites. The texture of the kielbasa can become rubbery or dry after freezing and thawing, and the glaze may separate or become watery upon reheating, losing its signature sticky consistency. While technically safe to freeze, the quality and enjoyment of the dish will significantly diminish. It’s best to make a fresh batch when the craving strikes.
Avoid These Mistakes
✕ Overcrowding the Baking Sheet
A common error is piling the kielbasa too high on the baking sheet. This leads to steaming rather than caramelization, resulting in soggy kielbasa and a less flavorful, runny glaze. Always spread the kielbasa in a single layer, using two baking sheets if necessary, to ensure each piece gets direct heat and caramelizes beautifully. This is crucial for achieving that desired sticky, slightly crispy exterior on your Sticky Brown Sugar Kielbasa Bites.
✕ Not Dissolving the Brown Sugar Fully
If your glaze turns out grainy or gritty, it’s likely because the brown sugar wasn’t completely dissolved in the butter and other liquids before baking. Ensure you stir the glaze mixture constantly over medium-low heat until it’s perfectly smooth and no sugar crystals are visible. This step is essential for creating a luscious, uniform, and truly sticky glaze for your Sticky Brown Sugar Kielbasa Bites.
✕ Overcooking the Kielbasa
While we want a nice caramelized glaze, overcooking the kielbasa can dry it out and make it tough or rubbery. Kielbasa is pre-cooked, so you’re mainly heating it through and caramelizing the glaze. Keep an eye on it during the last few minutes of baking; once the glaze is bubbly and sticky and the edges are slightly browned, it’s ready. This prevents chewy and disappointing Sticky Brown Sugar Kielbasa Bites.
✕ Skipping the Parchment Paper
The glaze is incredibly sticky once cooled, and trying to clean a baking sheet without parchment paper can be a real chore. Always line your baking sheet, as it ensures easy removal of the kielbasa and makes cleanup a breeze. This simple step saves you time and frustration, allowing you to enjoy your Sticky Brown Sugar Kielbasa Bites without the hassle.
✕ Ignoring the Dijon Mustard
Some home cooks might be tempted to omit the Dijon mustard, thinking it’s just a minor ingredient. However, Dijon is crucial for balancing the sweetness of the brown sugar, providing a necessary tangy counterpoint that prevents the glaze from being cloyingly sweet. It adds depth and complexity, elevating the flavor profile from merely sweet to wonderfully sophisticated. Don’t underestimate its power in these Sticky Brown Sugar Kielbasa Bites.
nutrition Nutrition Facts
Per serving: 1/8 of recipe
Nutritional information is an estimate and may vary based on specific ingredient brands and preparation methods. These Sticky Brown Sugar Kielbasa Bites are a treat, so enjoy them in moderation!
flag Conclusion
There you have it, my friends! These Sticky Brown Sugar Kielbasa Bites are truly everything you want in a party appetizer—quick to make, packed with an incredible sweet and savory flavor, and utterly impossible to stop eating. The smoky sausage, the rich, buttery brown sugar glaze, and that subtle hint of Dijon mustard create a perfect harmony in every single bite. I guarantee this recipe will become a cherished part of your culinary repertoire, disappearing faster than you can say “more, please!” Head over to HomeRecipes.com for more delicious inspiration, and happy cooking!
sell Related Topics
Frequently Asked Questions
Can I use a different type of sausage for these Sticky Brown Sugar Kielbasa Bites? expand_more
Absolutely! While traditional smoked beef or chicken kielbasa delivers the best, most authentic flavor, you can certainly experiment with other fully cooked sausages. Turkey or beef sausages that are pre-cooked and have a good smoky flavor would work well. Just ensure they are not raw sausages, as the cooking time for the glaze is relatively short. Avoid anything too spicy if you want to maintain the sweet and savory balance of the original recipe. I’ve tried these with mild Italian sausage in a pinch, and it was a pleasant, albeit different, experience.
How can I make this recipe less sweet if I prefer a more savory profile? expand_more
If you find the glaze a bit too sweet for your palate, there’s an easy adjustment to make your Sticky Brown Sugar Kielbasa Bites more savory. Reduce the light brown sugar by about one-quarter, so use approximately 3/4 cup instead of 1 cup. To further enhance the savory and tangy notes, consider adding an extra teaspoon of Dijon mustard or even a splash of apple cider vinegar to the glaze. This will introduce more acidity and cut through the sweetness, creating a more pronounced savory tang. You could also increase the garlic powder slightly for more aromatic depth.
Can I cook these Sticky Brown Sugar Kielbasa Bites in an air fryer instead of the oven? expand_more
Yes, you certainly can cook these in an air fryer for a quicker, crispier result! After coating the kielbasa with the glaze, arrange the pieces in a single layer in your air fryer basket, ensuring not to overcrowd it. Air fry at 375°F (190°C) for 10-12 minutes, shaking the basket vigorously halfway through to promote even browning and prevent sticking. The air fryer will give the kielbasa a slightly crispier exterior, and the glaze will still caramelize beautifully. I often use this method when I'm making a small batch for myself or when I need appetizers in a hurry.
Can I add vegetables to this Sticky Brown Sugar Kielbasa Bites recipe? expand_more
Absolutely! Adding vegetables is a fantastic way to extend this recipe and add more texture and flavor. Bell peppers (especially red, yellow, or orange for sweetness), sliced onions, or even chunks of pineapple pair beautifully with the sweet and savory glaze. You can toss them with the kielbasa and glaze before baking, or add them about halfway through the baking process so they don't get too soft. The vegetables will absorb some of that delicious glaze, becoming tender and flavorful. Pineapple, in particular, adds a lovely tropical tang that complements the brown sugar and kielbasa wonderfully.
What are some common mistakes to avoid when making Sticky Brown Sugar Kielbasa Bites? expand_more
One of the most common mistakes is overcrowding the baking sheet. When you pile the kielbasa too high, it steams rather than caramelizes, resulting in a less sticky, less flavorful glaze and soft kielbasa. Always ensure a single layer for optimal browning. Another error is not dissolving the brown sugar completely in the glaze; this can lead to a grainy texture. Stir the glaze mixture thoroughly until it's smooth and glossy before adding the kielbasa. Lastly, overcooking can dry out the kielbasa, making it tough. Keep an eye on it, especially during the last few minutes, to ensure it remains juicy and tender.
More Recipes You'll Love
Ultimate Crispy Nacho Egg Rolls: A Fusion Masterpiece

Cashew Cheese Recipe (Creamy Vegan Spread)
Jarlsberg Cheese Dip Recipe (Creamy & Easy Appetizer)
Mississippi Dip Recipe (Creamy Savory Snack)

Nacho Egg Rolls Recipe (Crispy & Cheesy)
Community Kitchen