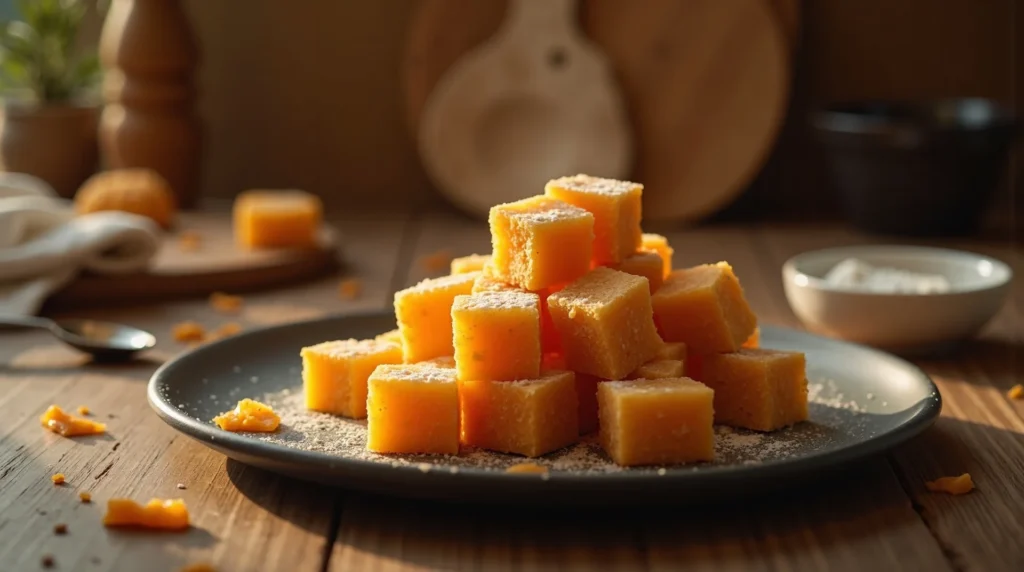
Master Homemade Sponge Candy: Airy, Crunchy Perfection
This recipe transforms simple pantry staples into spectacular, airy sponge candy—a crackling, toffee-flavored confection that is surprisingly easy to master with the right technique.
restaurant_menu Ingredients
Sponge Candy Base Ingredients
Optional Chocolate Coating
hardware Essential Tools
9x13-inch baking pan
Heavy-duty aluminum foil
Large, heavy-bottomed saucepan
Candy thermometer (essential)
Whisk
Sturdy wooden spoon
Wire cooling rack
format_list_numbered Preparation
Preparation and Setup
Line a 9x13-inch baking pan completely with heavy-duty aluminum foil, ensuring it covers the edges completely
Thoroughly brush the entire surface of the foil liner with melted butter; do not skimp on this step
Measure out all your dry and liquid ingredients and have them standing by, as the final mixing stage moves very quickly
Combine the brown sugar, corn syrup, and vinegar in the heavy-bottomed saucepan
Cooking and Reaction
Heat the sugar mixture over medium heat, stirring constantly until the sugar is fully dissolved and the liquid is smooth
Insert a candy thermometer and continue cooking without stirring until the mixture reaches exactly 300°F
Immediately remove the saucepan from the heat source the instant 300°F is registered
Swiftly add the baking soda and stir vigorously but briefly—no more than 10 to 15 seconds—until the mixture foams up into a pale, aerated mass
Immediately pour the entire foaming mixture into the prepared buttered pan; do not scrape the sides or try to smooth the top
Setting and Finishing
Allow the candy to cool and harden completely at room temperature, undisturbed, for at least one hour
Once completely hard, use the foil edges to lift the slab of sponge candy out of the pan
Place the slab on a cutting board and use the back of a heavy spoon or a blunt knife to carefully break the candy into irregular, bite-sized pieces
favorite You Might Also Love
Browse All arrow_forwardThe Easiest 4 Ingredient Lemon Cream Cheese Dump Cake Recipe

Mastering 10 Cup Cookies: A Chewy American Classic

Irresistible 4-Ingredient Blueberry Dump Cake: Easiest Dessert Recipe
Velvety Slow Cooker Rice Pudding Masterpiece

White Texas Almond Sheet Cake Recipe (Southern-Style)
Artisan No-Churn Strawberry Ice Cream: Make Your Own At Home
Try These Variations
Chocolate Dipped Sponge Candy
Once cooled and broken, dip half of each piece into melted, tempered chocolate for a richer finish
Salted Caramel Variation
Add 1/2 teaspoon of flaky sea salt to the sugar mixture before cooking, and sprinkle extra salt over the top immediately after pouring into the pan
Spice Infusion
Add 1/4 teaspoon of ground cinnamon and a tiny pinch of cayenne pepper to the baking soda before adding it to the hot syrup for a warming kick
Chef's Pro Tips
Always use a heavy-bottomed pot to prevent scorching the sugar, which introduces an irreversible bitter flavor
Ensure your baking soda is fresh and active; an old box will not produce the vigorous foaming required for good sponge candy
Before you start cooking, ensure your workspace is cool and dry, as high humidity will cause the final product to weep and become sticky
When breaking the candy, use a light tapping motion; heavy smashing can crush the delicate air pockets you worked to create
Storage Guide
Airtight Container (Room Temp)
Store in a completely sealed container, ideally with a piece of white bread inside to absorb moisture, for up to two weeks
Refrigerator
Strictly avoid this method, as condensation will destroy the candy’s crisp texture
Freezing
Not recommended; the moisture introduced during thawing will ruin the delicate structure of the sponge candy
Avoid These Mistakes
✕ Over-stirring the mixture after adding the baking soda, which deflates the essential CO2 bubbles and results in dense candy
✕ Failure to use a candy thermometer, leading to undercooked (chewy) or overcooked (burnt/bitter) candy
✕ Scraping the sides of the saucepan when pouring, as the residual candy is often too cooked and contaminates the perfect batch
✕ Allowing the sugar syrup to sit on the heat for even a few seconds past 300°F, causing immediate bitterness
✕ Storing the candy in an open container or the refrigerator, which leads to tackiness and moisture absorption
nutrition Nutrition Facts
Per serving: Approximately 1 inch pieces
Nutritional values are approximate and based on the base recipe without chocolate coating.
flag Conclusion
There you have it—the definitive guide to creating stunning, shatteringly crisp sponge candy in your own home. This is a recipe that demands respect for technique but offers unparalleled rewards for your patience and precision. Once you nail that 300°F mark and master the quick stir, you will never look at store-bought honeycomb the same way again. Go ahead, break out that thermometer, and create some golden, airy happiness today. Share your success stories for this wonderful sponge candy with us here at HomeRecipes.com!
sell Related Topics
Frequently Asked Questions
Why did my sponge candy turn out dense and chewy instead of airy? expand_more
This is almost always a temperature issue. If the syrup didn't reach the full 300°F, it didn't cook long enough to drive off enough moisture, resulting in a softer, chewier texture. Alternatively, you may have over-stirred the mixture after adding the baking soda, physically knocking the CO2 bubbles out before they could set. Remember, the stir after adding the soda should be fast and brief—just enough to incorporate the powder.
Can I substitute the brown sugar with granulated white sugar for sponge candy? expand_more
You certainly can, but you are sacrificing flavor depth. Granulated sugar yields a lighter, more neutral 'honeycomb' flavor, whereas brown sugar gives you that classic, deep toffee note that makes this American sponge candy so addictive. If you must use white sugar, I recommend adding 1 teaspoon of molasses or a splash of maple syrup to the cooking mixture to mimic the complexity lost by omitting the brown sugar.
My candy is dark brown and tastes slightly burnt. What went wrong? expand_more
This indicates overheating or using too high a heat setting for too long. If the syrup goes much past 305°F, the sugar begins to break down (caramelizes too far) and develops bitter notes. More importantly, if the baking soda was added while the heat was still on, the reaction becomes too violent and scorches the mixture. Ensure you remove the pan completely from the burner before adding the soda, and aim for that precise 300°F reading.
Is it safe to use a non-stick pan instead of lining with foil? expand_more
I strongly advise against it for this specific recipe. Candy making involves extremely high temperatures—up to 300°F—and while many non-stick coatings are rated high, the risk of damaging the coating or releasing fumes is not worth it, especially when dealing with something you intend to eat. Furthermore, the foil allows you to easily lift the entire candy slab out without scraping, which is crucial for preserving the integrity of your sponge candy structure.
How do I prevent my sponge candy from getting sticky the next day? expand_more
Stickiness is caused by humidity absorption. The best defense is a perfect initial cook (reaching 300°F) and immediate, complete airtight storage. Do not store it in the refrigerator. If you live in a humid environment, try making this on the driest day of the week. For storage, the trick of placing a small piece of fresh white bread inside the airtight container helps immensely by acting as a desiccant, absorbing moisture before the candy can.
More Recipes You'll Love
Easy Pecan Pastry Bars Recipe (Southern Classic)
Chef’s Guide to Irresistible Yum Yum Cake
Banana Pudding Cups Recipe (No-Bake Dessert)
The Ultimate Halal Piña Colada Dip: Tropical Bliss at Home

Apple Cake Recipe (Classic British Delight)

Community Kitchen