
Easy Chili Cheese Dip Recipe (3-Ingredient Game Day)
Discover the ultimate easy chili dip that comes together in a flash! This 3-ingredient recipe from Chef HomeRecipes delivers a rich, creamy, and bubbly game day favorite. With a base of perfectly spread cream cheese, savory canned chili, and a generous topping of sharp cheddar, it bakes to golden perfection every time. Get ready for a crowd-pleasing appetizer that requires minimal effort but delivers maximum flavor and comfort.
restaurant_menu Ingredients
Main Ingredients
For Serving
hardware Essential Tools
9-inch pie pan or oven-safe baking dish
Spatula or spoon
Measuring cups
Cheese grater (if using block cheese)
format_list_numbered Preparation
Preparation
Preheat your oven to 350°F (175°C) and ensure your cream cheese is at room temperature for easy spreading.
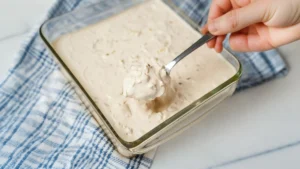
Using a spatula or the back of a spoon, spread the softened 8 ounces of cream cheese evenly across the bottom of a 9-inch pie pan or similar oven-safe baking dish, creating a smooth, consistent layer.
Carefully pour the entire 15-ounce can of chili over the cream cheese layer, then gently spread it out with your spatula or spoon to cover the cream cheese completely and evenly.
Generously sprinkle the 1 1/2 cups of freshly grated sharp cheddar cheese over the chili layer, ensuring an even blanket of cheese from edge to edge.
Place the chili dip into the preheated oven and bake for 20-25 minutes, or until the cheese is gloriously melted, bubbly, and starts to turn a beautiful golden brown around the edges.
Remove the chili dip from the oven and allow it to rest for about 5 minutes before serving to let it set slightly and cool down to a comfortable eating temperature.
Serve your hot and bubbly chili dip immediately with your favorite tortilla chips, corn chips, or other dippers, and enjoy!
favorite You Might Also Love
Browse All arrow_forwardUltimate Sizzler Cheese Toast: Restaurant Flavor at Home

Nacho Egg Rolls Recipe (Crispy & Cheesy)

Mastering Irresistible 4 Ingredient Sausage Balls
Explosive Flavor: Ultimate 2 Ingredient Pizza Chips

Jarlsberg Cheese Dip Recipe (Creamy & Easy Appetizer)
Ultimate Crispy Nacho Egg Rolls: A Fusion Masterpiece
Try These Variations
Spicy Kick Chili Dip
For those who love a little heat, add 1-2 tablespoons of finely diced jalapeños (fresh or canned) to the chili layer before topping with cheese. Alternatively, a pinch of cayenne pepper or a dash of your favorite hot sauce mixed into the chili can provide a delightful kick, elevating the classic chili dip experience with minimal effort. This variation is particularly popular for game day gatherings.
Smoky Southwest Chili Dip
Introduce a smoky depth by using a smoked cheddar cheese instead of sharp cheddar, or by sprinkling 1/2 teaspoon of smoked paprika over the chili layer before adding the cheese. You could also mix in a couple of tablespoons of fire-roasted corn to the chili for added texture and a subtle sweetness that complements the smoky notes beautifully, making your chili dip truly unique.
Creamy Tex-Mex Chili Dip
For an even creamier and slightly tangier profile, mix 1/4 cup of sour cream or plain Greek yogurt into the cream cheese layer before spreading. You could also use a blend of cheddar and Monterey Jack cheese for the topping to enhance the melt and create a milder, more approachable flavor for those who prefer less sharp notes in their chili dip. This makes for a wonderfully rich texture.
Loaded Chili Dip
After baking, transform your chili dip into a fully loaded experience by garnishing with extra toppings. Think a dollop of sour cream, a sprinkle of fresh chopped green onions or cilantro, a few sliced black olives, or even some crumbled cooked ground beef (if you used a vegetarian chili). These additions not only add visual appeal but also introduce layers of flavor and texture, turning a simple chili dip into a substantial appetizer.
Chef's Pro Tips
Ensure Cream Cheese is Truly Softened
The biggest hurdle home cooks face with this chili dip is spreading cold, firm cream cheese. For a perfectly smooth base, your cream cheese needs to be at true room temperature. If you’re short on time, you can unwrap it and microwave it on low power (e.g., 50%) for 15-20 seconds, checking and flipping halfway. This ensures it spreads like butter, integrating seamlessly with the chili and preventing lumps.
Choose Your Chili Wisely
The quality and flavor of your canned chili will significantly impact the final taste of your chili dip. Opt for a brand you already enjoy eating on its own. For a smoother dip texture, I recommend a bean-less chili or one with minimal beans. If your chili is particularly thick, you can add a tablespoon or two of water or broth to thin it slightly for easier spreading and better integration with the cream cheese.
Grating Your Own Cheese Makes a Difference
While pre-shredded cheese is convenient, it often contains anti-caking agents like cellulose, which can prevent it from melting as smoothly and creating that desirable gooey pull. For the best chili dip, take the extra minute to grate your own sharp cheddar from a block. The difference in melt, texture, and flavor is truly noticeable and worth the effort for a superior result.
Don’t Be Afraid to Season
Even though this is a 3-ingredient recipe, a chef always tastes and adjusts. Before you spread the chili, give it a quick taste. Does it need a pinch of salt? A dash of garlic powder? A bit more chili powder? A small adjustment can elevate the entire chili dip. Remember, you’re building layers of flavor, and even a simple canned chili can benefit from a little personalized touch.
Storage Guide
Refrigerator Storage
Allow the chili dip to cool completely to room temperature before transferring it to an airtight container. A glass container with a tight-fitting lid is ideal as it won’t absorb flavors. Store in the refrigerator for up to 3-4 days. This prevents bacterial growth and maintains the dip’s freshness, ensuring it’s safe and delicious for later enjoyment.
Reheating in the Oven
For best results, reheat leftover chili dip in the oven. Transfer the chilled dip to an oven-safe dish, cover loosely with aluminum foil to prevent drying, and bake at 300°F (150°C) for 15-20 minutes, or until heated through and bubbly. This method helps the cheese re-melt smoothly and prevents the dip from becoming rubbery, retaining its original texture and appeal.
Reheating in the Microwave
While the oven is preferred, you can reheat small portions of chili dip in the microwave. Transfer a serving to a microwave-safe bowl and heat on medium power in 30-second intervals, stirring well after each interval, until warmed through. Be careful not to overheat, as this can make the cheese tough and the dip greasy. This method is quick for individual servings but may alter the texture slightly.
Avoid These Mistakes
✕ Using Cold Cream Cheese
A common mistake is trying to spread cream cheese straight from the refrigerator. This results in a lumpy, uneven base that doesn’t melt smoothly with the chili, leading to inconsistent texture in your chili dip. Always allow cream cheese to soften at room temperature for at least 30-60 minutes, or gently microwave it for a few seconds to achieve a perfectly spreadable consistency.
✕ Overbaking the Dip
Baking the chili dip for too long or at too high a temperature can cause the cheese to become overly crispy and oily, and the chili underneath to dry out. The goal is melted, bubbly cheese, not a hardened crust. Keep a close eye on it; once the edges are golden and the center is bubbling, it’s ready. Overbaking compromises the creamy, gooey texture that makes this chili dip so appealing.
✕ Uneven Spreading of Ingredients
If the cream cheese or chili layers are not spread evenly, you’ll end up with bites that are either too cheesy, too chili-heavy, or lacking in one component. This lack of balance detracts from the overall experience of the chili dip. Take the time to gently and evenly distribute each layer across the baking dish to ensure every scoop is perfectly balanced in flavor and texture.
nutrition Nutrition Facts
Per serving: 1 serving (approx. 1/6 of dip)
Nutritional values are approximate and can vary based on specific brands of chili and cheese used.
flag Conclusion
There you have it, fellow food lovers! A chili dip recipe that’s so simple, so satisfying, and so utterly delicious, it’s bound to become a staple in your home. This easy, cheesy, and incredibly flavorful dip is perfect for any occasion, from a casual family night to a big game day gathering. It’s a testament to the fact that you don’t need a complex ingredient list to create something truly memorable and comforting. So go ahead, whip up this chili dip, gather your favorite dippers, and watch it disappear. Happy cooking from my kitchen to yours, here at HomeRecipes.com!
sell Related Topics
Frequently Asked Questions
Can I make this chili dip ahead of time? expand_more
Absolutely! You can assemble the chili dip completely, layering the cream cheese, chili, and cheddar cheese in your baking dish, then cover it tightly with plastic wrap and refrigerate for up to 24 hours. When you're ready to bake, simply remove it from the refrigerator about 30 minutes before baking to allow it to come closer to room temperature, then bake as directed. You might need to add an extra 5-10 minutes to the baking time since it will be going into the oven chilled. This makes it a fantastic option for parties or game day preparations!
What kind of chili should I use for this recipe? expand_more
For the best results with this chili dip, I recommend using a good quality canned chili that you genuinely enjoy the flavor of on its own. A chili without beans or with very few beans will generally give you a smoother, more dip-like consistency, which is ideal here. Brands like Hormel or Nalley offer excellent, readily available options in most American supermarkets. If you prefer a bit more heat, look for a 'spicy' variety, or you can always add a pinch of cayenne pepper or a dash of hot sauce to your chosen chili.
Can I substitute other cheeses for the sharp cheddar? expand_more
Yes, you certainly can! While sharp cheddar provides a classic, tangy flavor and a beautiful melt, feel free to experiment. A blend of cheddar and Monterey Jack will give you an even stretchier, milder dip. Pepper Jack is a great choice if you want to introduce a little heat. For a richer, nuttier flavor, a smoked gouda or even some aged white cheddar can be wonderful. Just ensure that whatever cheese you choose is a good melting cheese to achieve that coveted gooey texture in your chili dip.
My chili dip turned out a bit oily. What went wrong? expand_more
An oily chili dip usually indicates that it was baked for too long or at too high a temperature, causing the fats in the cheese and chili to separate excessively. To avoid this, keep a close eye on your dip while it's baking. Once the edges are golden and the center is bubbling, it's done. Overbaking also tends to dry out the chili underneath, making the texture less appealing. Using a good quality, not overly greasy canned chili can also help prevent this issue.
What are some good non-chip dippers for this chili dip? expand_more
Beyond the classic tortilla and corn chips, there are many fantastic non-chip dippers for this chili dip! For a healthier option, consider an assortment of crisp raw vegetables like celery sticks, carrot sticks, bell pepper strips (red, yellow, or orange), or even cucumber slices. These add a refreshing crunch and contrast beautifully with the rich dip. For something more substantial, toasted baguette slices, warm pita bread cut into triangles, or even sturdy pretzel crisps can be excellent choices. Don't be afraid to get creative and try what you love!
More Recipes You'll Love
Ultimate Crispy Nacho Egg Rolls: A Fusion Masterpiece

Banana Pudding Cups Recipe (No-Bake Dessert)
Explosive Flavor: Ultimate 2 Ingredient Pizza Chips

Pan-Fried Halloumi Recipe (Crispy & Quick)

Cashew Cheese Recipe (Creamy Vegan Spread)
Community Kitchen