Ultimate Ground Beef Tortilla Wraps Mastery
These are not your average quick wraps; they are perfectly engineered ground beef tortilla wraps built for maximum flavor and structural integrity. We focus on deep seasoning through the Maillard reaction on the beef and balancing that richness with a bright, tangy homemade sauce and essential fresh crunch. This recipe transforms a simple meal into a deeply satisfying, high-protein handheld experience perfect for busy American families seeking bold, reliable weeknight dinners.
restaurant_menu Ingredients
For the Savory Beef Filling
For Assembly and Crunch
For the Tangy Creamy Sauce
hardware Essential Tools
Large, heavy-bottomed skillet (Cast Iron Preferred)
Wooden spoon or stiff spatula
Medium mixing bowl
Whisk
Wire cooling rack or plate for holding cooked beef
Cutting board
Sharp chef's knife
format_list_numbered Preparation
Cooking the Flavorful Beef Base
Heat the 2 tablespoons of olive oil in your large skillet over medium-high heat until it begins to shimmer lightly, signaling the pan is ready for browning. Add the finely chopped onion and sauté for 4-5 minutes, stirring often until they are softened and just beginning to turn pale gold, releasing their primary sweetness into the oil.
Seasoning and Sauce Preparation
Introduce the 1 pound of ground beef, breaking it apart immediately into small, uniform crumbles. Cook aggressively, stirring only every few minutes to encourage deep browning (Maillard reaction) on the meat particles, about 6 to 8 minutes total. Drain off any excess rendered fat, leaving about 1 tablespoon behind for flavor.
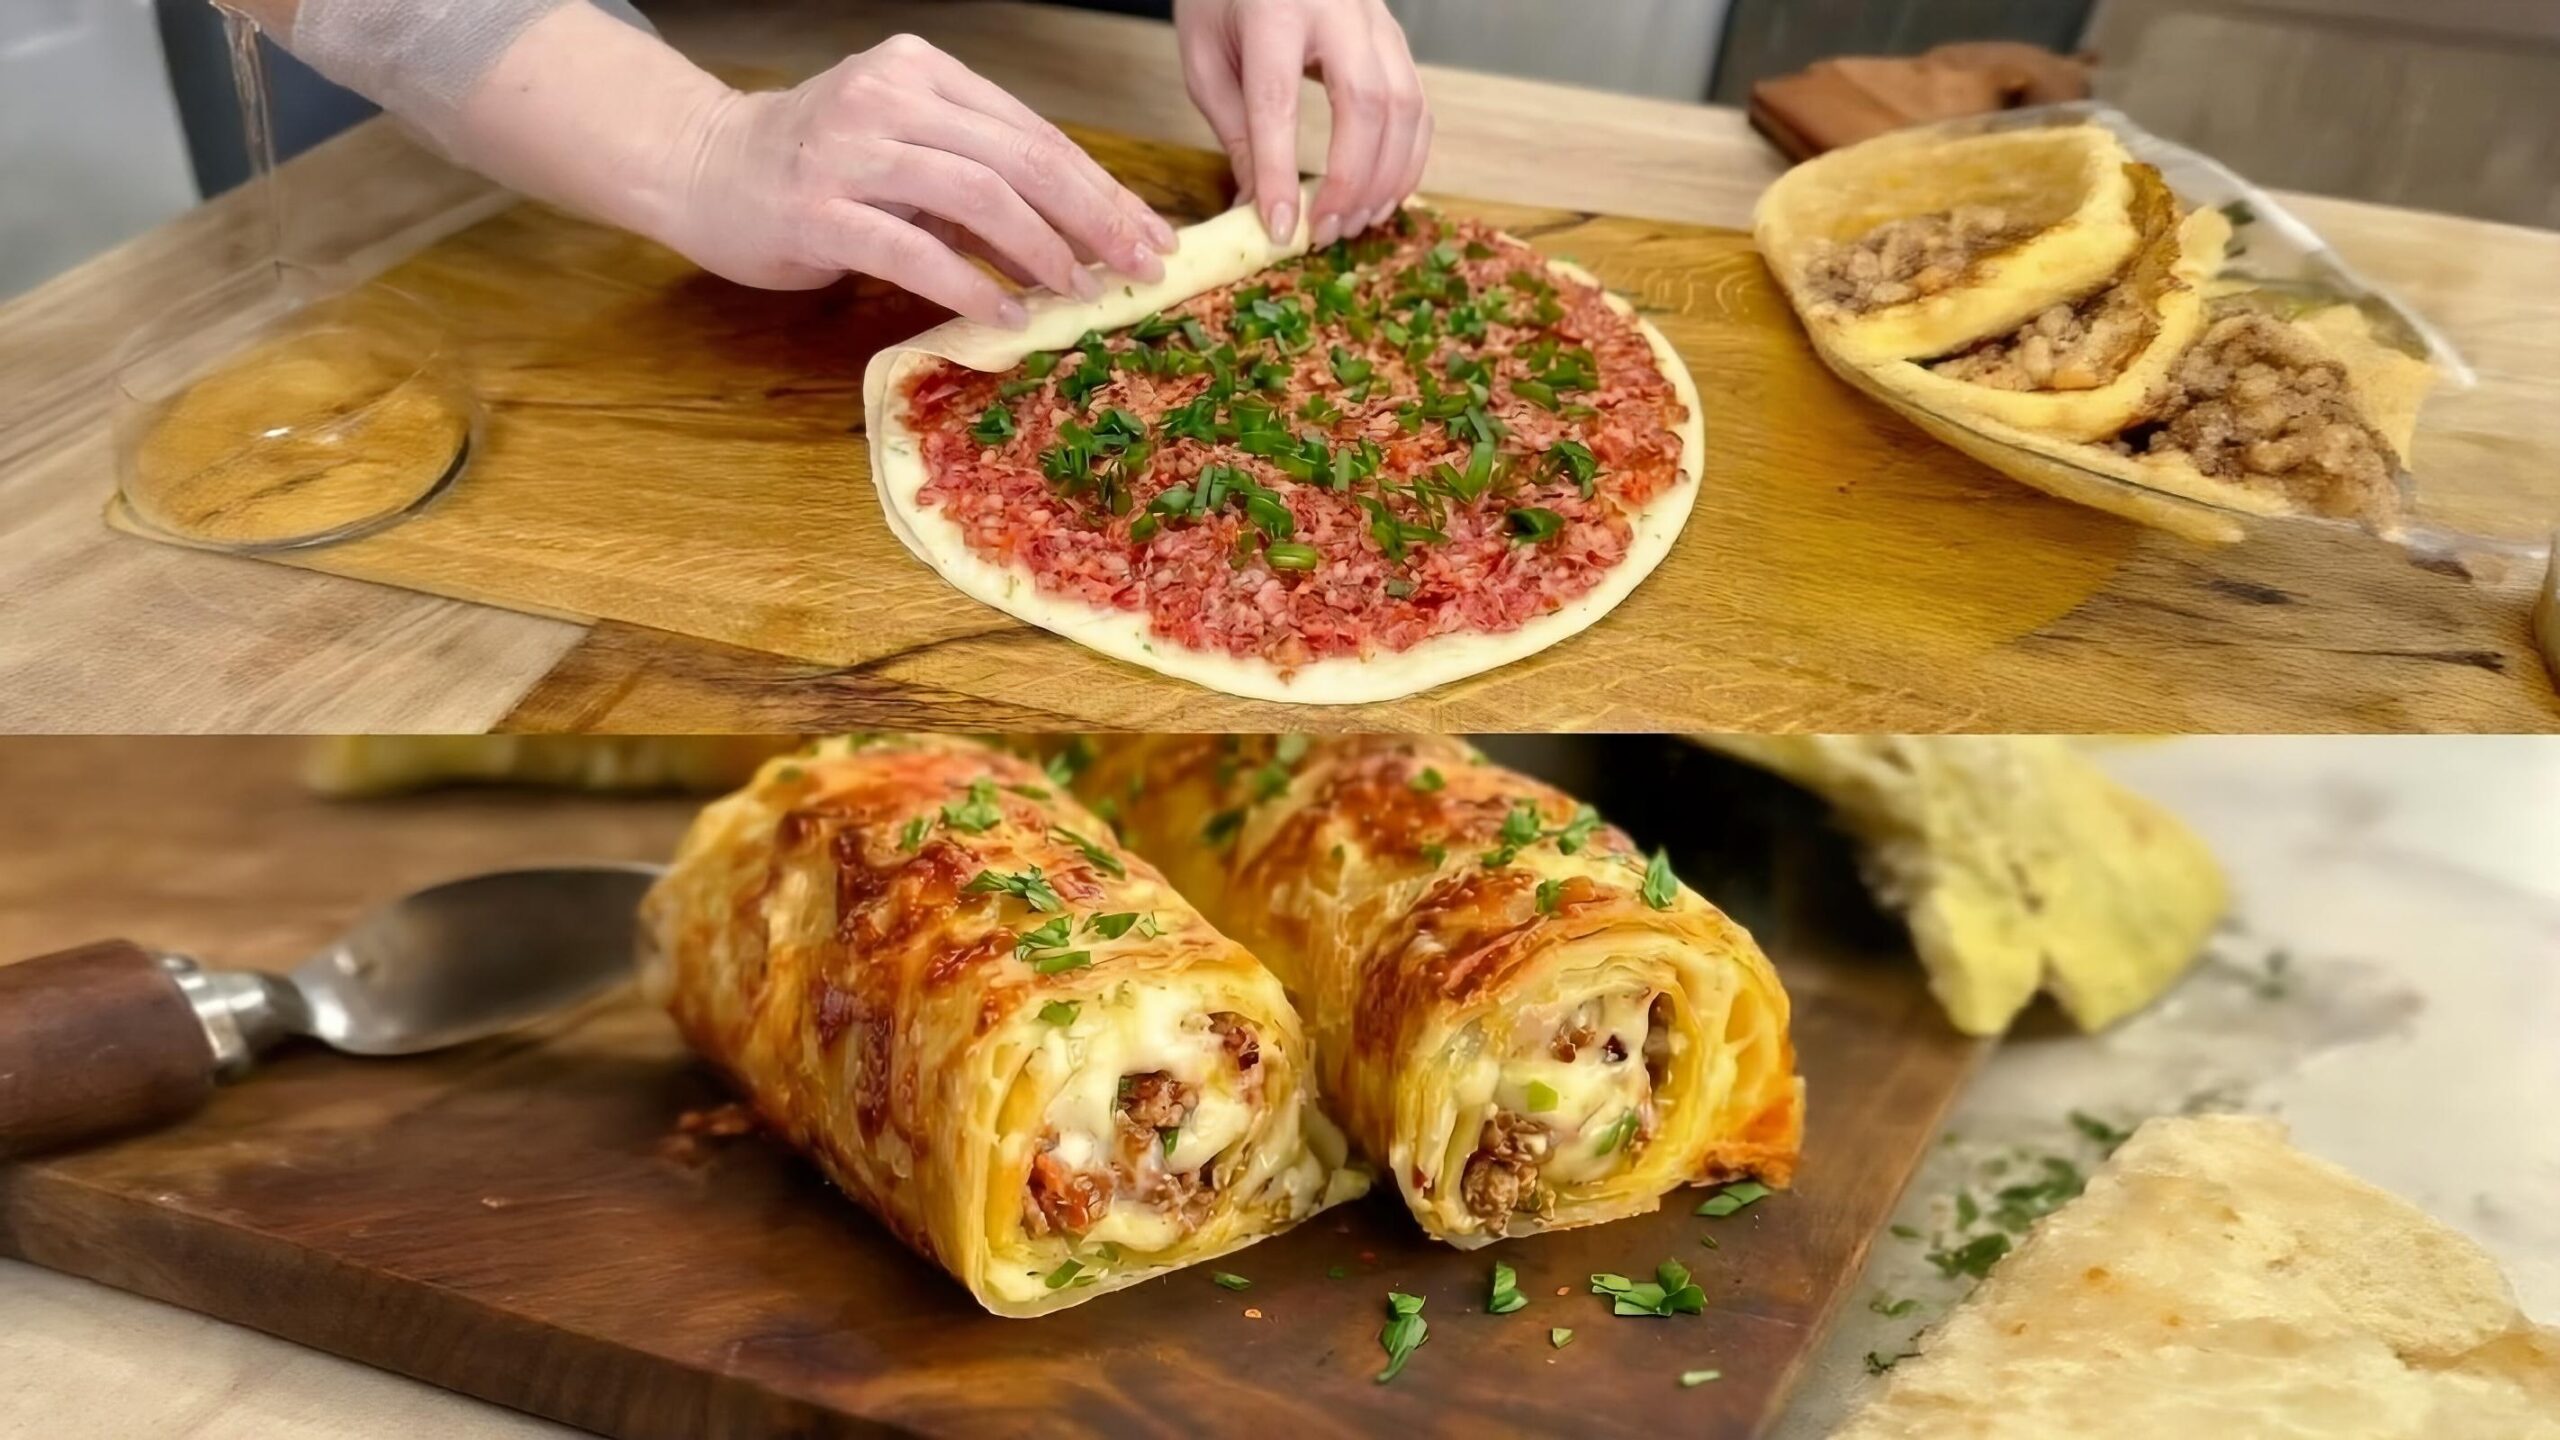
Assembly and Rolling
Reduce the heat to low and stir in the salt, pepper, and garlic powder, cooking for one final minute to bloom the spices. Transfer the beef mixture to a clean bowl to cool for 5 minutes. While cooling, whisk together all sauce ingredients until perfectly smooth and set aside.
favorite You Might Also Love
Browse All arrow_forward
Velvety Slow Cooker Imitation Crab Feast

Garlic Butter Shrimp Pasta: A Quick and Delicious Recipe
Mastering Rich Homemade Spaghetti Sauce and Noodles
Mastering Ultimate Caesar Chicken With Asparagus Recipe
Ultimate New Orleans Baked Mac and Cheese
Ultimate Chicken Cordon Bleu Lasagna Bake
Try These Variations
Smoky Southwest Ground Beef Tortilla Wraps
To infuse a deeper, smoky profile into your filling, eliminate the garlic powder and instead add 1 teaspoon of sweet smoked paprika, 1/2 teaspoon of ground cumin, and 1/4 teaspoon of cayenne pepper along with the other seasonings. For the sauce, replace the ketchup with 1 tablespoon of adobo sauce from a can of chipotles in adobo, blending until smooth. This variation offers a much more robust, complex flavor profile perfect for a weekend meal. This smoky twist truly transforms the character of the standard ground beef tortilla wraps.
Zesty Mediterranean Ground Beef Tortilla Wraps
For a lighter, brighter take, omit the ketchup and mustard from the sauce entirely. Instead, use the lemon juice, mayonnaise, and add 1 teaspoon of dried oregano and 1/2 teaspoon of dried dill to the sauce base. When assembling, replace the cheddar cheese with crumbled feta cheese (reducing the amount slightly, as feta is saltier) and substitute the iceberg lettuce with finely chopped fresh parsley and baby spinach. This creates a surprisingly fresh and herbaceous take on the classic ground beef tortilla wraps.
Tex-Mex Loaded Ground Beef Tortilla Wraps
Amp up the richness and texture by adding 1/2 cup of drained black beans to the beef mixture during the final minute of cooking. For the cheese, use a Mexican blend that includes Asadero or Oaxaca cheese for superior melt. For an extra layer of flavor, add 1/4 cup of finely diced green bell pepper along with the onions. If you enjoy heat, incorporate 1 tablespoon of finely diced jalapeño (seeds removed) into the beef mixture just before seasoning. These become incredibly hearty ground beef tortilla wraps.
Chef's Pro Tips
When blooming your spices (salt, pepper, garlic powder) with the warm beef, ensure the heat is low enough (around 250°F) that they toast lightly but do not scorch. Toasting releases fat-soluble flavor compounds, making the seasoning taste deeper and richer, rather than raw or dusty, which is an essential trick for maximizing flavor in quick-cooking ground meats for ground beef tortilla wraps.
Always use freshly grated cheddar cheese. Pre-shredded cheese is coated in cellulose or potato starch to prevent clumping in the bag. This coating inhibits proper melt, leaving you with grainy, waxy cheese pockets instead of the gooey, rich binder you need to hold the interior of your ground beef tortilla wraps together.
For an incredibly professional finish, once your wrap is rolled tightly, place it seam-side down back into the dry, hot skillet used for warming the tortillas. Press down gently with a spatula for about 30 seconds per side. This brief toasting seals the seam shut, creating a slightly crispy exterior that provides a fantastic textural counterpoint to the soft interior of the ground beef tortilla wraps.
The quality of your fat matters immensely. If you substitute olive oil with a neutral oil like canola or vegetable oil, you sacrifice flavor. I prefer a good quality, slightly fruity extra-virgin olive oil for the onions, as that subtle peppery note carries beautifully through the final seasoning blend of the ground beef tortilla wraps.
Storage Guide
Refrigerator Storage (Best for 1-2 Days)
For optimum texture, never store the assembled ground beef tortilla wraps. Instead, store the cooked beef filling in an airtight, shallow container to maximize surface area for cooling, allowing residual heat to escape quickly. Store the sauce in a separate sealed jar. Keep the lettuce and tomatoes whole or loosely covered until assembly time. When ready to eat within 48 hours, reheat the beef mixture gently on the stovetop and assemble fresh with the crisp vegetables.
Freezing the Cooked Filling
The seasoned ground beef freezes exceptionally well for up to three months. Cool the cooked filling completely, portion it into 1-pound freezer bags, press out all the air, and lay them flat to freeze. When reheating from frozen, thaw overnight in the refrigerator first, then heat slowly in a skillet over medium-low heat (around 300°F) until steaming hot throughout, stirring often. This preserves the integrity of the seasoning for future ground beef tortilla wraps.
Assembled Wrap Storage (Use Caution)
If you must store assembled wraps, wrap each one individually and tightly in plastic wrap first, then wrap again in aluminum foil. Store in the coldest part of the refrigerator for no more than 24 hours. Reheat in a 350°F oven wrapped in foil for 10 minutes. Do not microwave assembled wraps, as this steams the tortilla excessively, resulting in a rubbery texture rather than the desired pliability for these ground beef tortilla wraps.
Avoid These Mistakes
✕ The most common error I see when folks make these ground beef tortilla wraps is failing to drain the rendered fat adequately after browning the beef. If you leave too much fat in the pan, the moisture condenses as the filling cools, causing the bottom of your tortilla to become greasy and tear prematurely under the weight of the filling. After browning, tilt the pan and use a large spoon to physically skim or spoon out the excess liquid fat before adding your dry spices.
✕ Overloading the filling is the second major structural failure point. People assume more filling equals better value, but it guarantees a blow-out. When assembling the ground beef tortilla wraps, use only about 3/4 cup of meat mixture total per wrap, ensuring you leave at least 1.5 inches clear on the top and bottom edges so you have enough tortilla real estate to properly tuck and roll the sides without straining the material.
✕ Using cold or room-temperature vegetables directly on the hot beef filling is a recipe for soggy results. The heat from the meat immediately transfers to the lettuce and tomato, causing them to wilt instantly and release their water content prematurely into the tortilla. Always allow the cooked beef filling to rest for at least 5 minutes, letting the temperature drop slightly before layering the fresh components for your ground beef tortilla wraps.
nutrition Nutrition Facts
Per serving: 1 wrap
These values are approximate and based on 80/20 beef and standard flour tortillas. Adjustments to lean beef or whole wheat tortillas will lower fat and calorie counts.
flag Conclusion
There you have it—the definitive guide to crafting superior ground beef tortilla wraps that stand up to any quick-meal challenge. We’ve moved beyond mere assembly and focused on the critical steps of building flavor through proper browning and balancing textures with that vibrant sauce. This recipe is proof that dedication to detail results in exponentially better home cooking, even for the simplest dishes. Don’t just make a wrap; engineer a perfect handheld meal. I encourage you to make this ground beef tortilla wraps recipe your new staple, and as always, feel free to adjust the spices to make it uniquely yours. Happy cooking from the HomeRecipes kitchen!
Frequently Asked Questions
What is the ideal temperature to serve the beef filling? expand_more
The ideal serving temperature for the beef filling in your ground beef tortilla wraps should be hot, but not scalding. You are aiming for an internal temperature around 165°F when you assemble. If the filling is too hot (closer to 200°F), it will immediately over-steam the fresh lettuce and tomatoes, causing them to wilt and release excessive moisture, which leads to a soggy tortilla. Allowing the cooked meat to rest for 5 minutes after seasoning brings it down to that perfect, flavorful warmth.
Can I use corn tortillas instead of flour for these wraps? expand_more
You certainly can use corn tortillas, but be aware that the structural difference is significant. Corn tortillas are more brittle and less pliable than flour, especially when cold. If you switch, you must use the double-tortilla method common in high-end taquerias. Warm two corn tortillas per wrap, then stack them before filling. This layering technique provides the necessary strength and flexibility to fold and roll your ground beef tortilla wraps without them cracking open under pressure.
How can I make the sauce ahead of time without it separating? expand_more
The sauce is a stable emulsion, largely thanks to the mayonnaise base, but temperature fluctuations can cause separation. You can safely prepare the sauce up to three days in advance. Store it in a sealed container in the refrigerator. Before assembling your ground beef tortilla wraps, remove the sauce from the fridge about 15 minutes prior. This allows it to come up slightly in temperature, ensuring it is creamy and easily drizzled, rather than thick and stubborn straight from the cold.
I want to make this gluten-free; what adjustments are necessary? expand_more
Making these ground beef tortilla wraps gluten-free is straightforward. The beef filling, spices, and sauce are naturally gluten-free, provided your mustard is certified GF. The main change is the tortilla. Substitute the flour tortillas with certified gluten-free corn tortillas or large gluten-free flour alternatives, which are widely available now, often made with rice flour or tapioca starch. Remember the crucial warming step, as GF tortillas can be even more prone to cracking than standard flour ones.
What is the purpose of adding lemon juice to the sauce? expand_more
The lemon juice serves a vital chemical function: acid cuts fat. The ground beef and the mayonnaise are both high in fat, which creates a rich, heavy mouthfeel. The sharp, bright acidity from the fresh lemon juice acts as a palate cleanser in every bite, lifting the flavors and preventing the entire ground beef tortilla wrap from tasting too heavy or dull. It’s the secret ingredient that provides that necessary 'zing' without adding spice.
More Recipes You'll Love
Restaurant-Worthy Philly Cheesesteak Stuffed Peppers
Mastering Comfort: Rich Sausage Gravy Recipe

Hearty Slow Cooker Amish Chicken Chowder

Community Kitchen