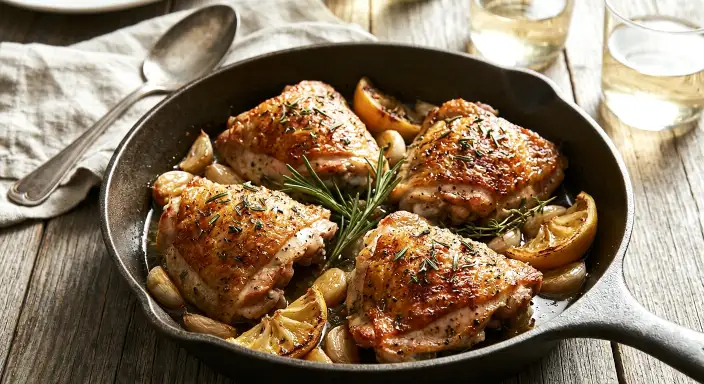
Roasted Garlic Chicken Recipe (Herb & Lemon)
Experience the ultimate comfort food with this exquisite roasted garlic chicken recipe. Featuring tender, juicy bone-in, skin-on chicken infused with sweet, mellow roasted garlic, fragrant rosemary, fresh thyme, and a bright squeeze of lemon. This recipe elevates a simple chicken dish into a culinary masterpiece, perfect for a satisfying family dinner or entertaining guests, promising rich flavors and a delightful aroma that fills your kitchen.
restaurant_menu Ingredients
For the Roasted Chicken
hardware Essential Tools
Large mixing bowl
Paper towels
Sharp knife
Cutting board
Large baking sheet or roasting pan
Instant-read meat thermometer
Aluminum foil
format_list_numbered Preparation
Getting Started
Preheat your oven to 425°F (220°C) with a rack in the middle position. This high initial heat is essential for developing a crispy skin on your roasted garlic chicken.
Pat the chicken pieces thoroughly dry with paper towels. Removing excess moisture is a critical step for achieving that desired golden-brown, crispy skin and is a core chef's secret for perfect roasted chicken.
Peel all the cloves from the two heads of garlic. If any cloves are particularly large, you can slice them in half to ensure even roasting and caramelization, enhancing the roasted garlic flavor.
Seasoning and Roasting
In a large mixing bowl, combine the dried chicken, peeled garlic cloves, olive oil, chopped fresh rosemary, chopped fresh thyme, lemon zest, kosher salt, and freshly ground black pepper. Ensure every piece is well-coated with the garlic and herb mixture.
Use your hands to thoroughly massage the seasoning into the chicken, ensuring it's evenly distributed over all surfaces. This hands-on approach helps infuse the chicken with the aromatic roasted garlic and herb flavors.
Arrange the seasoned chicken pieces, garlic cloves, and lemon wedges in a single layer on a large baking sheet or roasting pan. Ensure there's enough space between each piece to allow for proper air circulation and even browning, preventing steaming and promoting crispiness.
Roast in the preheated oven at 425°F (220°C) for 20 minutes. This initial high heat blast helps to sear the chicken and render the fat in the skin, beginning the Maillard reaction for incredible color and flavor.
Finishing Touches
After 20 minutes, reduce the oven temperature to 375°F (190°C) and continue to roast for an additional 25-35 minutes. The precise timing will depend on the size of your chicken pieces and your oven's calibration.
Cook until the chicken reaches an internal temperature of 165°F (74°C) when measured with an instant-read thermometer inserted into the thickest part of a thigh, making sure not to touch the bone. The skin should be beautifully golden brown and crispy, and the roasted garlic cloves should be soft and caramelized.
Remove the baking sheet from the oven and transfer the roasted garlic chicken to a clean cutting board. Tent it loosely with aluminum foil and allow it to rest for 5-10 minutes. This critical resting period allows the juices to redistribute throughout the meat, ensuring a tender and incredibly juicy result.
While the chicken rests, you can lightly mash some of the soft roasted garlic cloves with a fork and mix them with the pan juices accumulated in the roasting pan. This creates a simple yet incredibly flavorful sauce to spoon over your roasted garlic chicken before serving.
favorite You Might Also Love
Browse All arrow_forwardKing Cake Inspired New Orleans Baked Mac and Cheese
Iconic Five-Ingredient Chicken Casserole Bake
Mastering Comfort: Rich Sausage Gravy Recipe
Baked Potato Casserole Recipe (Cheesy & Loaded)
Chicken Poke Bowl Recipe (Easy & Flavorful)
Hard-Boiled Eggs Recipe (Perfect Every Time)
Try These Variations
Spicy Roasted Garlic Chicken
For those who love a bit of heat, introduce a pinch of red pepper flakes or a finely minced jalapeño (seeds removed for less heat) into the seasoning mix along with the garlic, rosemary, and thyme. This will provide a pleasant warmth that complements the savory roasted garlic flavor without overpowering it, adding a vibrant kick to your roasted garlic chicken. Adjust the amount to your preferred spice level.
Mediterranean Herb Blend
Instead of just rosemary and thyme, experiment with other Mediterranean herbs. Add 1 teaspoon of dried oregano and 1 teaspoon of dried basil, or a pre-made Italian seasoning blend, to the olive oil and garlic mixture. This will lend a different aromatic profile to your roasted garlic chicken, reminiscent of sun-drenched coastal cooking. Don’t forget a sprinkle of dried marjoram for an earthy undertone.
Smoked Paprika Roasted Garlic Chicken
Incorporate 1 teaspoon of smoked paprika into your seasoning blend. Smoked paprika adds a beautiful reddish hue and a deep, smoky undertone that pairs exceptionally well with chicken and roasted garlic. It gives the roasted garlic chicken a richer, more complex flavor dimension, without needing an actual smoker. You could also add a pinch of cayenne for a smoky-spicy kick.
Honey-Mustard Glazed Roasted Garlic Chicken
In the last 15 minutes of roasting, brush the chicken with a mixture of 2 tablespoons honey and 1 tablespoon Dijon mustard. This creates a slightly sweet and tangy glaze that caramelizes beautifully, adding another layer of flavor to your roasted garlic chicken. The sweetness from the honey will perfectly balance the savory garlic and herbs.
Chef's Pro Tips
The Power of Brining (Optional but Recommended)
For the absolute juiciest roasted garlic chicken, consider a simple dry brine. Sprinkle 1/2 teaspoon of kosher salt per pound of chicken over the pieces and refrigerate uncovered for at least 4 hours, or preferably overnight. The salt draws out moisture, then reabsorbs it, tenderizing the meat and ensuring flavor penetrates deep within. This scientific process, known as osmosis, guarantees a moist and tender result.
Don’t Waste Those Pan Juices
After resting the chicken, don’t discard the flavorful pan juices! These are liquid gold, rich with rendered chicken fat, caramelized garlic, and herb essence. Deglaze the pan with a splash of chicken broth or even a tablespoon of lemon juice, scraping up any browned bits from the bottom. This creates an instant, intensely flavorful sauce to drizzle over your roasted garlic chicken, enhancing every bite.
Roast Vegetables Alongside
Maximize your oven’s efficiency by roasting your side vegetables in the same pan or on an adjacent sheet pan. Hearty vegetables like potatoes, carrots, or Brussels sprouts can be tossed with olive oil, salt, and pepper and added to the pan during the last 25-30 minutes of the chicken’s cooking time. This not only saves time and dishes but also allows the vegetables to absorb some of the delicious roasted garlic and chicken flavors.
Batch Roasting Garlic
Since you’re already roasting garlic for this recipe, consider roasting an extra head or two. Roasted garlic is incredibly versatile—it can be mashed into butter, spread on toast, added to mashed potatoes, or blended into dressings and sauces. It’s a fantastic way to elevate many other dishes with minimal extra effort, making the most out of your oven’s heat.
Storage Guide
Refrigerator
Allow the roasted garlic chicken to cool completely to room temperature before storing. Transfer the chicken pieces and any pan juices to an airtight container. Properly stored, it will maintain its quality and safety for 3-4 days in the refrigerator at 40°F (4°C) or below. Ensure the container is sealed tightly to prevent odor transfer and maintain moisture. This extended shelf life makes it excellent for meal prepping for the week.
Freezer
For longer storage, you can freeze cooked roasted garlic chicken. Once completely cooled, wrap individual chicken pieces tightly in plastic wrap, then place them in a freezer-safe bag or airtight container. This helps prevent freezer burn. It can be stored in the freezer for up to 2-3 months. Thaw frozen chicken overnight in the refrigerator before reheating to ensure even thawing and food safety.
Reheating (Oven)
To reheat, preheat your oven to 300°F (150°C). Place the chicken pieces on a baking sheet, optionally adding a tablespoon of chicken broth or water to the bottom of the pan to create some steam and prevent drying. Cover loosely with foil and heat for 15-20 minutes, or until warmed through to 165°F (74°C). For crispier skin, remove the foil during the last 5 minutes. This method is ideal for restoring the texture of your roasted garlic chicken.
Reheating (Microwave)
For a quicker reheat, place chicken pieces on a microwave-safe plate. Cover loosely with a damp paper towel to help retain moisture. Microwave on medium power in 60-second intervals, checking for doneness, until heated through. Be aware that microwaving will not crisp the skin and may result in a slightly different texture, but it is a convenient option for a quick meal from your roasted garlic chicken leftovers.
Avoid These Mistakes
✕ Overcrowding the Pan
A common mistake when roasting is cramming too many chicken pieces into a single baking sheet. This causes the chicken to steam rather than roast, leading to pale, rubbery skin instead of crispy, golden-brown perfection. Always ensure there’s ample space around each piece for proper air circulation, using two pans if necessary, for the best roasted garlic chicken.
✕ Not Patting the Chicken Dry
Skipping the crucial step of patting the chicken completely dry with paper towels before seasoning is a major oversight. Any residual moisture on the skin will create steam in the oven, preventing the skin from crisping up and achieving that desirable crackling texture. This simple action is fundamental for achieving a truly delicious roasted garlic chicken.
✕ Not Resting the Chicken
Cutting into the chicken immediately after it comes out of the oven is a common error that results in dry meat. During cooking, muscle fibers contract and push juices to the center. Resting allows these juices to redistribute throughout the meat, leading to a significantly juicier and more tender roasted garlic chicken. Always allow at least 5-10 minutes of rest time, tented with foil.
✕ Under-seasoning
Fear of over-salting often leads to under-seasoned food. Chicken, especially bone-in pieces, requires a generous hand with salt and pepper to ensure the flavor penetrates beyond the surface. Don’t be afraid to season boldly; a well-seasoned roasted garlic chicken is a flavorful chicken. Taste as you go, and remember that cooked food often needs more seasoning than you might think.
✕ Using Pre-Minced Garlic
While convenient, pre-minced jarred garlic simply doesn’t offer the same depth of flavor or sweet mellowness as fresh garlic when roasted. The compounds in fresh garlic transform beautifully in the oven, becoming sweet and creamy. Pre-minced garlic, often preserved in oil or water, lacks this transformative quality and can sometimes taste acrid when roasted, diminishing the overall quality of your roasted garlic chicken.
nutrition Nutrition Facts
Per serving: 1 thigh with garlic and pan juices
Nutritional values are estimates and can vary based on specific ingredient brands and preparation methods. This calculation is based on using bone-in, skin-on chicken thighs, with a generous amount of roasted garlic.
sell Related Topics
Frequently Asked Questions
Can I use boneless, skinless chicken for this roasted garlic chicken recipe? expand_more
While bone-in, skin-on chicken is highly recommended for the best flavor and juiciness, you can certainly adapt this roasted garlic chicken recipe for boneless, skinless cuts. If you opt for boneless, skinless chicken thighs or breasts, reduce the cooking time significantly. Boneless breasts will cook in about 20-25 minutes at 375°F (190°C), while boneless thighs might take 25-30 minutes. Always use an instant-read thermometer to check for an internal temperature of 165°F (74°C) to ensure doneness without overcooking. Be mindful that the skin crispiness will be absent, but the garlic and herb flavors will still be fantastic.
What kind of garlic is best for roasting? expand_more
For this roasted garlic chicken, I highly recommend using fresh, whole heads of standard white or purple garlic. Avoid pre-peeled or pre-minced garlic in jars if possible, as they often lack the robust flavor and sweet mellowing properties of fresh garlic when roasted. Elephant garlic can also be used, but it has a much milder flavor profile, almost like a leek, so you might need to use more and adjust expectations for the intensity of the garlic flavor. The beauty of roasting garlic is how it transforms, so starting with fresh, intact cloves is essential for that rich, sweet result.
How can I tell if the chicken is fully cooked without a thermometer? expand_more
While an instant-read thermometer is the most reliable way to ensure your roasted garlic chicken is perfectly cooked, you can also check for doneness by piercing the thickest part of the chicken (near the bone, if using bone-in pieces) with a knife or fork. The juices should run clear, not pink. Another indicator is the color of the meat itself; it should be opaque throughout. However, these visual cues are less precise and can lead to overcooking or undercooking. Investing in a good quality instant-read thermometer is one of the best kitchen tools for any home cook, ensuring food safety and perfectly cooked meals every time.
Can I prepare the chicken ahead of time? expand_more
Absolutely! Preparing the chicken ahead is a fantastic time-saving strategy for this roasted garlic chicken. You can season the chicken with the olive oil, herbs, lemon zest, salt, and pepper up to 24 hours in advance. Store it covered in the refrigerator. The longer it marinates, the more the flavors will penetrate the meat, leading to an even more delicious result. Just be sure to bring the chicken out of the refrigerator about 30 minutes before roasting to allow it to come closer to room temperature, which promotes more even cooking.
What are some good side dishes for roasted garlic chicken? expand_more
This roasted garlic chicken is incredibly versatile when it comes to side dishes. Beyond the mashed potatoes and roasted vegetables I mentioned earlier, you could consider a creamy polenta or grits, which would be excellent for soaking up the pan juices. A simple rice pilaf or even couscous would also work wonderfully. For something lighter, a fresh Caprese salad with ripe tomatoes, mozzarella, and basil, or a quinoa salad with fresh herbs and a lemon vinaigrette would complement the richness of the chicken beautifully. Don't forget a crusty loaf of bread to sop up any leftover garlic-infused olive oil!
More Recipes You'll Love
Ultimate Creamy Crockpot Mac And Cheese Recipe
Slow Cooker Million Dollar Chicken: Ultimate Comfort

Ultimate Ground Beef Tortilla Wraps Mastery
Mastering Weeknight Wonders: Six Essential Recipes
Spicy Bang Bang Shrimp Recipe (Crispy & Flavorful)
Community Kitchen