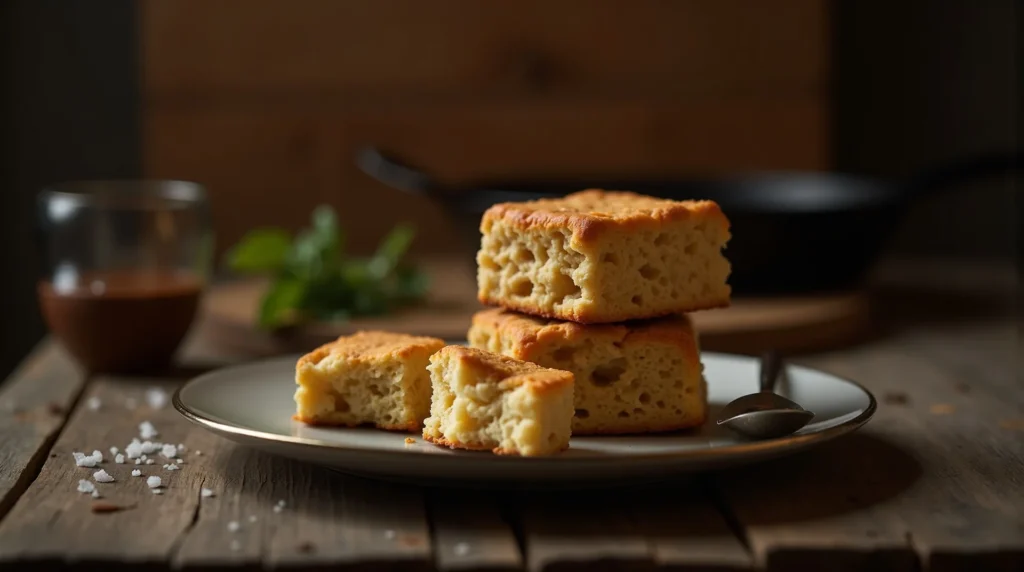
Mastering Authentic Ships Biscuits: A Chef’s Guide
These are not your fluffy Southern favorites! We recreate the legendary, near-indestructible hardtack of maritime history, focusing on the crucial low-and-slow drying process that made these ships biscuits last for years.
restaurant_menu Ingredients
Essential Ingredients for Durable Ships Biscuits
For Serving (Optional Rehydration)
hardware Essential Tools
Large, sturdy mixing bowl
Whisk
Plastic wrap
Rolling pin
Bench scraper or sharp knife
Baking sheet
Parchment paper
Wire cooling rack
format_list_numbered Preparation
Dough Preparation and Initial Roll
In a large, robust mixing bowl, thoroughly whisk together the 3 cups of all-purpose flour and 1 teaspoon of kosher salt until completely uniform in texture.
Begin adding the ice-cold water gradually, starting with 1 cup, mixing by hand until the mixture just begins to come together into a shaggy mass.
Knead the mixture on a lightly floured surface until a cohesive, very stiff dough ball forms; add water by the teaspoon if necessary, but err on the side of dryness.
Wrap the stiff dough tightly in plastic wrap and allow it to rest at room temperature for 30 minutes to fully hydrate the flour proteins.
Preheat your oven to 375°F (190°C) and line a heavy-duty baking sheet with parchment paper for the first bake of your ships biscuits.
The Two-Stage Cook for Preservation
Roll the rested dough out evenly until it achieves a consistent thickness of approximately 1/4 inch across the entire surface.
Using a sharp knife or bench scraper, cut the dough into uniform 3-inch by 3-inch squares; strive for consistency so the drying process is even across all your ships biscuits.
Place the squares onto the prepared baking sheet, ensuring they do not touch, and bake at 375°F (190°C) for 15 minutes until they are firm to the touch.
Reduce the oven temperature significantly to 250°F (120°C) to begin the crucial drying phase for these historical ships biscuits.
Carefully flip each biscuit, then firmly pierce each one 5 to 7 times across the surface using a skewer or sharp knife tip to allow internal moisture to escape.
Return the pierced biscuits to the low oven and bake for an additional 1.5 to 2 hours, flipping them every 30 minutes, until they feel remarkably light and sound hollow when tapped.
Remove the fully dried ships biscuits from the oven and allow them to cool completely on a wire rack; they will continue to harden as they cool to their final, sturdy state.
favorite You Might Also Love
Browse All arrow_forward
Creamy Peppery Coleslaw: A Refreshing Twist on a Classic
Homemade Fruit Cocktail Recipe (Better Than Canned!)

Slow Cooker Hobo Dinners Recipe (Individual Foil Tray)

Easy Crescent Roll Reuben Bake: A Flavorful Casserole Recipe
Mastering Induction Cooking: Techniques for the Modern Kitchen

Mary Berry's Chocolate Cake
Try These Variations
Whole Grain Addition
Substitute up to 1/2 cup of the flour with fine whole wheat flour for a nuttier flavor profile, noting a slightly shorter shelf life.
Savory Seed Variation
Lightly press sesame or flax seeds into the dough before the first bake for added texture and flavor complexity.
Rye Substitution
Replace up to 1 cup of the all-purpose flour with dark rye flour for a denser, earthier historical taste, often preferred in older military rations.
Sweetened Version (Non-Historical)
After baking, lightly brush the cooled biscuits with a thin glaze made from powdered sugar and water, though this compromises long-term storage.
Chef's Pro Tips
Always use cold water when mixing the dough to control gluten development initially, ensuring a stiff mix rather than a sticky one.
When piercing the biscuits, make sure your holes go completely through the dough layer to ensure the center dries out effectively.
If you are planning to store these ships biscuits for more than a month, consider placing a small food-safe desiccant packet inside the storage jar.
Tap the finished product against your clean countertop; if it doesn’t make a distinct, sharp ‘clack,’ it needs another 30 minutes in the low oven.
Storage Guide
Airtight Jar (Recommended)
Store in a heavy glass jar with a tight-fitting lid in a cool, dark pantry for potentially years, provided they remain completely dry.
Vacuum Sealed Bags
For very long-term storage, vacuum sealing removes ambient air and humidity, extending freshness significantly beyond typical pantry storage.
Refrigerator
Avoid refrigeration, as the slight humidity in a fridge can encourage any residual moisture to compromise the integrity of the ships biscuits.
Avoid These Mistakes
✕ Using warm water, which activates the gluten too quickly and results in a sticky, unmanageable dough that is difficult to roll thinly.
✕ Not piercing the biscuits adequately before the second, low-temperature bake, leading to a soft, doughy pocket in the center that will spoil quickly.
✕ Baking at too high a temperature for the second phase, which burns the exterior while the interior remains moist, defeating the purpose of creating durable ships biscuits.
✕ Over-kneading the dough; while we need structure, excessive kneading develops too much toughness without the benefit of fat, making them almost impossible to chew later.
nutrition Nutrition Facts
Per serving: 1 biscuit
Nutritional values are estimates based on the simple flour/water/salt composition and do not account for any added serving liquids.
flag Conclusion
My friends, you have successfully navigated the culinary waters to produce genuine ships biscuits. This recipe is a testament to simplicity and endurance. While they won’t replace your favorite bisquick biscuits for breakfast, they offer something far more valuable: a direct connection to the history of resourcefulness. Go forth, share these fascinating crackers, and enjoy the pride of having conquered a technique born from sheer necessity. Happy cooking from HomeRecipes.com!
sell Related Topics
Frequently Asked Questions
Why are ships biscuits so incredibly hard? expand_more
The extreme hardness is a direct result of the preparation method, which aimed for total moisture removal to prevent spoilage from mold or bacteria during long, un-refrigerated voyages. They were baked twice—once to set the structure, and a second time at a very low temperature for hours to dehydrate them completely. This process effectively removes nearly all water content, leaving behind a dense, durable carbohydrate wafer that can last for years. They are functionally closer to a dry cracker than what we call a biscuit today.
Can I substitute the flour for something else in this recipe for ships biscuits? expand_more
While tradition dictates all-purpose flour, you certainly can experiment, but be mindful of the shelf life implications. Whole wheat flour contains oils that can go rancid over time, significantly shortening the longevity of your ships biscuits. If you use it, plan to consume them within a few weeks, rather than months. For the most authentic, long-lasting result, stick to white flour.
What did sailors actually do to make them edible? expand_more
Sailors had several methods, often dictated by what liquid was available. The most common involved dunking the biscuit into hot beverages like coffee or hot chocolate (if available) or cold liquids like water or grog (a diluted rum ration—though we avoid alcohol here). They would soak it until it softened enough to bite without chipping a tooth. Some would even crush them into a powder and mix them into soups or porridges, effectively creating a very thick, ancient gruel.
Are these ships biscuits safe to eat after many years? expand_more
If stored in a truly dry, airtight environment, the basic ingredients (flour, water, salt) are incredibly stable. The historical accounts suggest they remained edible for over a decade. The main risk, as noted by historians, was infestation by weevils or other pantry pests, not spoilage of the grain itself. If you see any sign of insect activity, discard them immediately. Otherwise, if they remain dry and hard, they are safe, albeit flavorless!
How does this differ from modern American biscuits? expand_more
The difference is profound! Modern American biscuits, like Bisquick biscuits or drop biscuits recipe styles, rely heavily on cold fat (butter or shortening) cut into the flour, combined with a chemical leavener like baking powder. This process creates steam pockets during baking, resulting in a light, flaky, tender crumb. Conversely, ships biscuits contain no fat and no leavening; they are designed to be the structural opposite—dense, heavy, and designed to resist rising or crumbling.
More Recipes You'll Love

Master the Ultimate Baked Ricotta Chicken: Restaurant Flavor at Home

20 Minute Bread Recipe (Quick & Easy)

Delicious and Easy Chicken Pasta Salad Recipe
No-Bake Biscoff Cheesecake: A Dreamy 5-Ingredient Dessert
Easy 3-Ingredient Sausage Cream Cheese Casserole: A Delicious Brunch Recipe

Community Kitchen